
Amazing Apple Pie Cheesecake
This post may contain affiliate links. Read the full disclosure here.
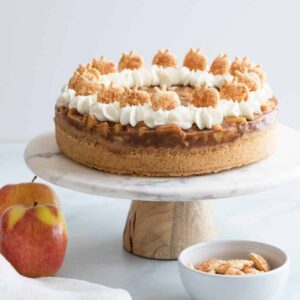
An apple pie cheesecake combines the best of both worlds! You get a fantastically creamy cheesecake topped with flavorful apple pie filling. This is sure to be a Fall delight.

There’s something so satisfying about cheesecake and apple pie. But when you combine the two, you get a fantastic dessert that will blow your mind.
I’m talking about an ultra-creamy cheesecake using my most popular cheesecake recipe. The baked cheesecake is topped with a stovetop apple pie filling so no additional baking is required.
The cheesecake is garnished with sweetened whipped cream and pie crust cut-outs. Which is totally optionally but highly recommended.
I think you will find the process for making this apple pie cheesecake to be easy and so worth the time. Yes, cheesecakes take time. But most of it is hands-off.
The cheesecake bakes for an hour then needs to cool to room temperature. And it must be refrigerated for at least 4 hours but it is so much better if you let it chill overnight.
If you want to try another great Fall-inspired cheesecake, try my pecan pie cheesecake and pumpkin cheesecake.
Why this recipe works
- The cheesecake base is my most popular recipe and it’s practically no-fail. It’s baked for 1 hour then topped with apple pie filling.
- The apple pie filling is thickened with flour so it stays in place on top of the cheesecake. You have to make sure you cook the flour long enough or the filling will taste like flour.

Ingredients
I love creating fun cheesecake variations and this recipe is just that. It tastes exactly like apple pie with cheesecake. The ingredient list is long but don’t let this veer you away from making the recipe. It’s truly delightful.
- Vanilla wafers: Crush vanilla wafer crumbs are used to make the base of the cheesecake.
- Sugar: Is used in all three parts of the cheesecake. Make sure to use regular granulated sugar.
- Butter: Unsalted butter helps glue the base together and adds richness to the topping.
- Cream Cheese: Use full-fat brick-style cream cheese. I always use Philadelphia and it works great.
- Sour Cream: Full-fat sour cream is a must here!
- Vanilla: Make sure to use high-quality pure vanilla because it will shine through in the end result.
- Salt: A little is needed for flavor.
- Eggs: Eggs are used in the cheesecake base for binding. Make sure they are at room temperature.
- Apples: Use any variety of apples you prefer. I usually use Granny Smithe or Pink Lady. Sometimes I’ll use a combination of both.
- Lemon juice: You only need a little. It helps stop oxidation on the apples.
- Flour: All-purpose flour is cooked with butter to make a roux for thickening the topping.
- Apple cider: Apple cider is the liquid that’s added to the roux. I love the flavor the cider offers.
- Brown sugar: Adds depth of flavor to the apple pie topping.
- Spices: Cinnamon and nutmeg are used to flavor the apple pie filling.
To bake this cheesecake you’ll need:
- 9-inch springform pan: I recommend looking for one that’s solid like this one by Nordic War*.
- Stand mixer: I highly recommend using a stand mixer* with the paddle attachment* for the cheesecake batter.
How to make apple pie cheesecake
Though there are a lot of steps, this cheesecake isn’t too difficult to make. It’s time-consuming because baked cheesecakes take time. But, you can busy yourself with other things while it’s baking and cooling.
The Crust – The crust is a combination of vanilla wafer crumbs, sugar, and butter. It’s all mixed together and pressed into the bottom of a springform pan. The crust is baked so holds up without crumbling.
The Filling – The cheesecake filling is incredibly easy to make. Use a stand mixer and the process is even easier. Simply combine everything using the mixer and bake.
The Topping – The apple pie topping is made on the stovetop. The process is very easy and takes no time at all.

Step 1: Make the crust
Line the inside bottom of a 9-inch springform pan with parchment paper cut to fit. Or line it with aluminum foil.
Combine vanilla wafer crumbs, sugar, and melted butter in a medium bowl. Press the mixture firmly into the bottom about 1-inch up the sides.
Bake the crust for 10 minutes then allow it to cool while you prepare the filling.

Step 2: Make the cheesecake filling
First, make sure you are starting with room-temperature ingredients for the filling. Set the cream cheese, sour cream, and eggs out on the counter 1 hour before you begin baking.
In the bowl of a stand mixer, beat the cream cheese on medium speed until it’s smooth and creamy. There should be no lumps!
Add the sugar and sour cream. Beat on low speed until everything is smooth. Add the vanilla and salt. Beat until well combined.
You really can’t over-mix at this point so don’t be afraid to make sure it’s mixed well.
Use a rubber spatula and gently fold the eggs into the batter until well combined. We add the eggs this way so we don’t incorporate too much air.
Pour the cheesecake filling into the prepared crust and use an offset spatula to smooth it over. Bake the cheesecake for 1 hour. It will be set around the edges but should remain jiggly in the middle.

Step 3: Make the apple pie topping
While the cheesecake bakes, work on the topping.
Toss the apple in lemon juice and set aside.
Heat the butter in a medium saucepan over medium-high heat until melted. Whisk in flour and cook for 5-7 minutes while whisking continuously. The flour should turn a golden brown color.
Slowly whisk in the apple cider making sure to smooth out any lumps. Add the apples, sugar, brown sugar, cinnamon, nutmeg, and salt. Stir until well combined.
Bring the mixture to a boil then reduce the heat and simmer for 10-15 minutes, until the apples are tender and the sauce has thickened.
Carefully spoon the topping evenly over the top of the baked cheesecake. Let the cheesecake cool to room temperature. Cover it with plastic wrap and refrigerate for at least 4 hours, but overnight is best.

Step 4: Serve the cheesecake
Remove the cheesecake from the oven and gently run a knife around the edge to loosen it from the pan. Remove the outer ring of the springform pan and transfer the cheesecake to a serving platter.
Top with stabilized whipped cream and pie crust cutouts. I’ll leave instructions for the cutouts down below in the recipe.

I am positive you will enjoy this apple pie cheesecake as much as me and my taste testers did!
Tips for success
- Use brick-style cream cheese. The stuff in the tub will not work.
- Room temperature ingredients are essential for a perfectly creamy cheesecake. Set the cold ingredients out about 1 hour before you plan to make the cheesecake.
- Use any variety of apple you prefer! The filling will taste amazing as long as you love the apples you’ve used. Granny Smith and/or Pink Lady are my go-to choices.
If you like cheesecake, you’ll love these other incredible cheesecake recipes:
Apple Pie Cheesecake
Ingredients
For the crust
- 2 cups (200 g) vanilla wafer crumbs
- ¼ cup (50 g) granulated sugar
- 5 tablespoons unsalted butter, melted
For the cheesecake filling
- 24 ounces (678 g) cream cheese, softened
- ¾ cup (150 g) granulated sugar
- ½ cup (114 g) sour cream, room temperature
- 1 tablespoon vanilla extract
- ¼ teaspoon salt
- 3 large eggs, room temperature, lightly beaten
For the topping
- 3 ½ cups (500 g) peeled and diced apples
- 1 tablespoon lemon juice
- 4 tablespoons unsalted butter
- ¼ cup (32 g) all-purpose flour
- ¾ cup (180 ml) apple cider
- ¼ cup (50 g) granulated sugar
- ¼ cup (52 g) light brown sugar, packed
- 1 teaspoon ground cinnamon
- ¼ teaspoon ground nutmeg
- ⅛ teaspoon salt
For the pie crust cutouts
- 1 homemade pie crust dough, or you can use store-bought
- 2 tablespoons milk
- 2 tablespoons coarse sugar
- homemade whipped cream, or you can use store-bought
Instructions
Make the crust
- Move the oven rack to the lower third position and heat the oven to 350°F. Wrap the outer bottom of a 9-inch springform pan tightly with heavy-duty aluminum foil (see note 2). Line the inside bottom with a piece of parchment paper cut to fit.
- Combine the vanilla wafer crumbs, sugar, and melted butter. Press the crumb mixture into the bottom and about 1-inch up the sides of the pan.
- Bake for 10 minutes. Set aside to cool while you make the filling.
Make the filling
- Reduce the oven temperature to 300ºF.
- In a large mixing bowl beat the cream cheese with an electric mixer until smooth and creamy, about 1 minute.
- Add the sugar and sour cream, beat until well combined. Add the vanilla, beat on low speed until smooth.
- Using a silicone spatula, gently stir in the eggs just until combined.
- Pour the batter over the prepared crust. Bake for 1 hour, OR until the edges are set and the center is slightly jiggly. Meanwhile, make the topping
Make the topping
- Toss the apples with lemon juice until evenly coated.
- In a medium saucepan, melt the butter over medium-high heat.
- Whisk in the flour and cook for 5 minutes while whisking continuously.
- Slowly whisk in the apple cider making sure to break up any lumps of flour.
- Stir in the apples, granulated sugar, brown sugar, cinnamon, nutmeg, and salt.
- Bring to a boil then reduce the heat and simmer for 10-15 minutes, until apples are tender and the sauce has thickened.
- Remove the cheesecake from the oven and carefully spoon the apple topping over the top.
- Place cheesecake on a wire rack and allow to cool to room temperature.
- Cover and refrigerate for at least 4 hours, preferably overnight.
Make the pie crust cutouts
- Prepare the pie dough according to the recipe instructions.
- Roll the dough into a 10-inch circle and use a 1-inch apple-shaped cookie cutter to cut shapes from the pie crust.
- Place the cutouts in a single layer on a parchment-lined baking sheet. Brush the cutouts lightly with milk and sprinkle with coarse sugar.
- Bake for 10-15 minutes, until lightly golden brown. Cool completely.
Serve the cheesecake
- Carefully loosen the outer ring on the springform pan and remove it. Transfer the cheesecake to a serving platter.
- Pipe swirls of whipped cream over the top of the cheesecake and garnish with pie crust cutouts.
- Dip a sharp knife in hot water to warm the blade. Carefully dry the blade and slice the cheesecake. Repeat with each slice.
Notes
- Use any variety of apple you prefer. I like to use Granny Smith and/or Pink Lady.
- Even though I didn’t use a water bath, I still wrap the pan in foil. Sometimes the melted butter from the crust will leak as it bakes. The foil will catch it instead of it dripping onto the bottom of the oven.
- This cheesecake is baked in a water bath. Please familiarize yourself with how to create a leakproof water bath.
- The baked and chilled cheesecake will keep for up to 4 days covered tightly and stored in the refrigerator.
- Pecan pie cheesecake will keep for up to 2 months covered tightly and stored in the freezer. Slice while frozen then allow the slices to thaw before serving.
Nutrition
The nutrition information provided is for convenience and as a courtesy only. It is not guaranteed to be accurate because nutrition information can vary for a variety of reasons. For precise nutritional data use your preferred nutrition calculator and input the exact ingredients and brands you used in the recipe.
100 percent.
This was the best cheesecake I’ve ever made. I did not put the crust pieces on top but did add the whipping cream at serving. I added a little allspice to the apples. The flavor of the apple and the very creamy cheesecake was wonderful!
If I wanted to make this cheesecake less creamy and more dense, do you have any tips?
You could try looking for a cheesecake recipe that is meant to be dense and less creamy. Then add this apple topping to it.