
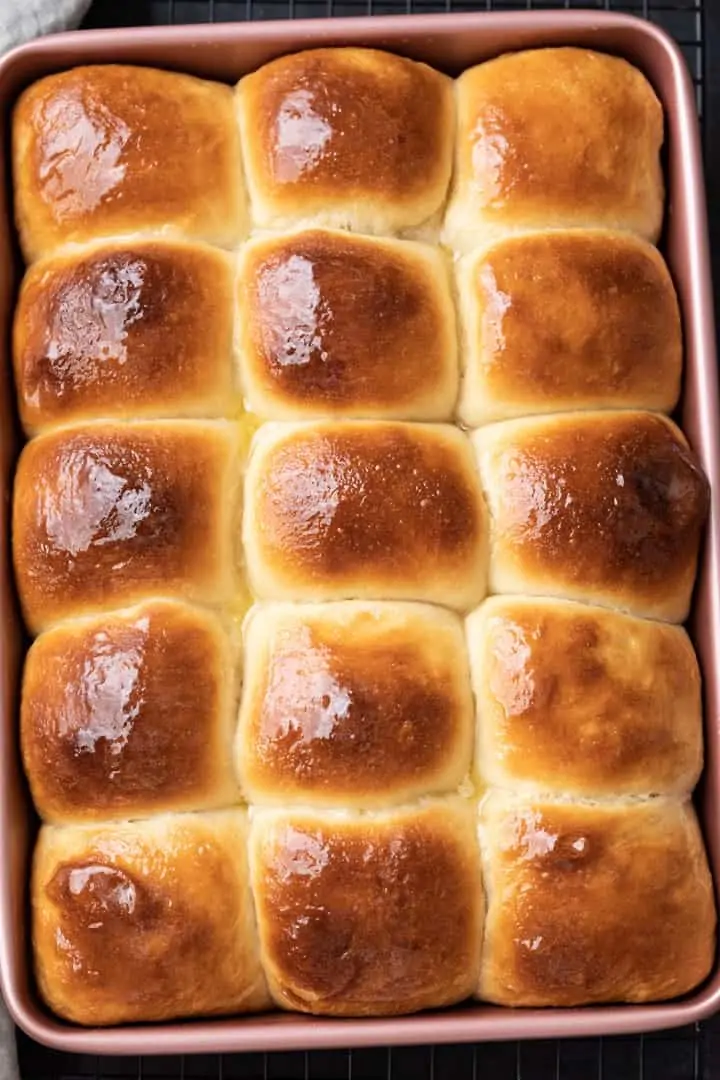
The Best Hawaiian Sweet Rolls
This post may contain affiliate links. Read the full disclosure here.
Hawaiian sweet rolls are some of my family’s favorite. They are great for sandwiches, as a side with dinner, or alone with honey butter.
Hawaiian sweet rolls are my favorite dinner rolls. If we’re having bread with dinner, it’s going to be these rolls. They are made similar to my easy homemade dinner roll recipe but they’re a lot sweeter.
I got hooked on this sweetly fragrant bread thanks to King’s Hawaiian. That brand is an evil genius.
Because I love the bread so much, I just could not resist making some from scratch. And then I couldn’t resist slathering them with honey butter.
These rolls really are the best and you are sure to agree!
Why this Hawaiian sweet rolls recipe works
- This recipe yields the perfect texture, the right amount of sweetness, and it comes together easily.
- Pineapple juice lends that familiar flavor of Hawaiian bread that we all love and gives the bread a subtle sweetness which is then enhanced with a touch of honey.
- Honey butter offers extra sweetness that really takes the rolls to a new level.

Hawaiian sweet rolls ingredients
These rolls use very staple ingredients. Either Instant or rapid rise yeast can be used. I don’t recommend using regular active dry yeast, though. I’ve tested it and it just doesn’t work well with this recipe.
- Pineapple juice: Pineapple juice is what gives the rolls a sweet and slightly tangy flavor.
- Buttermilk: Also offers a slight tanginess. Be sure to use whole (full fat) buttermilk.
- Butter: Is added to give the dough some richness.
- Honey: Use a mild-honey like clover honey.
- Flour: All-purpose flour is best for Hawaiian rolls.
- Yeast: Use instant or rapid-rise yeast.
- Salt: Added to help balance the sweetness.
- Egg: Is also added for sweetness.
- Vanilla extract: Adds a little extra flavor to the rolls.
How to Make the best Hawaiian sweet rolls
This homemade Hawaiian sweet roll is made with basic bread ingredients but there are a few extras to give the bread that distinct flavor of Hawaiian bread. I use half buttermilk and half pineapple juice for moisture and flavor. The two combined have a lovely sweet and tangy profile.
The Dough – The bread needs to rise twice. Each rise is about 1 to 1 and ½ hours. So make sure you plan ahead for this.
The first rise happens once the dough is mixed together and kneaded. The second rise is after you’ve portioned and shaped the dough into individual rolls.
Step 1: Combine the wet ingredients
Mix the pineapple juice, buttermilk, butter, and honey together in a microwave-safe bowl or large liquid measuring cup. Then microwave the mixture in 30-second intervals until it reaches 110°F.
It may appear curdled at this point. That’s perfectly normal so don’t fret.

Step 2: Make the dough
A stand mixer will be your best friend with this recipe or any yeast bread recipe. It makes the process so much easier!
Fit the stand mixer with the dough hook. Add the flour, yeast, and salt to the bowl. Mix on low speed for a few seconds to get everything combined.
Leave the mixer on low speed and slowly pour in the warm pineapple juice mixture. Then add the egg and vanilla. Let the mixer run on low for about 2 minutes until dough starts to form a ball.
Increase the speed to medium-low and continue to mix for 7 minutes. The dough will stick to the bottom of the bowl but should pull away from the sides.
It’s a soft dough that will be slightly tacky. Avoid adding excess flour.

Step 3: Let the dough rise
Very lightly flour your work surface and turn the dough out. Knead it briefly and shape it into a ball. Place the dough in a bowl that has been lightly greased and cover with plastic wrap.
Set the bowl in a warm place to rise for 1 and ½ hours. I like to have my oven preheating and use the microwave right above it as the warm environment.
If you do not have a microwave above the stove, you can heat your oven on the lowest temperature setting then turn the oven off and set the dough inside with the door slightly cracked open.

Step 4: Shape the dough and rise again
Once the dough has doubled in volume, gently punch it down to release some of the gas. Turn the tough out onto your work surface and divide it into 15 equal-sized pieces.
Shape each piece into a ball by pulling the edges under so the top of the dough is smooth.
Lightly grease a 9×13-inch pan and arrange the dough balls in 5 rows of 3. Cover with plastic wrap and let the dough rise again until doubled in size. This can take up to another 1 and ½ hours.
The rolls should be almost as tall as the top of the pan.

Step 5: Bake
Brush the tops of the rolls with melted honey butter and bake until golden brown. The honey butter will help give the rolls a rich golden color.
Use an instant-read thermometer to check the internal temperature of the rolls. They are done when they reach 190°F.
Brush the tops with more melted honey butter and let the rolls cool for about 10 minutes. Slide the rolls out of the pan onto a cooling rack and let them cool for another 20 minutes.
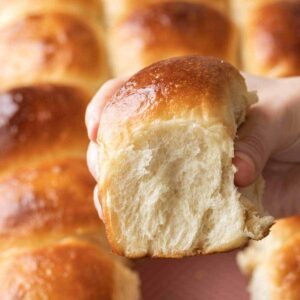
The rolls are best served warm on the day they are made.


Homemade honey butter
Homemade honey butter complements the sweet bread perfectly and can easily be whipped up in a matter of minutes.
You don’t even need a recipe for honey butter. Just take some unsalted butter, let it soften to room temperature, beat it with an electric mixer until is smooth and creamy, and slowly beat in some honey. Use as little or as much honey as you prefer.
You can store any leftover honey butter in the refrigerator and use it on toast or English muffins for breakfast!

More delicious yeast bread and rolls to try:
The Best Hawaiian Sweet Rolls
Ingredients
- 1 cup (240 ml) pineapple juice
- ½ cup (120 ml) buttermilk
- 6 tablespoons (89 g) unsalted butter, melted
- 5 ½ cups (715 g) all-purpose flour
- ⅓ cup (113 g) honey
- 1 tablespoon instant yeast
- 2 teaspoons salt
- 1 large egg, lightly beaten
- 1 tablespoon vanilla extract
- 4 tablespoons honey butter
Instructions
- Combine the pineapple juice, buttermilk, butter, and honey in a large liquid measuring cup. Microwave in 30 second intervals until the temperature reaches 110°F. The mixture may become curdled, this is normal.
- Using a stand mixer fitted with a dough hook, mix the flour, yeast, and salt on low speed until combined.
- With the mixer on low speed, gradually pour in the pineapple mixture followed by the egg and vanilla.
- Mix on low speed dough begins to come together, about 2 minutes. Increase the speed to medium-low and mix until the dough is no longer sticking to the sides of the bowl. It may still stick to the bottom.
- Turn the dough out onto a lightly floured surface and shape it into a ball. Place the dough in a lightly oiled bowl, cover with plastic wrap, and set in a warm place to rise until doubled in size, about 1 and ½ hours.
- Punch the dough down to deflate it and transfer it to a lightly floured work surface. Divide the dough into 15 equal size portions. Shape each portion into a smooth ball and arrange them in a lightly oiled 9×13-inch baking pan.
- Cover the pan with plastic and set in a draft-free area to rise until doubled in size, about 1 and ½ hours.
- Adjust the oven rack to the lower-middle position and heat the oven to 375°F.
- Brush the top of the rolls with melted honey butter. Bake the rolls for 20 minutes, or until the tops are golden brown, rotating halfway through the baking time. The internal temperature of the rolls should be 190°F.
- Brush the rolls with more melted honey butter and cool on a wire rack for 10 minutes. Transfer the rolls to a wire rack and cool for another 20 minutes. Rolls are best when eaten the day they are made.
Notes
- Yeast: Use either instant or rapid rise yeast. Active dry yeast will not be as efficient with this recipe.
- Honey butter: You can make it by mixing butter and honey. Start with ¼ to ½ cup of room temperature unsalted butter and mix in 2 tablespoons of honey at a time until you achieve the desired taste. Store leftover honey butter in the refrigerator and use it on toast, muffins, or rolls.
- Make the recipe through step 6. Cover the rolls with plastic wrap and refrigerate overnight. Set the rolls out at room temperature for 1 to 1 ½ hours until the rolls have doubled in size. Bake per the recipe instructions.
- Or you can freeze the rolls 10 minutes after shaping. When ready to use, thaw overnight in the refrigerator. Set the rolls out at room temperature for 1 to 1 ½ hours until the rolls have doubled in size. Bake per the recipe instructions.
- Fully baked rolls can also be frozen in an airtight container. Thaw overnight at room temperature then reheat in a 300°F oven for 10 minutes.
Nutrition
The nutrition information provided is for convenience and as a courtesy only. It is not guaranteed to be accurate because nutrition information can vary for a variety of reasons. For precise nutritional data use your preferred nutrition calculator and input the exact ingredients and brands you used in the recipe.
Recipe adapted from Cooks Country.
Me and my fiancé made these for a party and were an absolute hit! We made them into mini korean BBQ sliders and my goodness we couldnt have been happier with this recipe. So easy, so fun and absolutely perfect!
My kids love Kings Hawaiian bread in all its forms, so when I came across this recipe, they were excited to try it. We got a kick out of learning PINEAPPLE JUICE was the secret ingredient. The recipe is super easy to follow, so well written and didn’t take all day. Followed the recipe exactly. They smelled so good baking in the oven and we couldn’t quite wait for them to cool before trying the first one. Heaven!! So tender and delicious, just like the photo. The were gobbled up before I blinked. Thanks
Can you use bread flour for this recipe?
I don’t recommend swapping flours since the recipe was developed and tested with all-purpose. I just can’t guarantee how it will turn out if you change it.
Super great. Spectacular to all my family, they loved it. Thanks for the Recipe. God Bless you.
This recipe made nice rolls. They were moist and fluffy. However, these definitely do NOT taste like a Hawaiian sweet roll. They do not have that characteristic sweetness that a Hawaiian sweet roll has. They were still tasty as a classic dinner roll, but I was looking for a Hawaiian sweet roll. Kinda disappointed.
These were good rolls but nothing like Hawaiian rolls. Mine had no sweetness like I expected with the amount of pineapple juice and honey. Disappointing because of expectations but overall a light and yummy roll that everyone enjoyed.
I’m sorry you were unhappy with the final taste of the rolls.
My rolls turned out nicely but I think there is a discrepancy in the amount of flour the recipe asks you to use. 715 grams is less than 5 1/2 cups by about 3/4 cup. I decided to go with the higher amount and the dough was tougher and less pliable than I think it should have been. Am I correct? Great recipe otherwise; love the idea of combining buttermilk and pineapple.
There is no discrepancy in the amount of flour. For my recipes, 1 cup of all-purpose flour is equal to 130 grams. That means 5 1/2 cups of all-purpose flour will weigh 715 grams. When weight measurements are listed, it is very important to use those measurements instead of the cup measurements. This will give you precise measurements leading to a more successful bake. If you have the time, I recommend reading my articles on how to measure flour and baking fundamentals.
These are fantastic! My mom’s words were, “Sorry Grandma! These are better.”
I didn’t have pineapple juice but I did have canned pineapple chunks. I found that blending one 20-oz can chunks (with juice) is an excellent replacement for the juice when doubling the recipe.
Thanks for sharing!
Hi hi! Super excited to try this out. I do have 2 questions though. 🙂
1. Could I use a Pyrex glass pan to make this? If so, what kind of adjustments to the temperature or time should I make?
2. In the event that the dough is too sticky when I first mix the ingredients together (sadly it happens often where I live), up to how much flour can I add to make the dough easier to work with? Or would you recommend butter / oil instead?
Thank you! 🙂
I’m excited for you to bake these!
1. I don’t recommend using glass pans to bake bread. Glass is an insulator, rather than a conductor, so it’s slow to heat up. Once it’s hot, it retains that heat for longer. This often results in uneven baking and by the time the interior is baked through, the exterior is often overcooked, dry, or dark.
2. In step 4, if the dough isn’t clearing the sides of the bowl, you can mix in 1 tablespoon of flour at a time until it clears the bowl and is no longer sticky. It’s hard to say how much more flour you’ll need but adding too much extra flour can result in tough, dense rolls.
I just made these for thanksgiving. I’m not a bread maker but I just really wanted something different. From our fantastic feast, these rolls were somehow the star ? Many made ham and Turkey sandwiches at the dinner table lol I followed the make ahead instructions and made them the day before. I did not find them sweet enough, next time I may add more honey/pineapple juice (less buttermilk). The dough was very difficult to work with, I followed the suggestion of another commenter to use oil when transferring for the first rise. When shaping, I just had flour on hand. Making them again for Christmas by popular demand!
They are the perfect vessel for ham and turkey sandwiches! Hope you had a wonderful Thanksgiving.