
Lemon Tart (Gluten-Free)
This post may contain affiliate links. Read the full disclosure here.
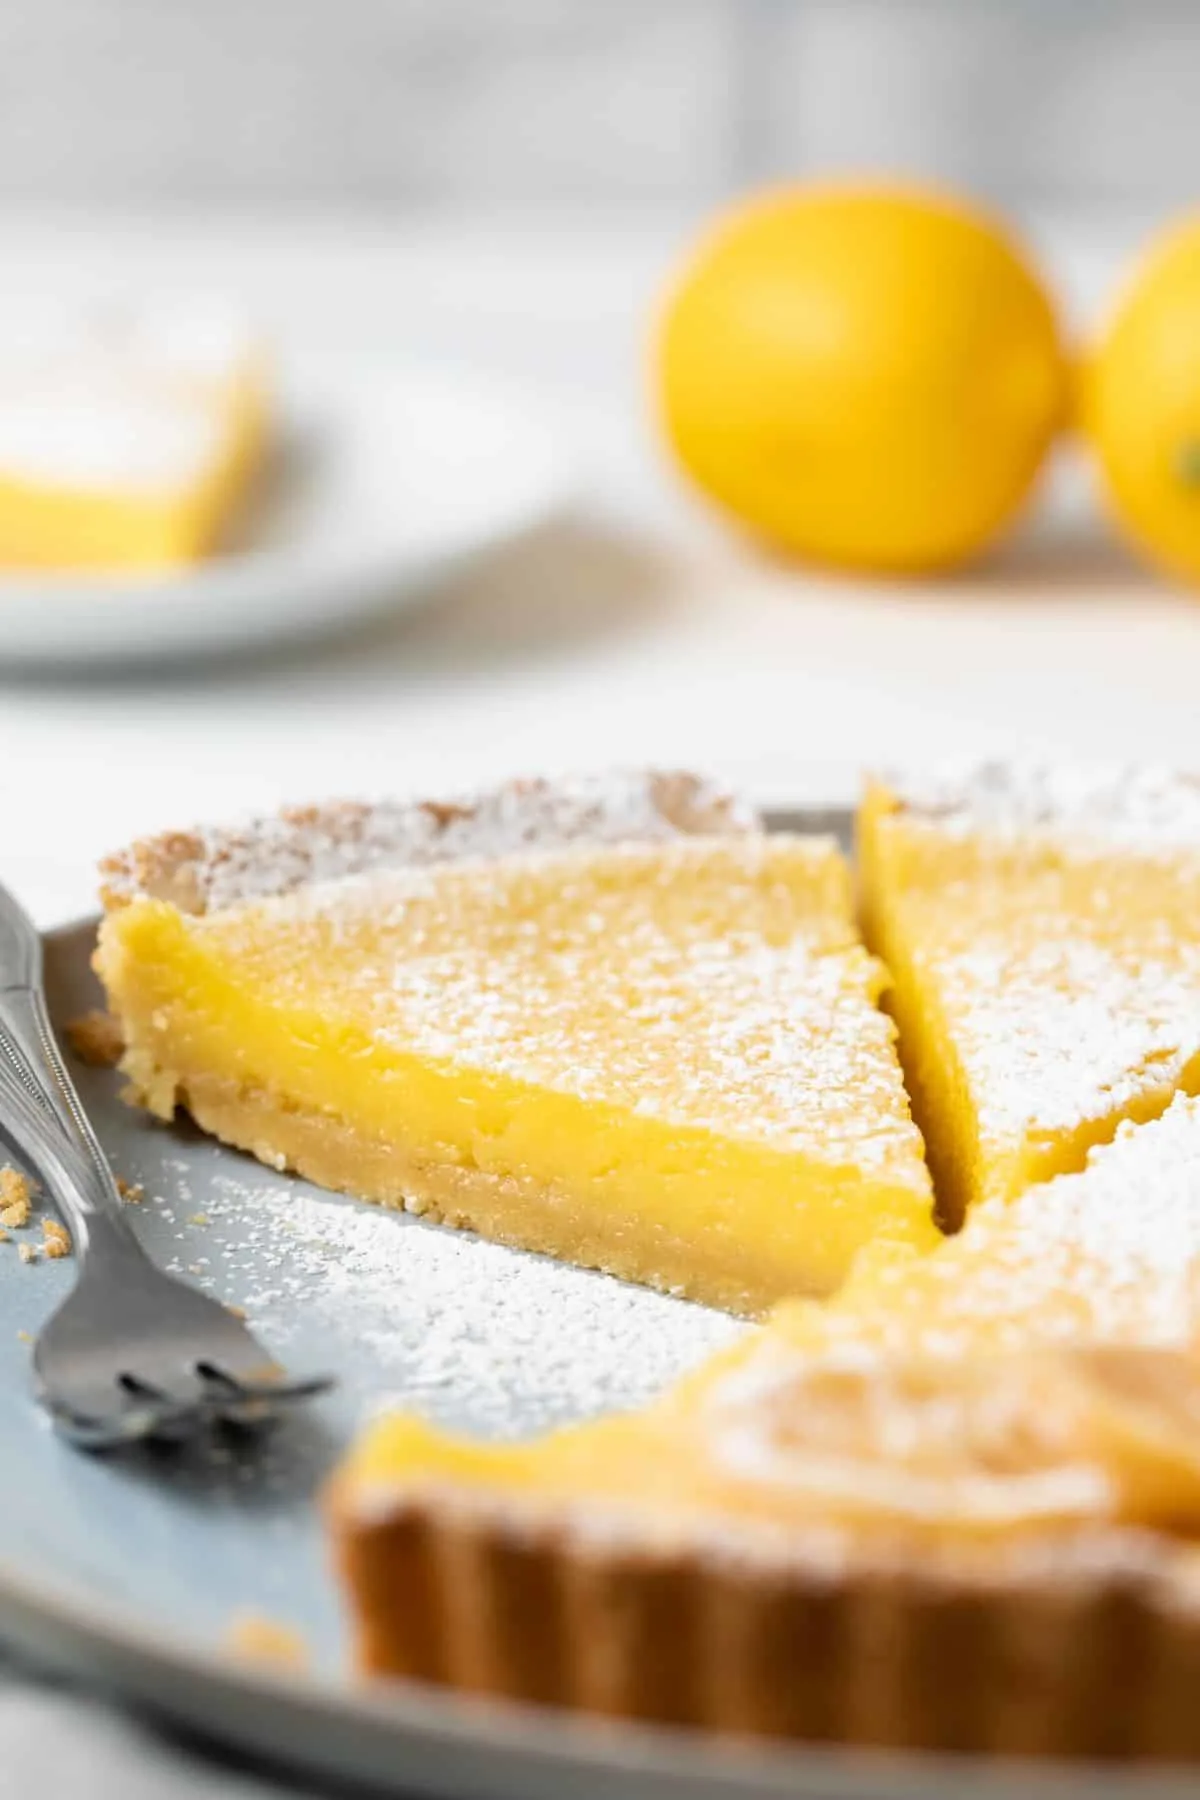
This gluten-free lemon tart recipe is one you will adore. With a classic shortbread crust and tart lemon filling, this tart is the ultimate lemon dessert.
This post is brought to you by Bob’s Red Mill.

Calling all lemon lovers! This lemon tart is for you!! It’s, by far, one of my favorites desserts to date. It’s so tangy and 100% gluten-free.
The recipe is basically my lemony lemon bars transformed into a tart.
And the best part is that the shortbread crust is made with gluten-free flour plus almond flour. But, you’d never know!
I used a combination of almond flour and gluten-free baking flour from Bob’s Red Mill and it came out like any traditional shortbread crust. I am so pleased with the results.
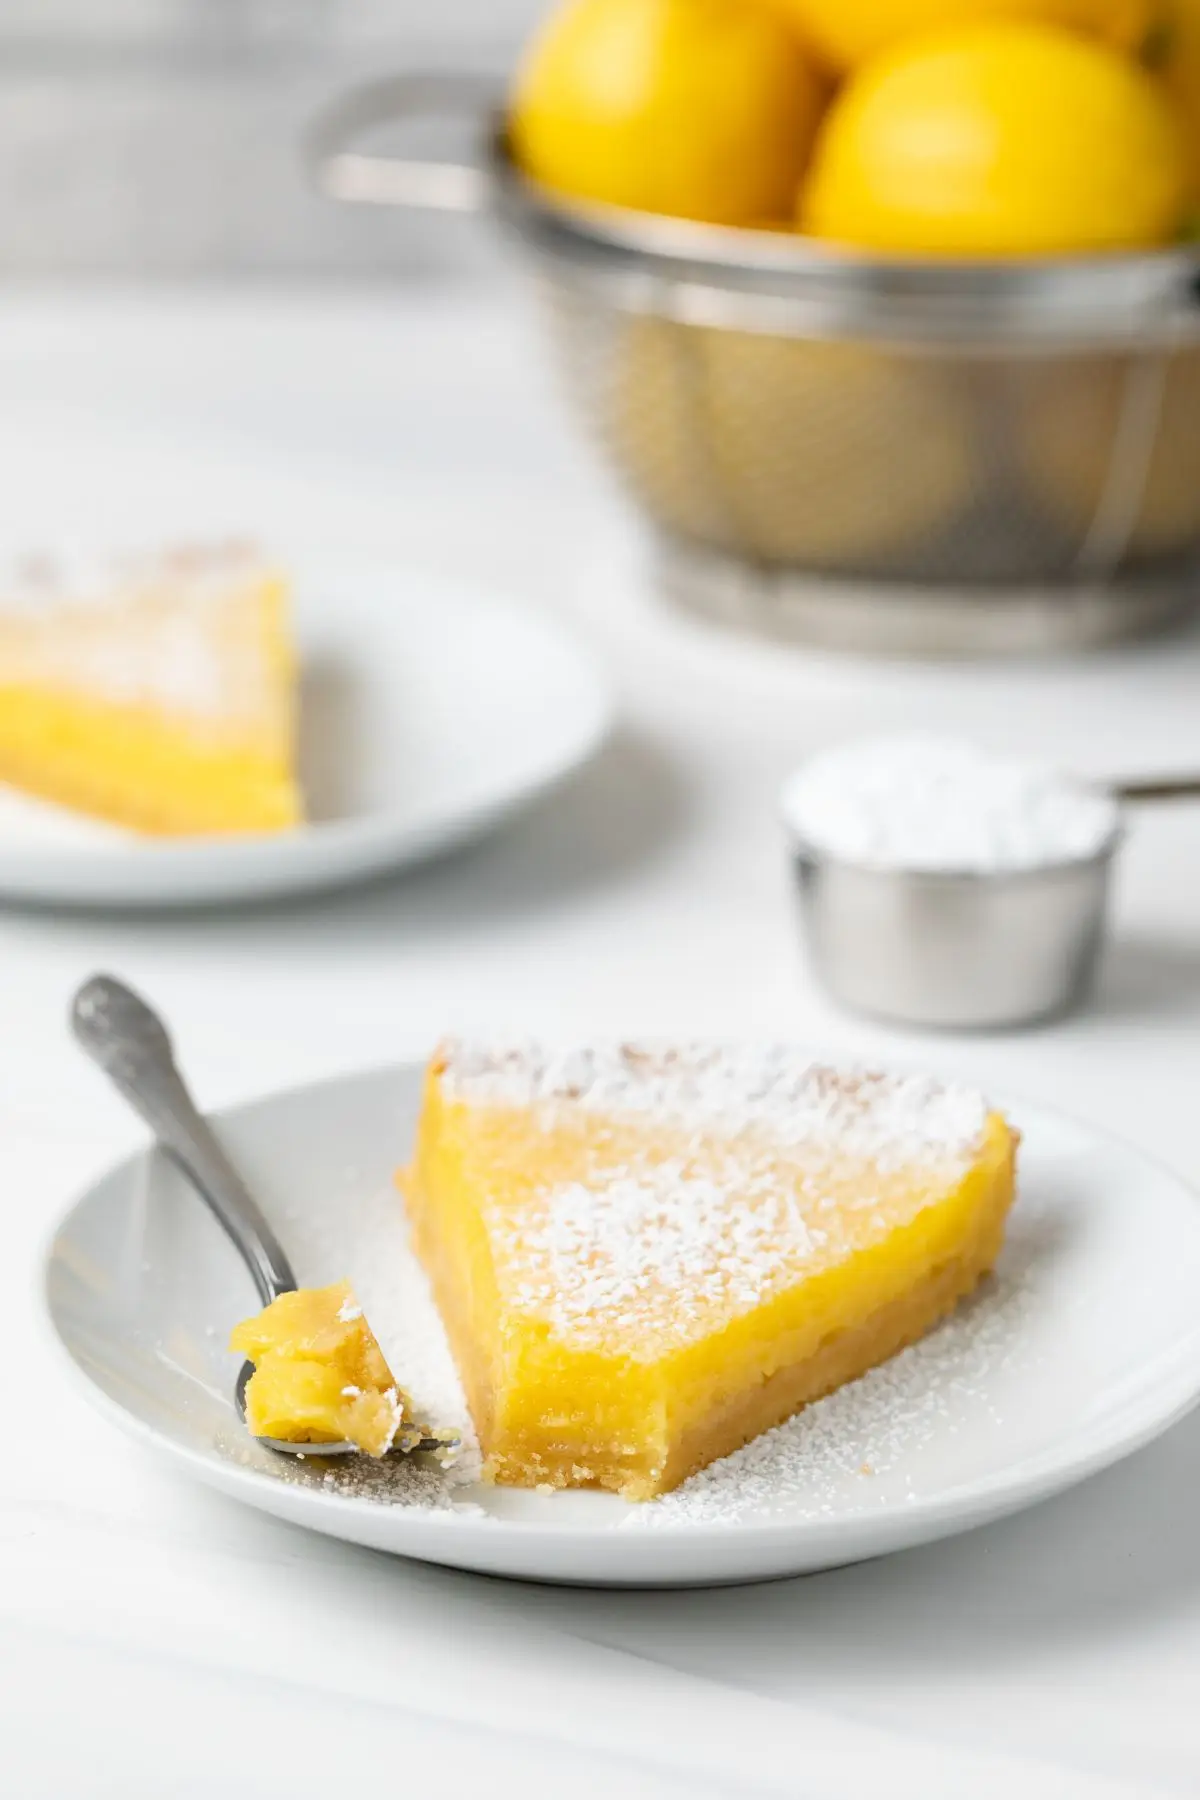
The filling is tangy. I like for my lemon desserts to be lip-puckering and that’s exactly how this tart is. If you’re not a fan of tart lemon flavor, you can add more sugar to the filling.
I think you will enjoy this recipe and find it similar to the French “tarte au citron”.
Here’s why this recipe works
- The cookie crust is made with almond flour, gluten-free flour, powdered sugar, and butter. The result is a perfectly crumbly and sweet crust that pairs well with the tangy lemon curd.
- The lemon curd is first cooked on the stove then it’s added to the crust and baked until set.
- A splash of cream and butter make the filling soft and creamy. Both are completely optional but I highly recommend adding them.
Ingredients
My homemade classic lemon tart requires a few staple ingredients. While this recipe uses gluten-free flour, you can make it with regular all-purpose flour.
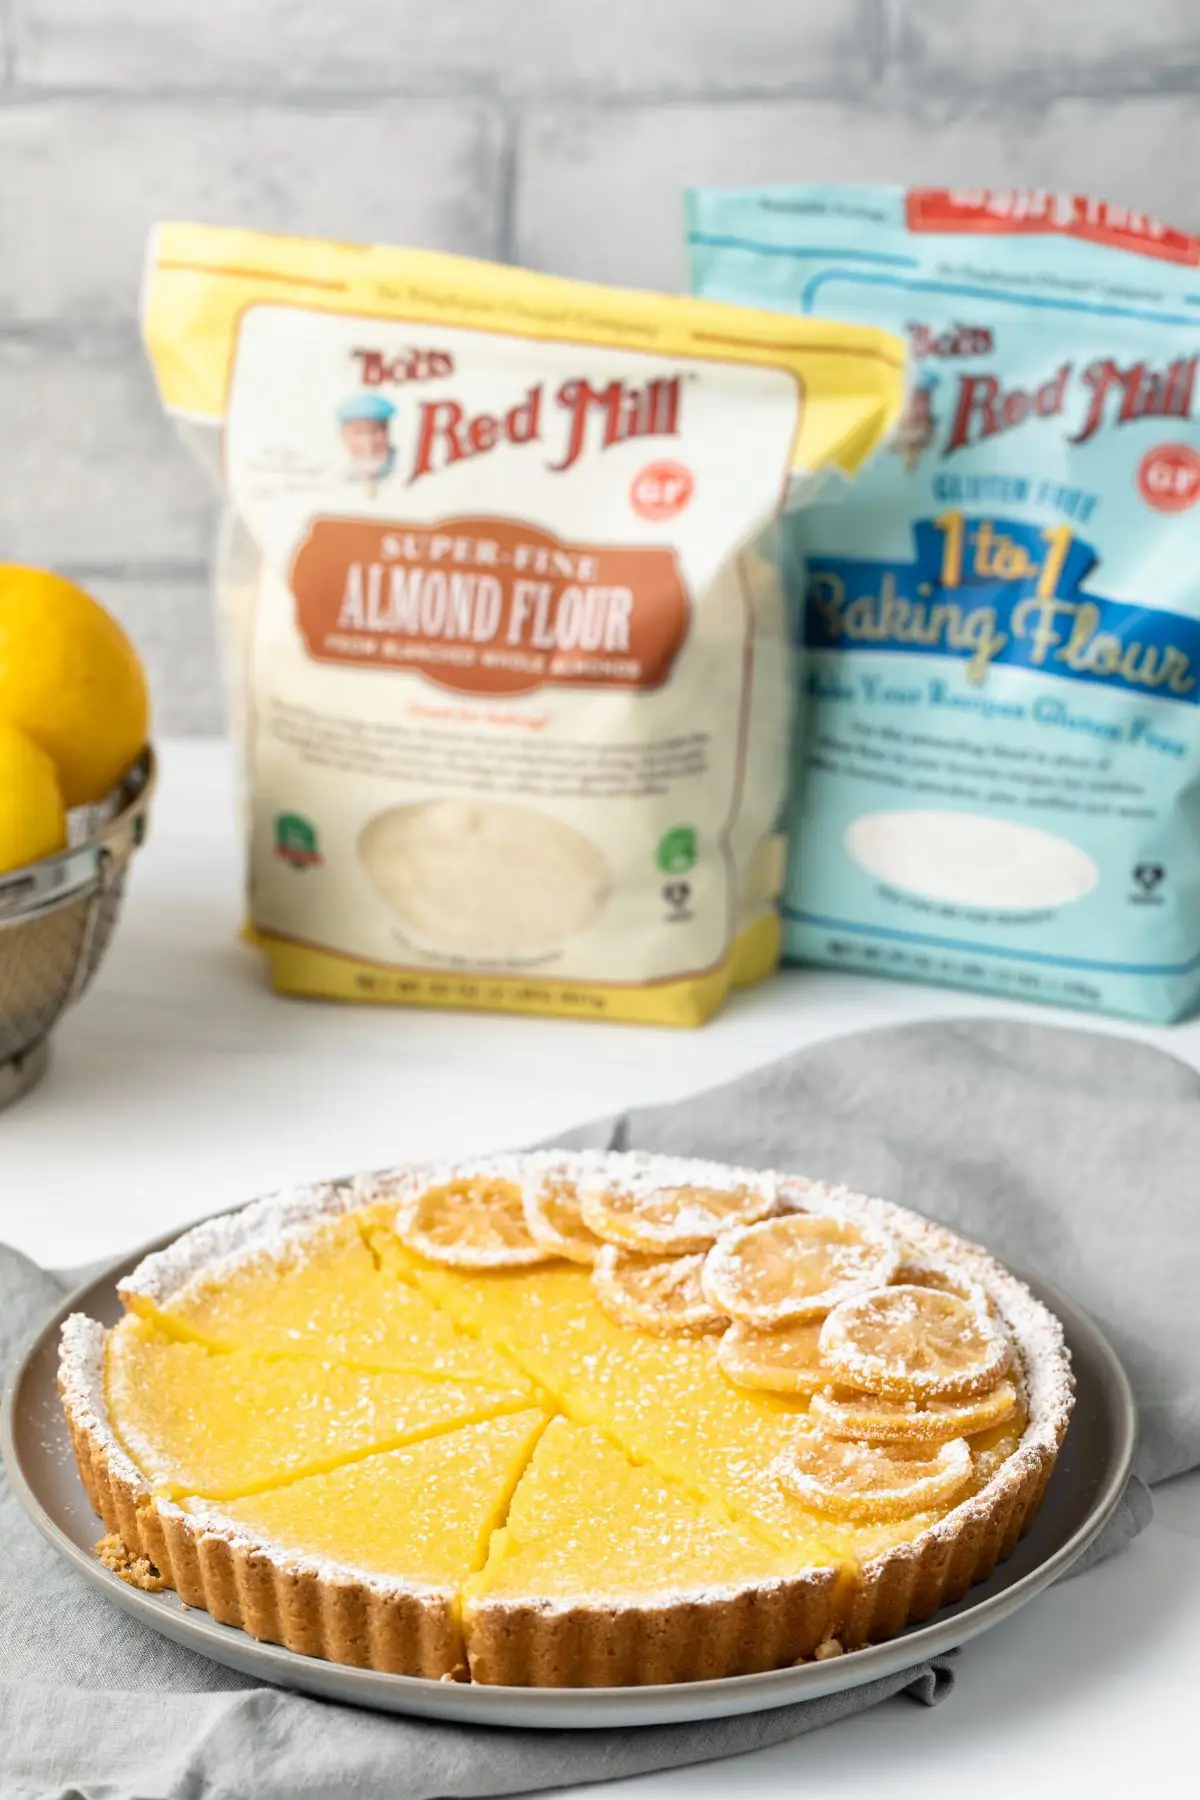
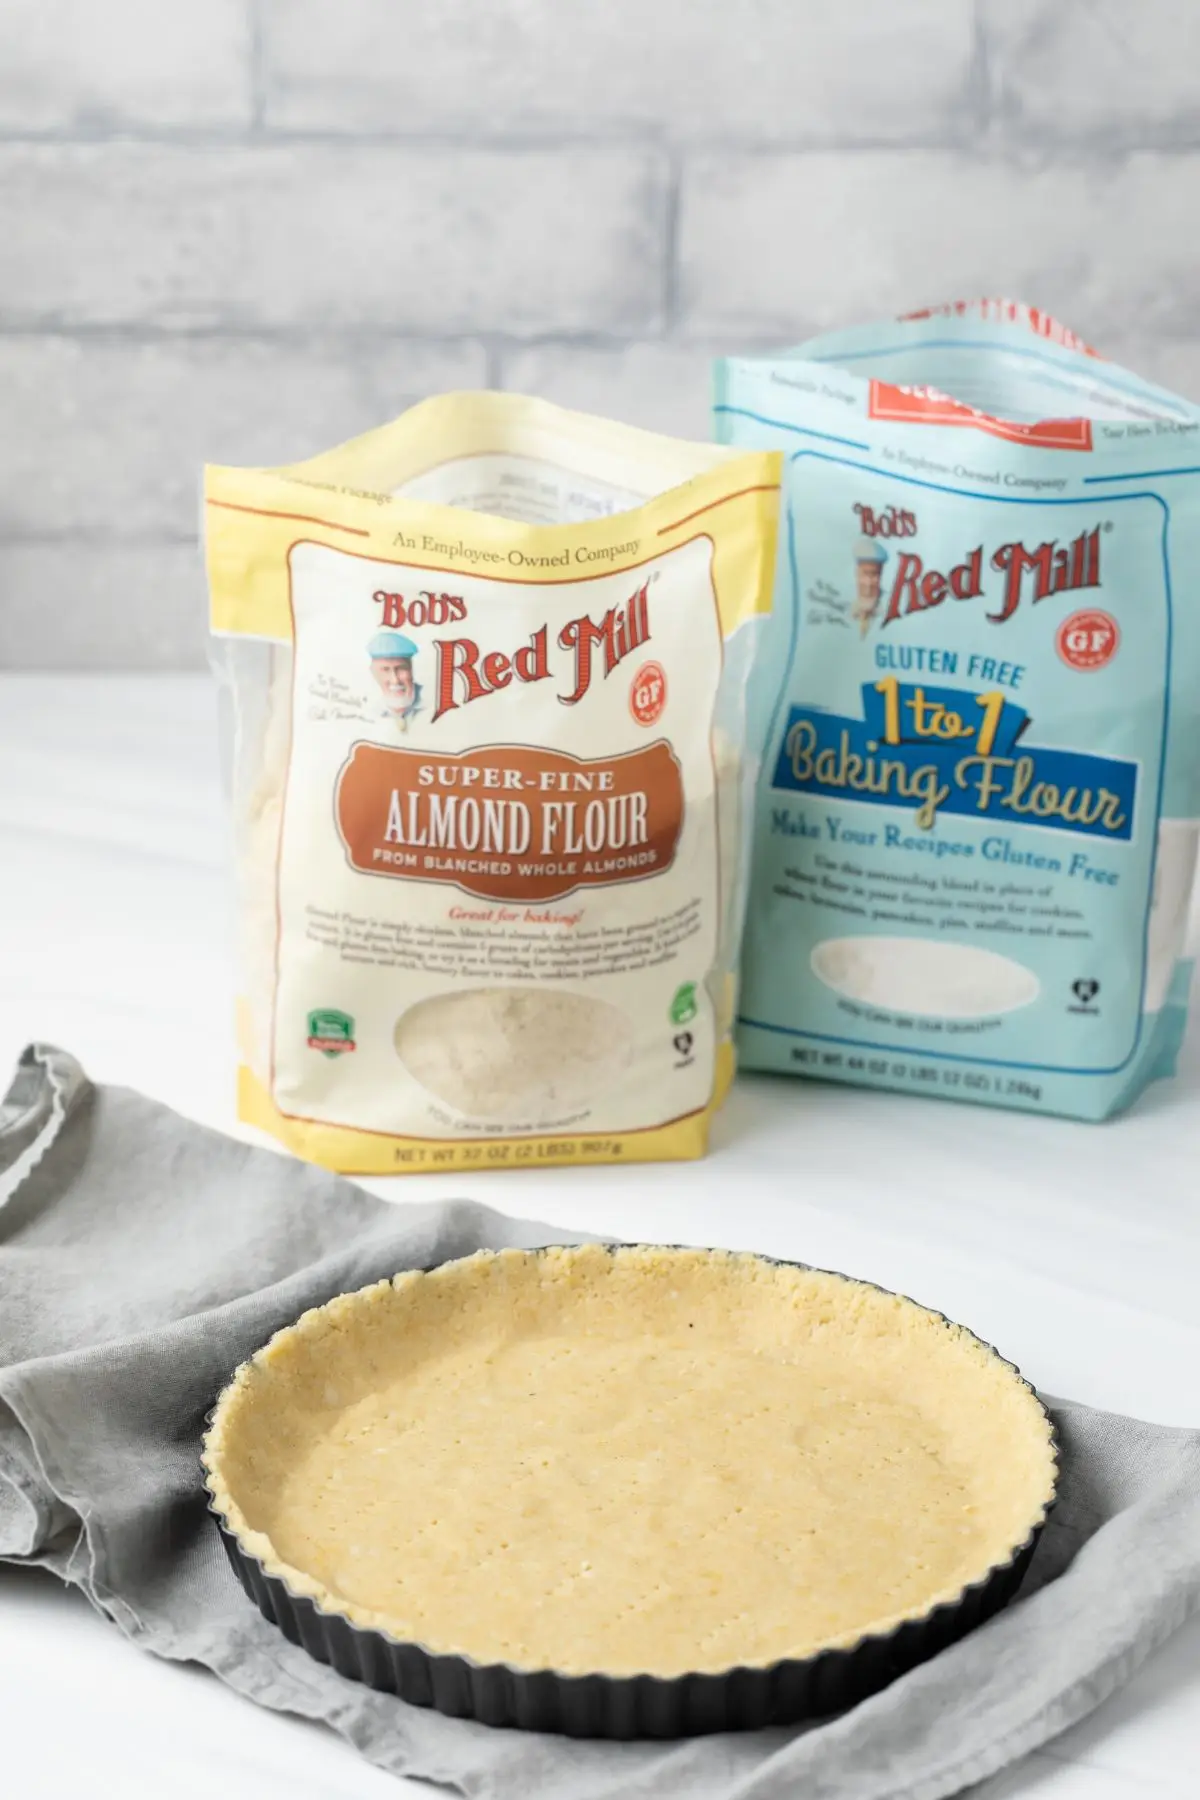
- Almond flour: I like adding a bit of Bob’s Red Mill Almond Flour to the crust. It adds a slightly nutty flavor that complements the lemon.
- Gluten-free flour: Bob’s Red Mill Gluten Free 1-to-1 Baking Flour is preferred. It will keep the crust tender and crumbly.
- Sugar: Powdered sugar goes in the crust so it bakes up soft and crumbly like traditional shortbread. Regular granulated sugar is used in the curd. Feel free to add a bit more if you don’t like a super tangy filling.
- Salt: Just a pinch goes in both the crust and the filling to help balance all the flavors.
- Butter: Unsalted sweet cream butter is what I used to test the recipe.
- Eggs: Lemon curd can taste a bit eggy, so use fresh eggs for the best results.
- Lemon: Lemon juice and zest are used to flavor the filling.
- Heavy cream: It’s completely optional to use heavy cream in the curd but I find that it adds a nice creaminess to the texture.
I garnished my tart with candied lemon slices. and powdered sugar. I made the slices with my candied orange recipe but used lemons instead of oranges.
Equipment needed
You only need a few tools to make this incredible lemon curd tart. Let’s see what they are.
Tart pan: The recipe fits a 9-inch tart pan. I like to use one with a removable bottom.
Fine mesh sieve: Push the curd through a fine-mesh sieve ensures the texture is creamy and free of eggy bits.
Saucepan: A heavy-bottomed saucepan is perfect for cooking the curd.
How to Make Gluten Free Lemon Tart
It isn’t difficult to make this easy tart recipe. It does have two elements that are made separately…
The crust – The shortbread crust is made by combining all the ingredients in a bowl then pressing it into a tart pan. It gets prebaked before adding the filling.
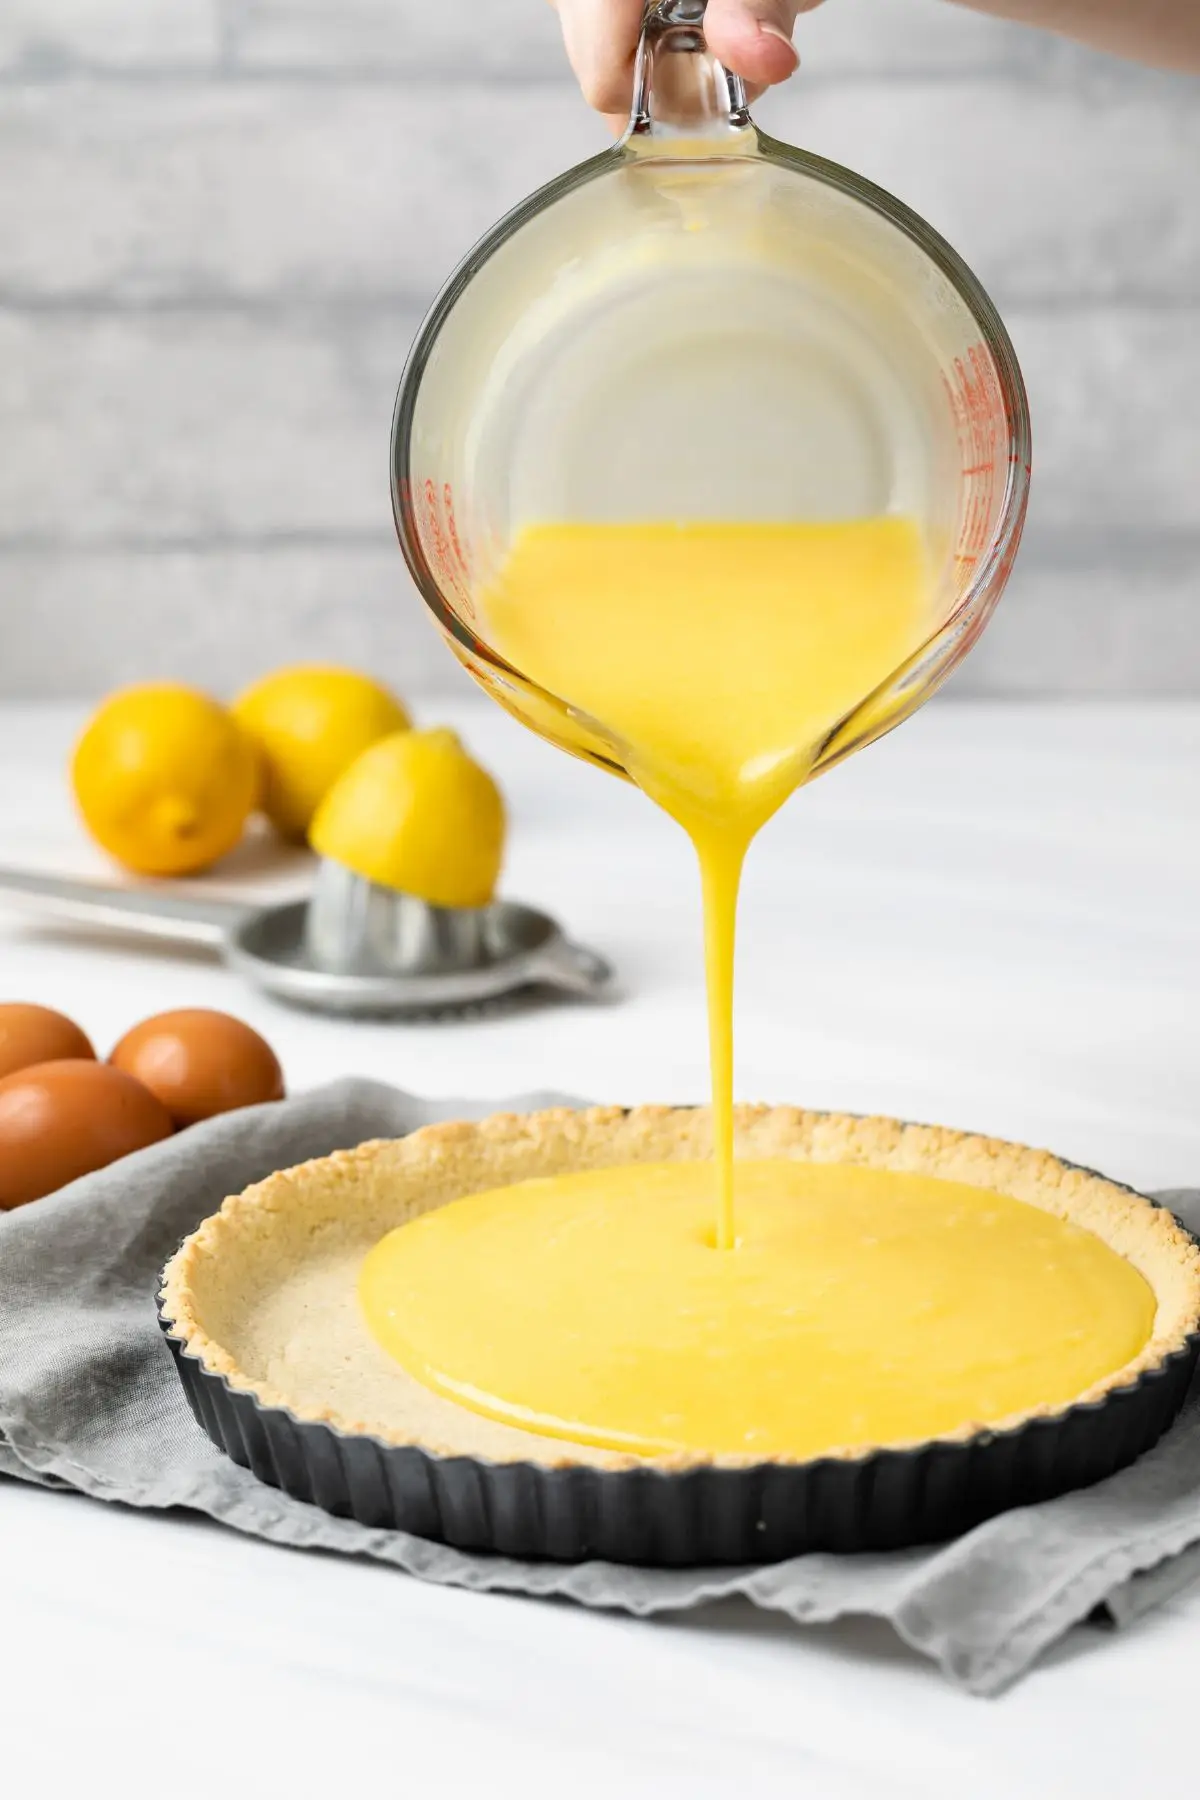
The filling – The filling is nothing more than a simple stove-top lemon curd. It comes together in a matter of minutes!
Step 1: Make the crust
Preheat the oven to 350°F before you begin. And generously grease a tart pan, even it the pan is nonstick.
Add all the ingredients to a mixing bowl and stir until well combined. The mixture should resemble wet sand and hold together when squeezed.
Press the dough evenly into the bottom of the prepared pan. I like for the bottom portion to be a bit thicker than the sides. Make sure to press firmly so the crust holds together.
Step 2: Bake the crust
Prick the crust with the tines of a fork to prevent it from bubbling up.
Bake it for 10-12 minutes or until it’s firm to the touch and just starting to turn golden.
If the crust bubbled up, use a stainless steel measuring cup and gently press it down. Do this as soon as you remove the crust from the oven, while it is warm.
Set it aside and make the filling.
Step 3: Make the filling
Whisk the eggs, yolks, sugar, salt, lemon juice, and lemon zest together in a medium saucepan.
Cook over medium heat for about 10 minutes, stirring constantly with a whisk. The mixture will thicken to the consistency of pudding.
Remove the curd from the heat. Stir in butter and cream. This is optional but it makes the curd creamier in texture.
Strain the curd through a fine-mesh sieve then spread it evenly into the prepared crust.
Step 4: Bake the tart
Bake the tart for 15-20 minutes. The filling should be set completely. It’ll jiggle slightly when shaken but shouldn’t appear to be too loose or runny.
Set the tart on a wire rack to cool for 1 hour then refrigerate for at least 2 hours before serving.
Helpful tip: I prefer to refrigerate the tart overnight. This ensures the filling won’t be runny and the tart will be easy to cut.
Expert Tips
- Add more butter to the filling. I only used 1 tablespoon of butter in the filling because I didn’t want to take away from the tangy lemon flavor. You can add up to ¼ cup of butter if you desire a less intense lemon flavor.
- Adjust the sugar to your liking. I love a super tart lemon profile but you may not. If you prefer a filling that is not so tangy and a little sweeter, increase the sugar. Add ½ to ¾ cup more.
- Garnish the tart. Use any topping you desire! Meringue, whipped cream, powdered sugar, candied lemon, and fresh berries are all great options.
- Original pie crust. You can also make this tart with my classic pie crust recipe.
How to Store
Store the tart in an airtight container in the refrigerator for up to 3 days. Or in the freezer for up to 3 months. Thaw overnight in the refrigerator.
More lemon recipes
Gluten Free Lemon Tart

Ingredients
For the crust
- 1 cup (135 g) Bob's Red Mill Almond Flour
- ⅔ cup (86 g) Bob's Red Mill Gluten-Free 1-to-1 Baking Flour
- ⅔ cup (80 g) confectioners' sugar
- ½ teaspoon salt
- 6 tablespoons unsalted butter, melted
For the filling
- 4 large eggs
- 3 large egg yolks
- 1 ¼ cup (250 g) granulated sugar
- ¼ teaspoon salt
- ¾ cup (180 ml) fresh lemon juice, about 6 lemons
- 1 tablespoon lemon zest, about 1 lemon
- 1 tablespoon unsalted butter, cut into small pieces
- 1 tablespoon heavy cream
- confectioners’ sugar for dusting, optional
Instructions
Make the crust
- Preheat the oven to 350°F. Generously grease a 9-inch tart pan with removable bottom; set aside.
- In a large mixing bowl, combine the almond flour, gluten-free flour, confectioners’ sugar, and salt. Stir with a whisk.
- Drizzle the butter over the flour mixture then stir together until moist and crumbly.
- Transfer the dough to the prepared pan and firmly press it into the bottom and all the way up the sides.
- Prick the bottom with a fork to prevent the crust from bubbling up. Bake for 10-12 minutes, until the crust is lightly firm to the touch and just starting to turn golden at the edges.
- Leave the oven on and set the crust on a wire rack while you make the filling.
Make the filling
- In a medium saucepan, whisk the eggs, egg yolks, sugar, and salt together until well combined. Whisk in the lemon juice and zest.
- Cook over medium heat, stirring constantly, until the curd thickens to the consistency of pudding, about 10 minutes.
- Remove from heat. Stir in the butter and cream.
- Strain the curd through a fine-mesh sieve then pour it into the prepared crust.
- Bake the tart for 15-20 minutes, until the filling is set. It should be slightly jiggly when shaken lightly.
- Set the tart on a wire rack to cool completely then refrigerate for at least 2 hours, overnight is best.
- Gently remove the tart from the pan and dust with confectioners’ sugar if desired.
Notes
- Adjust the sugar to your liking. I love a super tart lemon profile but you may not. If you prefer a filling that is not so tangy and a little sweeter, increase the sugar by ½ to ¾ cup.
- I decorated the tart with candied lemon slices using my candied orange recipe. Just replace the oranges with lemons.
- For the best flavor, I highly recommend using fresh lemon juice.
- The crust may bubble up slightly during baking. You can use a stainless steel measuring cup to gently press it down. Do this as soon as you remove the crust from the oven, while it is warm.
- Store the tart in an airtight container in the refrigerator for up to 3 days.
- Or in the freezer for up to 3 months. Thaw overnight in the refrigerator.
Nutrition
The nutrition information provided is for convenience and as a courtesy only. It is not guaranteed to be accurate because nutrition information can vary for a variety of reasons. For precise nutritional data use your preferred nutrition calculator and input the exact ingredients and brands you used in the recipe.
I have been making this tart for years and it is just the best. Thank you so much for this recipe.
Over the dozens of times I’ve made it I’ve come to realize I like a real jowl jouster of a lemon tart- extreme tartness. I use only 3/4 C sugar in the curd and I use 4-5 lemons worth of both zest and juice. Other than that I follow this. Perfection.
Complete winner, I made this lactose free and it still worked and was delicious. Everybody loved it and it is my sister in laws new favourite dessert!! THANK YOU.
I made this recipe, and ooooo it is delicious. I used oat and gluten free flour, the crust is tender. I also used monk fruit instead of sugar, and 2 TBS of corn starch. Not runny. It is delicious, tart and excellent in flavour.
10 stars!
😍😍
This recipe is fantastic, massive hit for everyone I baked for.
This is the second time we’ve made these and both times it’s come out super runny. There’s no way it’s undercooked because we’ve probably had it in the oven for at least 40 minutes and the filling is starting to brown on the top. We followed the recipe exactly so I’m really not sure what happened. However the filling is always delicious!
The filling needs to be cooked on the stovetop before going into the crust. You should let it cook until it’s thickened as stated in step 2 of make the filling.
Doesn’t seem to thicken much in 10 minutes
You need to continue to let it cook until it has thickened. It should coat the back of a spoon, that’s when it is ready.
could you leave the dough before putting it the tart tin, in the fridge for 30mins-1 hour?
That shouldn’t be a problem.
I developed a gluten intolerance a few years ago and basically just started eating the same thing every day. I wouldn’t cook or bake for anyone else because I didn’t think it was good enough, or I would cook from a normal recipe and just not eat any myself. It was very depressing. This is the first gluten free desert I learnt to bake. I practiced it a few times and made it for the family for christmas. My sister in law took a photo of it and said I won christmas, and that woman can bake like a badarse. You should make this delicious tart! We have different brands in australia, don’t worry about using different almond flour/GF flour. But dont use a tart tin with holes in the bottom like I did the first time unless you want an oven fire!