
Homemade Pizza Dough
This post may contain affiliate links. Read the full disclosure here.
My tried and true, all-time favorite pizza dough recipe. I’m fairly certain you and your family will prefer making this homemade pizza dough over using store-bought any day.
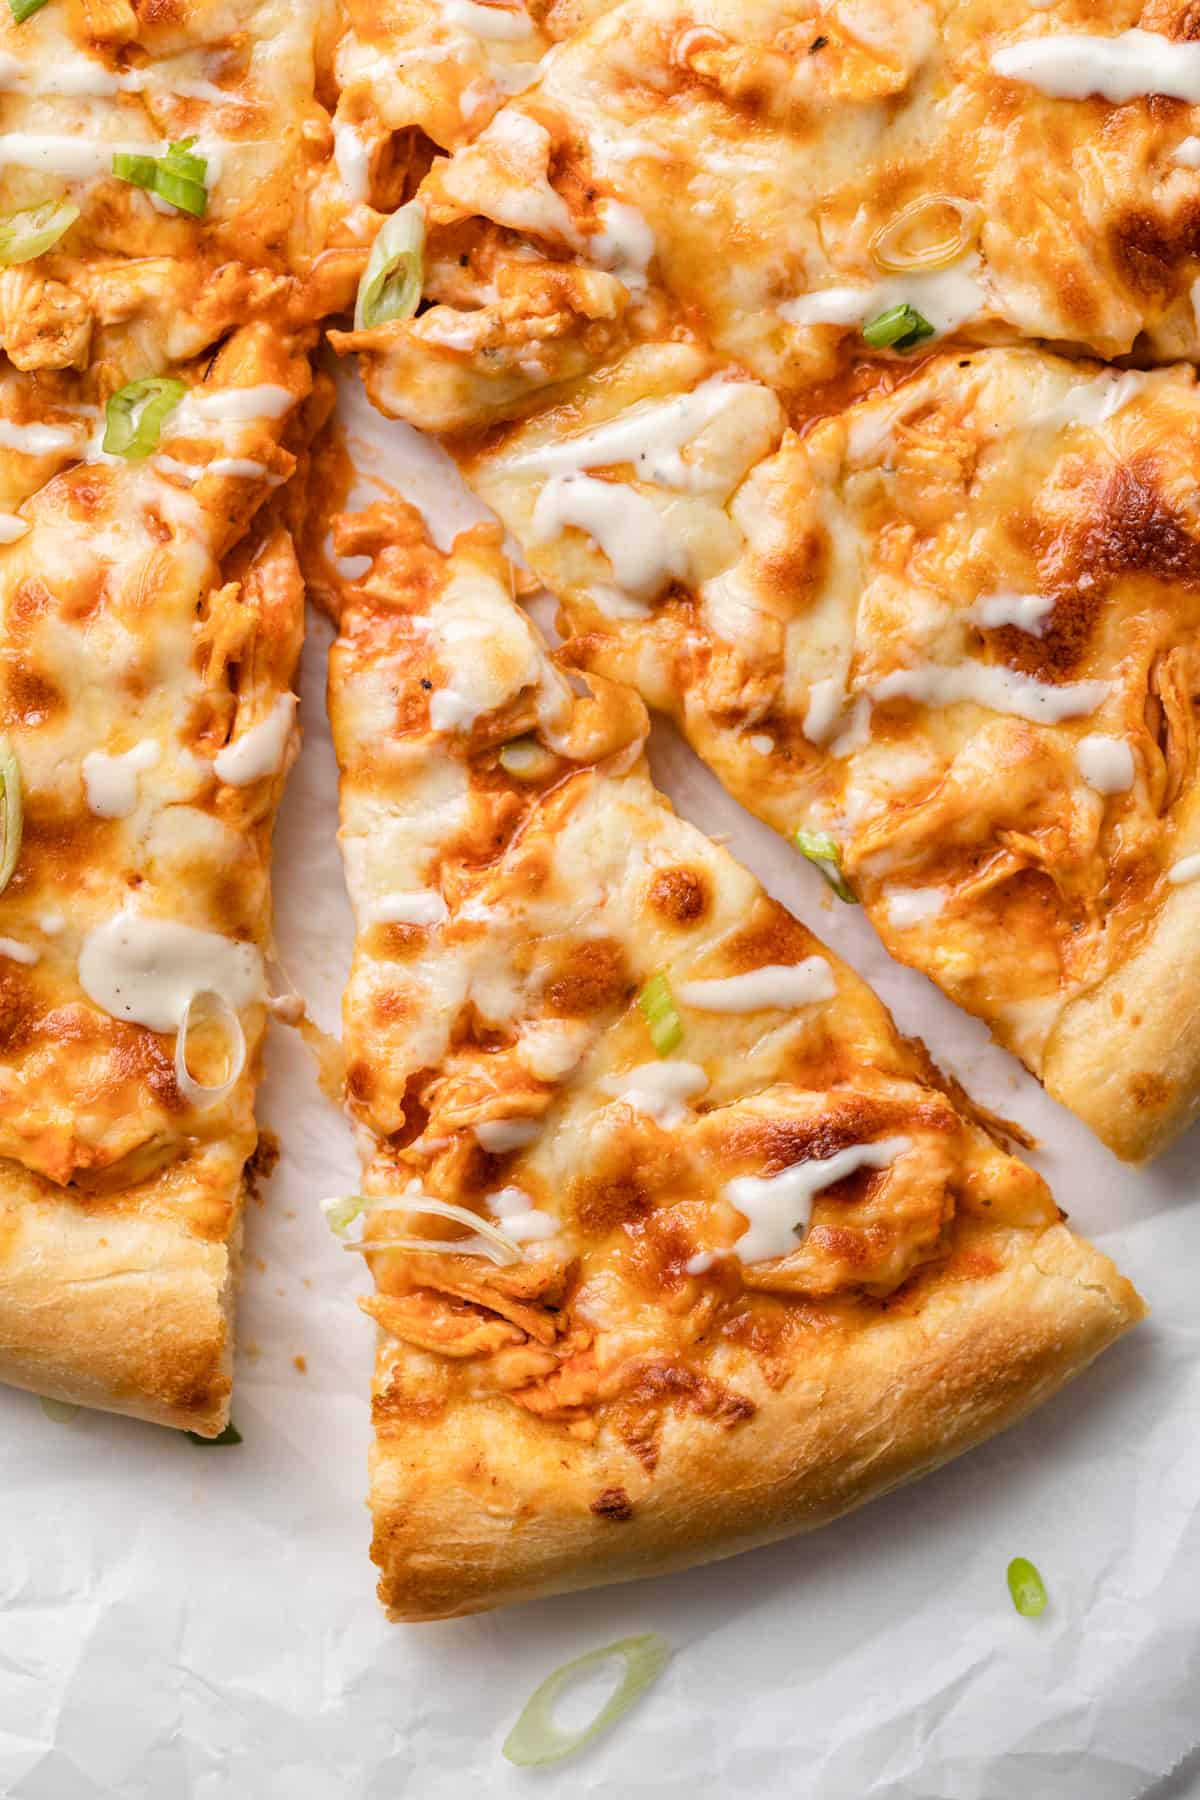
Soft, chewy, and incredibly delicious! You can enjoy a spicy sausage pizza or buffalo chicken pizza at home in just a little over an hour!
My homemade pizza crust recipe is the easiest because it’s made in a stand mixer. No kneading is required; the mixer will do all the work for you.
You will feel a sense of accomplishment once you’ve made your first pizza with this easy dough recipe. You will also never want to have your pizza any other way.
Another great thing about pizza dough is it can be frozen. You just have to let it thaw the night before and you’ll be able to get dinner on the table in a snap. This is convenient when you’re in the mood for bbq chicken pizza.
I’ll go over freezing pizza down later in the post.
Why this homemade pizza dough recipe works
- The stand mixer does all the work! If you don’t have one, you can knead by hand.
- The recipe yields enough dough to make two 12-inch pizzas
- The right amount of moisture is added to create a soft dough that has a slight chew. The crust will become your new favorite part of the pizza!
- The crust is slightly sweet which makes it extra delicious. Trust me on this one!
- Brush garlic oil over the crust before adding the toppings for even more flavor.
- This dough also makes great breadsticks!

Easy Pizza Dough Recipe Ingredients
This is seriously one of the easiest recipes because the ingredient list is fairly short. They are all staples from the pantry which also make the recipe convenient. Let’s go over all the ingredients:
- Yeast: Use a whole packet of yeast. It’s about 2 and ¼ teaspoons.
- Sugar: Feeds the yeast and adds a very light sweetness to the dough.
- Water: Warm the water to 105-115°F. Don’t go any warmer than 120°F to avoid killing the yeast.
- Flour: When making pizza dough, I prefer unbleached flour. I don’t always have unbleached flour on hand, though. Bleached all-purpose flour will still give great results. It’s been tested and that’s what I used in the video above.
- Salt: Just a teaspoon for flavor.
- Olive oil: A little goes in the dough and a little goes over the dough before the toppings are added.
- Garlic: Completely optional but garlic powder adds so much flavor.
How to make Pizza Dough
If you have a stand mixer, this will be incredibly easy. It’s basically a dump and turn on the mixer type of recipe. You really can’t make any mistakes here. The recipe is practically fool-proof.
The Dough – The dough comes together easily. It doesn’t require any special techniques but a stand mixer is recommended. All the ingredients are added, then the mixer will do the hard work for you!
Step 1: Activate the yeast
Make sure the water is at the right temperature. It needs to be warmed to 105-115°F.
If it’s too cool the yeast won’t activate. If it’s too hot the yeast will die.
Stir the sugar and yeast into the warm water and let it sit for 5 minutes. It should look creamy and foamy on the top.
If yours doesn’t look this way, toss it and start again with fresh yeast.
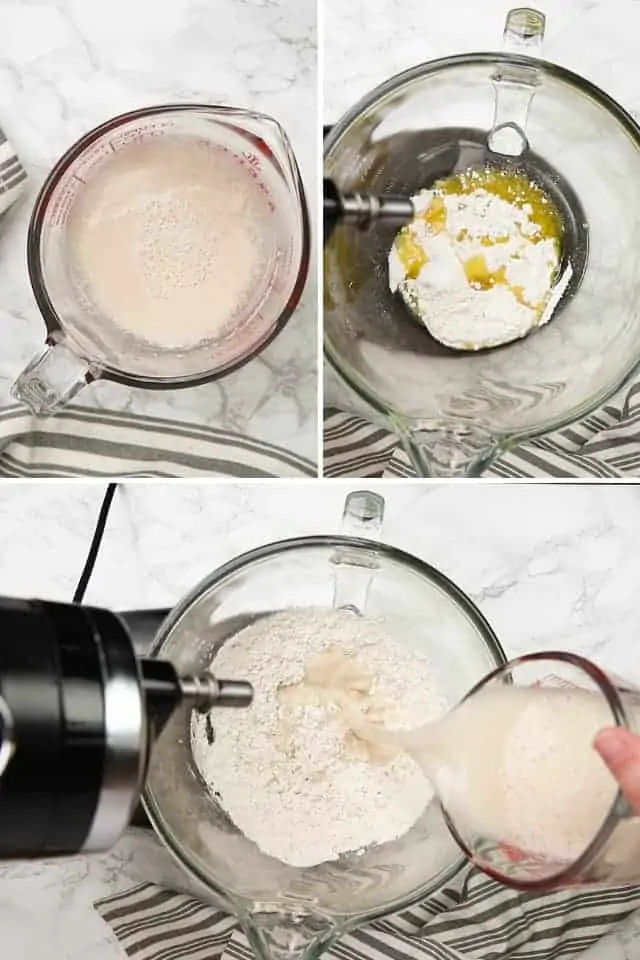
Step 2: Make the dough
Add 1 cup of flour, salt, and olive oil to the bowl of a stand mixer. Give it a stir with a whisk.
Stir the yeast mixture one more time and add it to the bowl with the flour mixture. Use a whisk to stir everything together.
Add the remaining flour and attach the dough hook to the mixer.
Turn the mixer to low speed and let it mix for 20 minutes. It seems like a long time but trust me.
The dough is done when it comes together and no longer sticks to the sides of the bowl.
Don’t rush the mixing process and refrain from adding additional flour. The dough will be slightly tacky when it’s finished but shouldn’t feel wet.

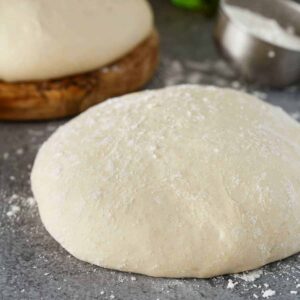
Step 3: Proof the dough
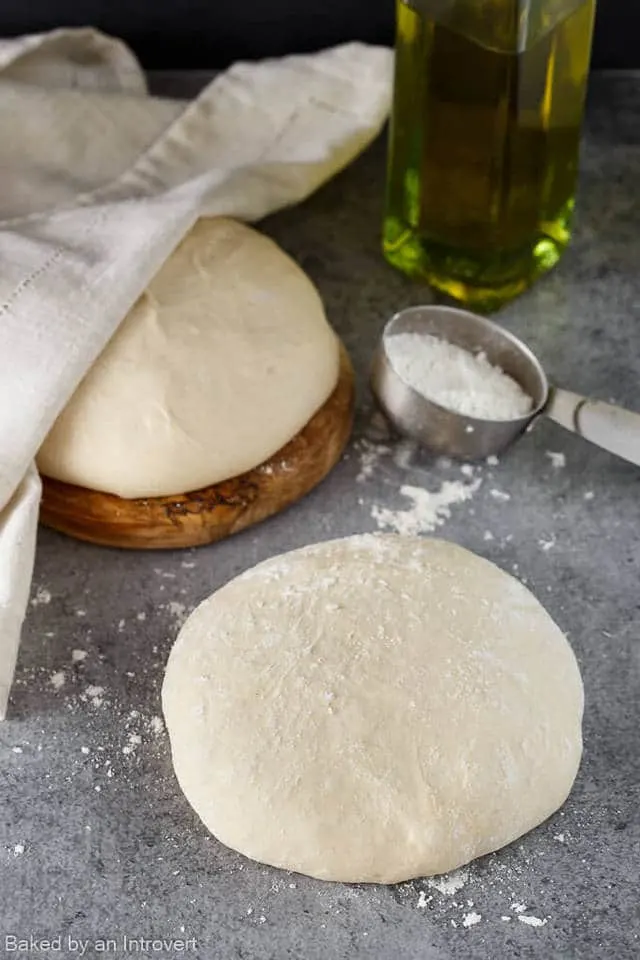
Lightly grease your hands with oil or cooking spray. Scrape the dough out of the bowl and shape it into a ball.
Place the dough in a large bowl that has been lightly greased with oil. Give the dough a couple of turns so the outside is coated in the oil from the bowl.
Cover the bowl with plastic wrap and place it in a warm, draft-free place to rise until it’s doubled in size. This can take up 45 minutes to 1 hour.

Step 4: Shape the dough
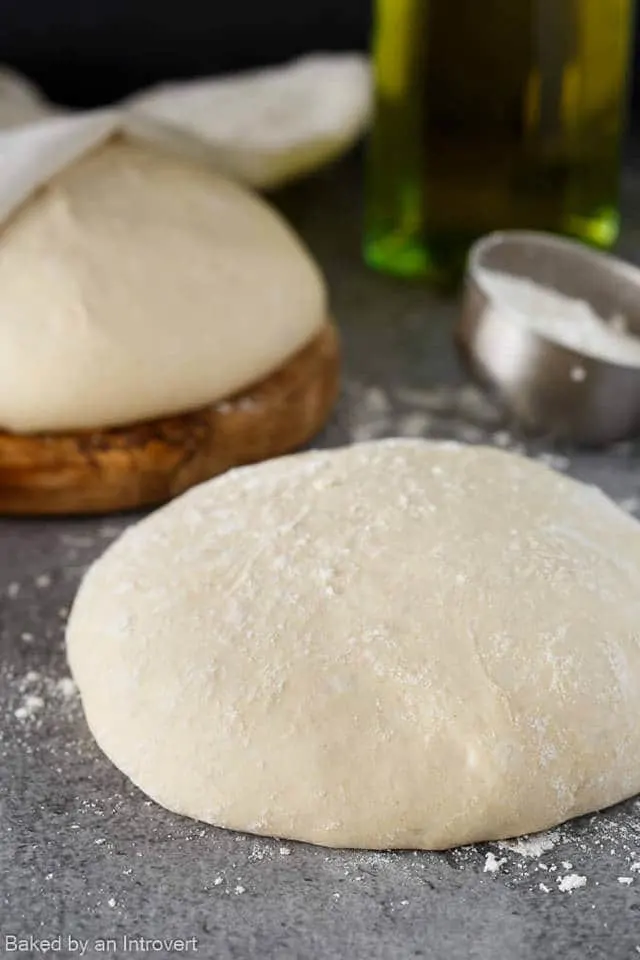
Gently press your fist into the center of the dough to release some of the air then turn it out onto a lightly floured surface.
Cut the dough in half. Cover each half with a lint-free towel and let them rest for 5 minutes.
Letting the dough sit like this for 5 minutes will allow the gluten to relax. This makes it easier to stretch the dough without it shrinking back.
Working with one piece of dough at a time, roll or gently stretch the dough out into a 12-inch circle. You can do this directly on a pizza pan, or pizza peel. Dust them with a little cornmeal to prevent the dough from sticking.

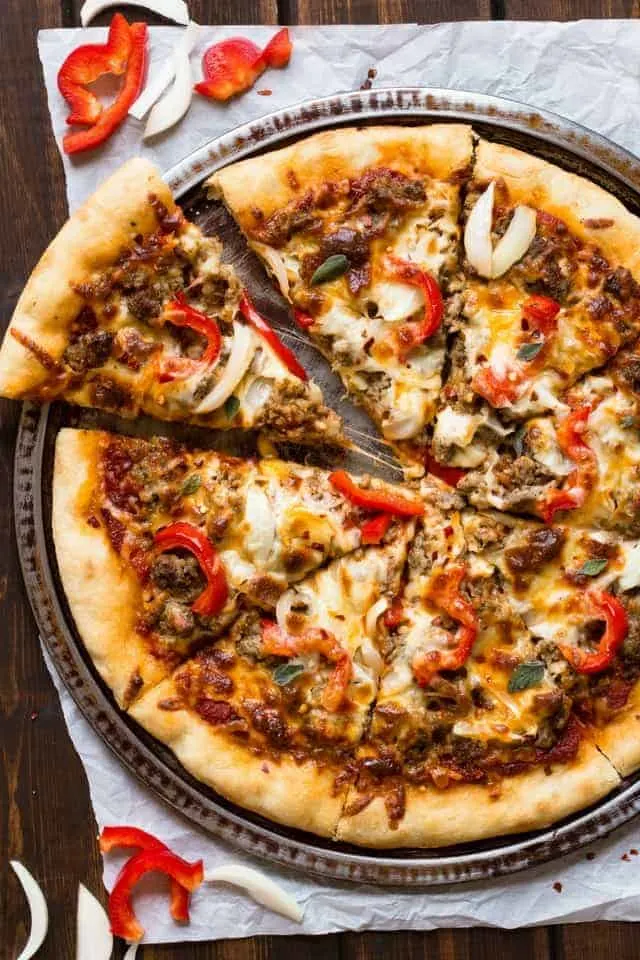
Step 5: Add topping and bake
I like to brush the top of the crust with garlic oil before adding the toppings. Just mix 1 tablespoon of olive oil with 1 teaspoon of garlic powder. Brush it evenly over the entire pizza dough.
Spread ½ cup of your favorite pizza sauce over the dough but leave a 1-inch bare rim around the edge.
Sprinkle 1-2 cups of your favorite shredded cheese. I prefer to use mozzarella cheese for a classic pizza topping.
Add up to 2 cups of your favorite toppings. Don’t go overboard with the toppings. Adding too many can cause the crust to become soggy. This is especially so if you are using all vegetables.
Bake the pizza at 475°F for 15-17 minutes, rotating halfway through, until the crust is golden brown and the cheese is fully melted.
Tips for freezing homemade pizza dough
- To freeze the dough, portion the dough out and coat it well with olive oil. Slip it into a zip-top freezer bag and seal it while squeezing all the air out. Try to get as much air out of the bag as you can.
- The dough can be frozen for up to 3 months!
- When you are ready to use it, thaw in the refrigerator overnight. Then, let it sit on the counter for 30 minutes just before you’re ready to make the pizza.
Homemade Pizza Dough
Ingredients
- 2 ¼ teaspoons active dry yeast, 1 packet
- 2 teaspoons granulated sugar
- 1 ¼ cups (300 ml) water, warmed to 105-115°F
- 3 ⅔ cups (476 g) all-purpose flour, plus more shaping
- 1 teaspoon salt
- 2 tablespoons extra-virgin olive oil, plus 1 tablespoon
- 1 teaspoon garlic powder, optional
Instructions
- Combine the yeast, sugar, and warm water in a small bowl. Stir to dissolve the yeast and set aside for 5 minutes. The yeast mixture should look creamy and foamy on the top.
- In the bowl of your stand mixer, combine 1 cup of the flour, salt, and 2 tablespoons of the olive oil.
- Stir the yeast once more to make sure it is all dissolved and add it to the flour mixture. Mix together with a hand whisk until lump free. Add the remaining flour and attach the dough hook to the mixer.
- Turn the mixer on low speed and mix for 15 -20 minutes, until the dough comes together and begins to pull away from the sides of the bowl. It takes time for the dough to come together. Don’t rush it and refrain from adding more flour. The dough should be slightly tacky once it’s finished kneading.
- Lightly coat a bowl with olive oil. With lightly greased hands, scrape the dough out and shape it into a ball. Place the dough into the greased bowl and gently roll it around to coat all sides of the dough ball with oil. Cover with a lint-free towel and place the dough in a warm place to rise until doubled in size, about 45 minutes.
- Gently punch the dough down and turn it out onto a lightly floured surface. Divide the dough into 2 equal halves. Shape each half into a ball, cover and let rest for 5 minutes.
- Roll the dough out into a 12-inch circle. You can also do this directly on your pizza pan. If you are using a pizza stone, do this step directly on your pizza peel. Spray your pizza pan with non-stick spray and dust lightly with flour or cornmeal. Once you’ve shaped the dough, gently transfer it to your prepared pizza pan.
- Using the remaining Tbs of olive oil, brush the top of the pizza with the oil. (For a more flavorful option, stir 1 tsp of garlic powder into the oil.)
- Top with your favorite toppings and bake at 475°F for 15-17 minutes, rotating halfway through, until the crust is golden brown and the cheese is fully melted.
Notes
- Use proper measuring techniques to measure the flour. Don’t scoop the flour out with the measuring cup! Instead, lightly spoon the flour into the measuring cup then level it off with the back of a knife. OR weigh the flour.
- The dough freezes well. Prepare through step 6 then brush a light coating of olive oil all over the dough. Wrap the dough in plastic wrap and then place it in a resealable freezer bag. Squeeze all of the air out of the bag and freeze for up to 3 months. Thaw in the refrigerator overnight then let the dough come to room temperature for about 30 minutes prior to using.
Nutrition
The nutrition information provided is for convenience and as a courtesy only. It is not guaranteed to be accurate because nutrition information can vary for a variety of reasons. For precise nutritional data use your preferred nutrition calculator and input the exact ingredients and brands you used in the recipe.
This is by far my favorite pizza dough recipe! Turns out perfect every single time!!!
Please add picture of crust from the side…I would like to see the texture. I am looking for a crust similar or same as Papa Johns or Costco type texture…thx
There’s a video that shows the texture of the crust once it’s baked.
Hello?
Should i preheat the oven before i put the pizza?
Always.
I made this in my brand new stand mixer and the dough had no elasticity. It broke immediately on stretching so I never even baked it.No idea what I did wrong….
First, weigh the ingredients so you know you are using the exact quantities called for. Then, make sure you are letting the mixer run on low speed for 15-20 minutes. This is the mixer kneading the dough and will make it the proper elasticity. If you are using a KitchenAid, the lowest setting is actually a stir setting. You want to use one notch higher.
Jennifer, I am planning on making this pizza dough this Saturday for dinner. With that said, how long can the dough be out on counter before baking pizza? Should I wait and make the dough later in the day? This has always been a puzzling question because I like to do prep earlier in the day and be done with it. Looking forward to your response. Thanks JK
It takes about 45 minutes for the dough to rise. It will need to be baked after that.
This was the first dough recipe I tried that I was able to use just half of it for one full-size pizza. I usually need to use the entire batch, even though they say to divide it in two. Otherwise, I can’t roll it out enough to make a 12-inch pizza. But this one, rolled out so easily. On top of that, I could easily side it on and off the pizza peel to and from the stone. I’ve never been able to do that before! Always had to resort to parchment paper. I’m sure the previous failings have been mine, but for some reason this particular recipe let me overcome those problems.
Yay! I use this recipe all the time for homemade pizzas so I’m thrilled to hear you loved it as much as I do!!
This was the first dough recipe I tried that I was able to use just half of it for one full-size pizza. I usually need to use the entire batch, even though they say to divide it in two. Otherwise, I can’t roll it out enough to make a 12-inch pizza. But this one, rolled out so easily. On top of that, I could easily side it on and off the pizza peel to and from the stone. I’ve never been able to do that before! Always had to resort to parchment paper. I’m sure the previous failings have been mine, but for some reason this particular recipe let me overcome those problems.
Yay for pizza success!
I’m sorry you had issues with the dough being too dry. I make pizzas all the time using my recipe and it has never failed me so I know the recipe works. The common mistake is people really don’t know how to properly measure flour. You can’t just scoop it out with the measuring cup because flour compacts and you’ll end up with way more than you need. There is a toggle above the ingredients for metric ingredient amounts so you can use weight measurements. I also have an entire post dedicated to How to Measure Flour properly so you can have success with every one of my recipes.
This recipe worked perfectly the first time. It was easy to make the dough. It rolled out very easily I’ve had trouble with other recipes with the dough being too elastic to roll out. It was also not too sticky. Perfect and made delicious pizzas. We baked them on the grill and that gave them a nice brown crispy crust but the top was still soft and chewy.
This recipe worked perfectly the first time. It was easy to make the dough. It rolled out very easily I’ve had trouble with other recipes with the dough being too elastic to roll out. It was also not too sticky. Perfect and made delicious pizzas. We baked them on the grill and that gave them a nice brown crispy crust but the top was still soft and chewy.