Homemade English Muffins
This post may contain affiliate links. Read the full disclosure here.
This Homemade English Muffins recipe is so much easier than you think! It’s so simple and will give you soft, chewy muffins in no time. Enjoy them with butter or your favorite jam!
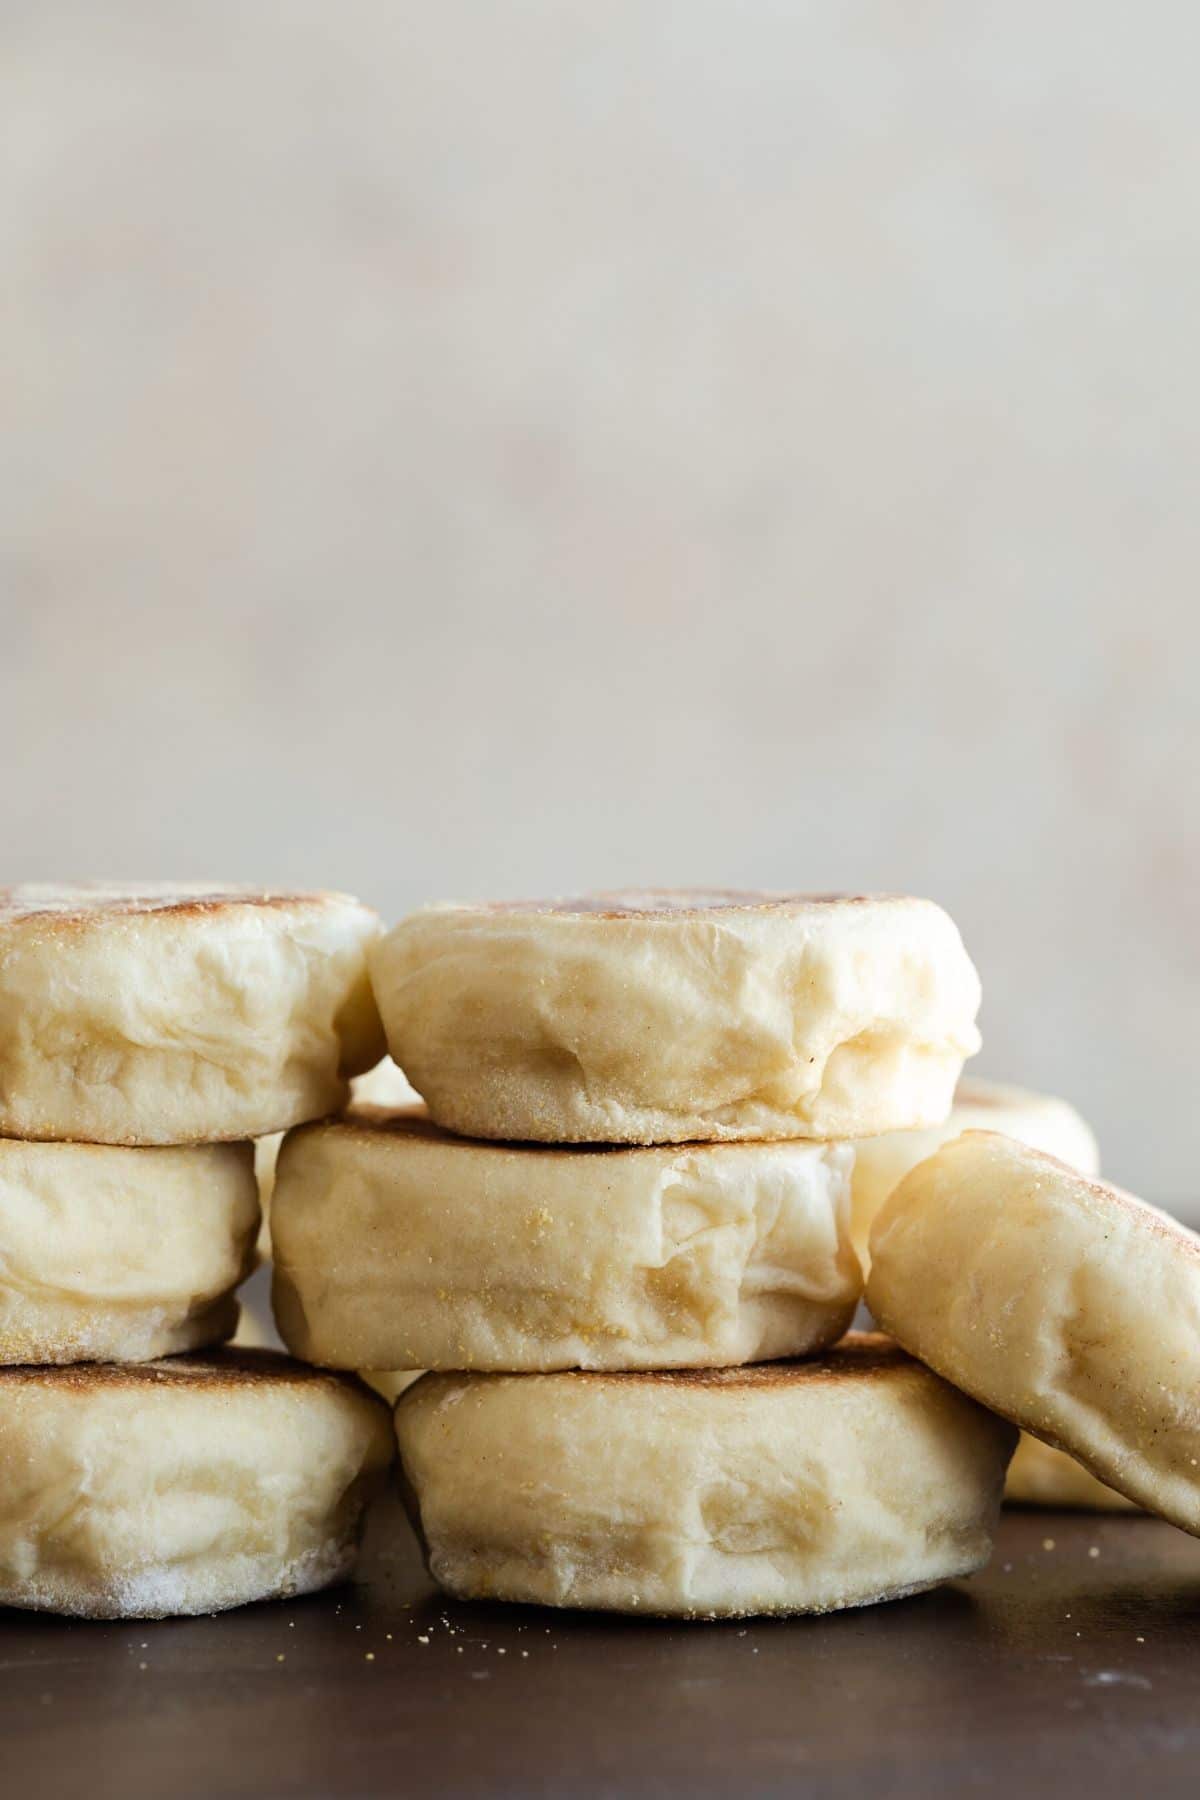
Homemade English Muffins Anyone Can Make
This recipe turned out to be a winner and it’s actually quite simple. Simply mix the ingredients in a stand mixer and let the dough rise, then shape and cook. If you’re looking for a whole wheat version, try my 100% whole wheat English muffins.
Who doesn’t love a toasted English muffin for breakfast?
Unlike banana bran muffins and cinnamon raisin muffins, English muffins are leavened with yeast. They are typically served sliced and toasted with a sweet or savory topping. You can even make sandwiches with them.
With this tutorial, you can make English muffins at home any time you want.
Why this Homemade English Muffins recipe works
- Bread flour is used to give the muffins a chewy texture.
- The dough is sticky! A sticky dough means there’s optimal hydration to yield nooks and crannies that English muffins are known for.
- The muffins are toasted on the stovetop then baked in the oven. Baking them ensure the middle is completely done.
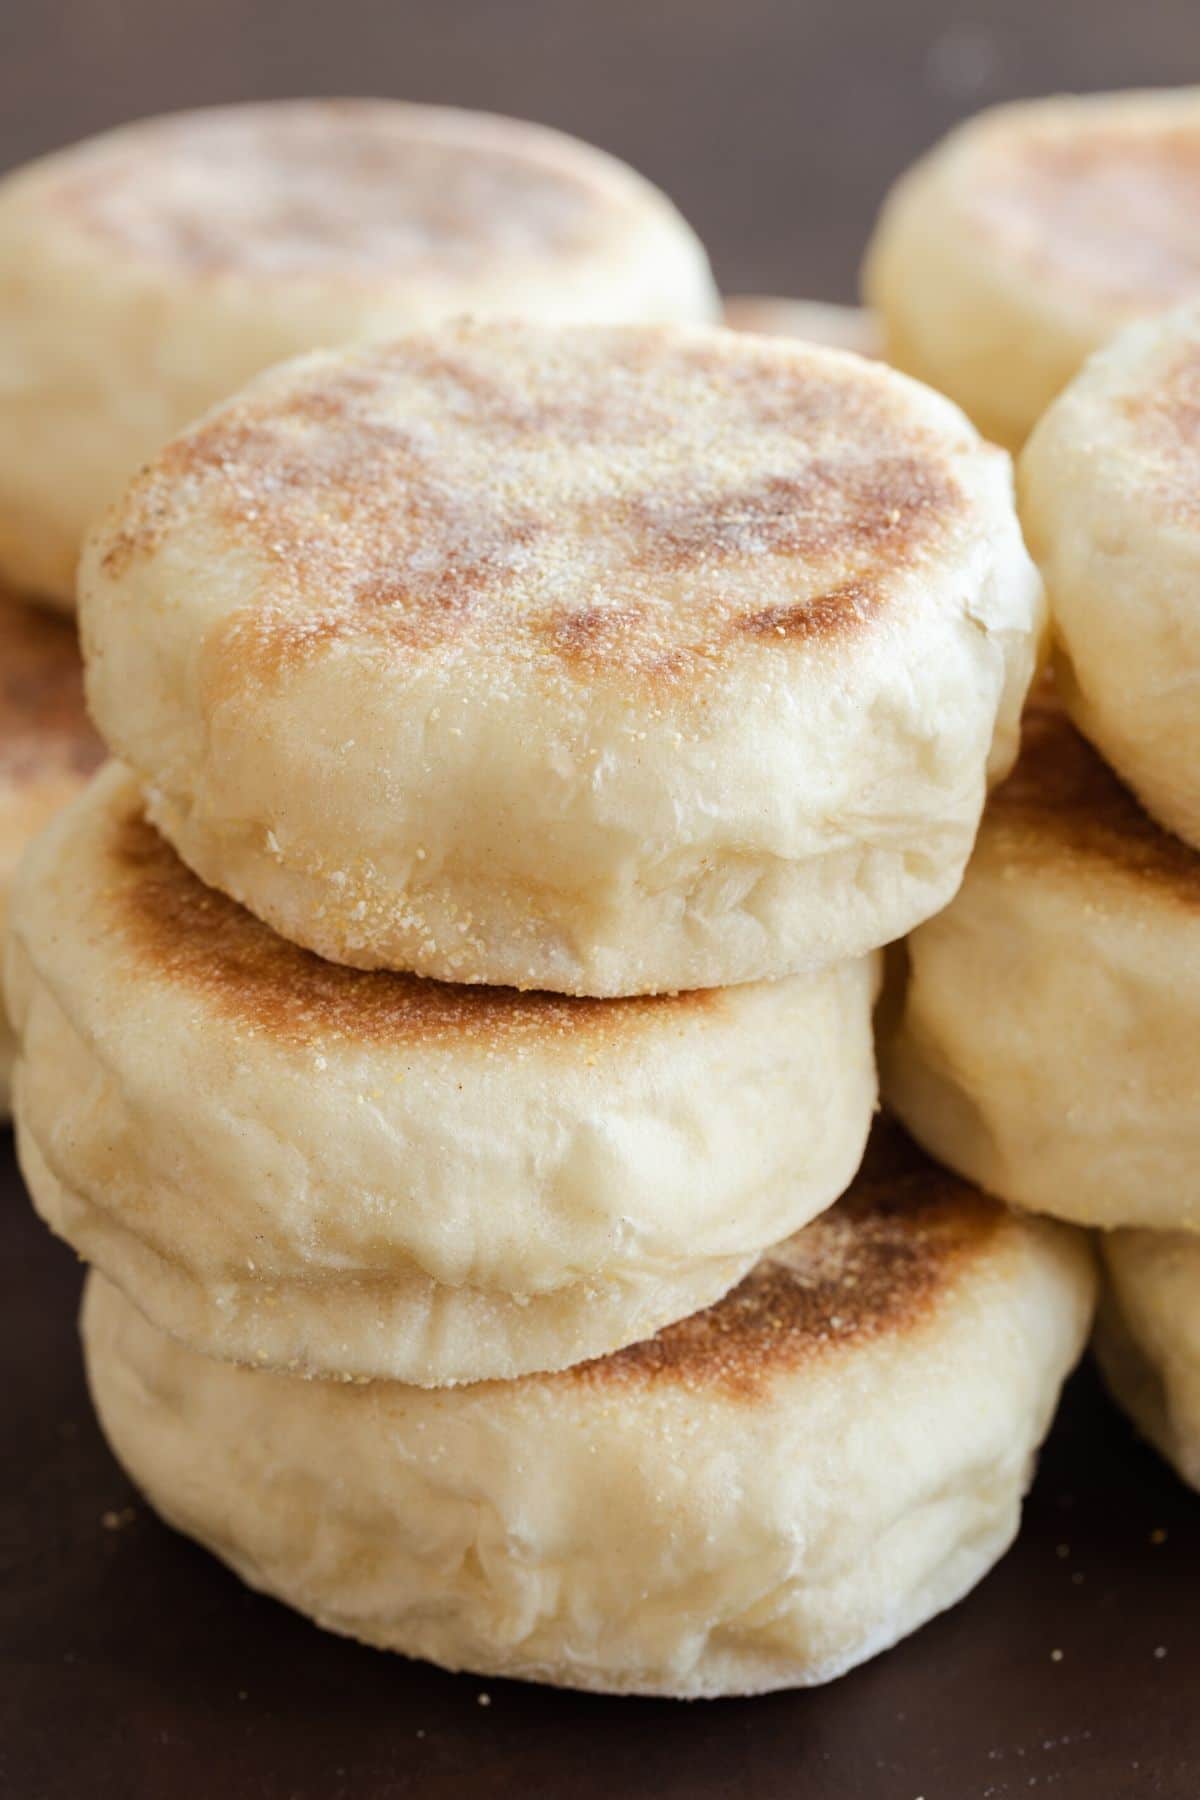
How to make English Muffins
The dough needs two rises. Once right after it’s prepared and once after it’s divided and shaped into English muffins. Let’s go over how to make it. Or you can scroll all the way down to get the full printable recipe with ingredients.
The Dough – This dough recipe is soft and chewy. It’s a basic dough recipe using flour, yeast, milk, sugar, and salt. The dough will be sticky but avoid excess flour. This sticky dough will yield muffins filled with nooks and crannies.
Here’s how to put it together…
Proof the yeast. Warm milk and honey to 105-115°F. Stir in the yeast and set aside for 5 minutes. Then whisk in egg and butter.
Make the dough. Use a stand mixer to make it easier since this dough will be sticky. With the dough hook attached, mix flour and salt together then gradually pour in the yeast mixture. Let the dough mix for about 4 minutes until it turns smooth but is still sticky.
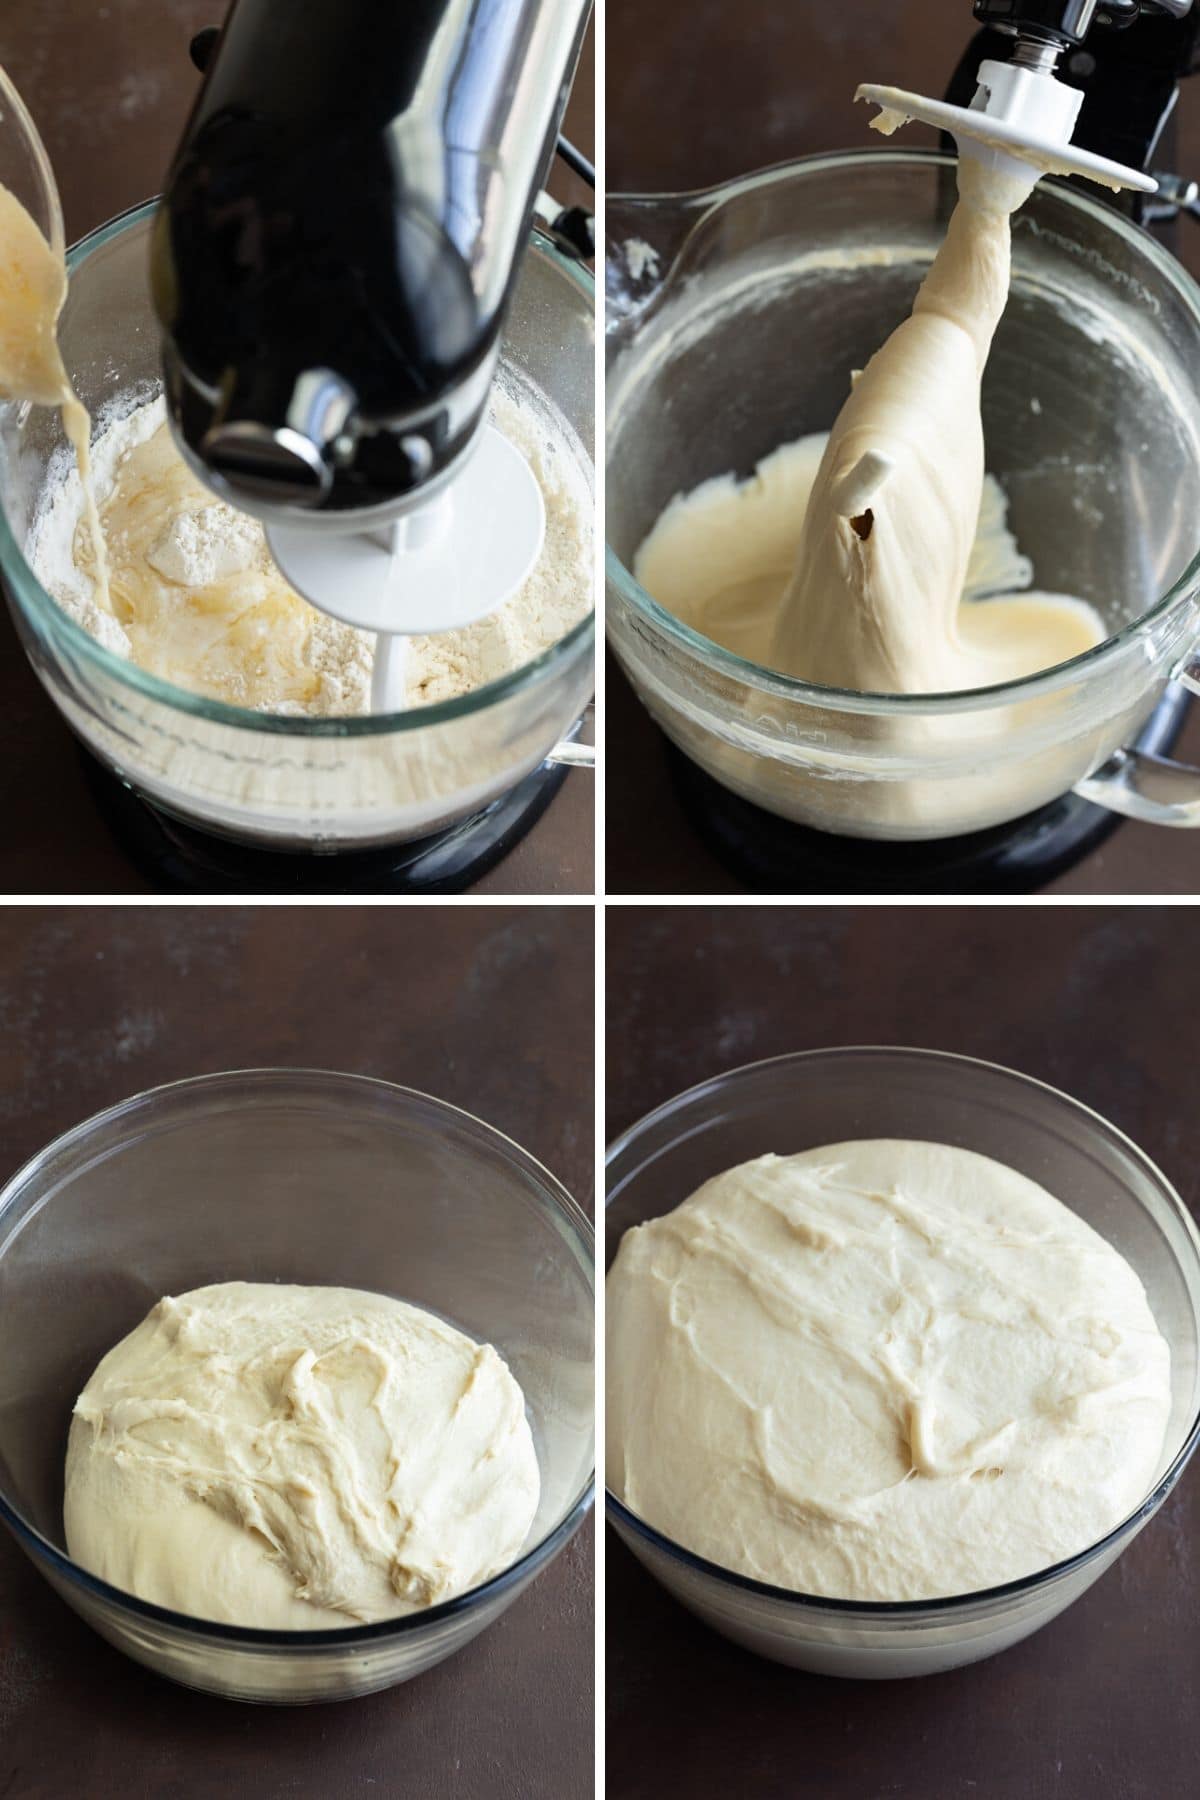
Proof the dough. Scrape the dough into a lightly greased bowl, cover it with plastic wrap and let it rise in a warm place until it’s doubled in size. This can take about 45 minutes to 1 hour.
Divide the dough. Turn the dough out onto a lightly floured surface and divide it into 16 equal-sized pieces. Or you can pinch off pieces of dough and weigh them for more uniform muffins. Each piece of dough should weigh about 78 grams.
You can make smaller muffins by dividing the dough into 22 pieces, each weighing about 57 grams.
Shape the dough. Roll each piece of dough into a ball then flatten the ball into a disk.
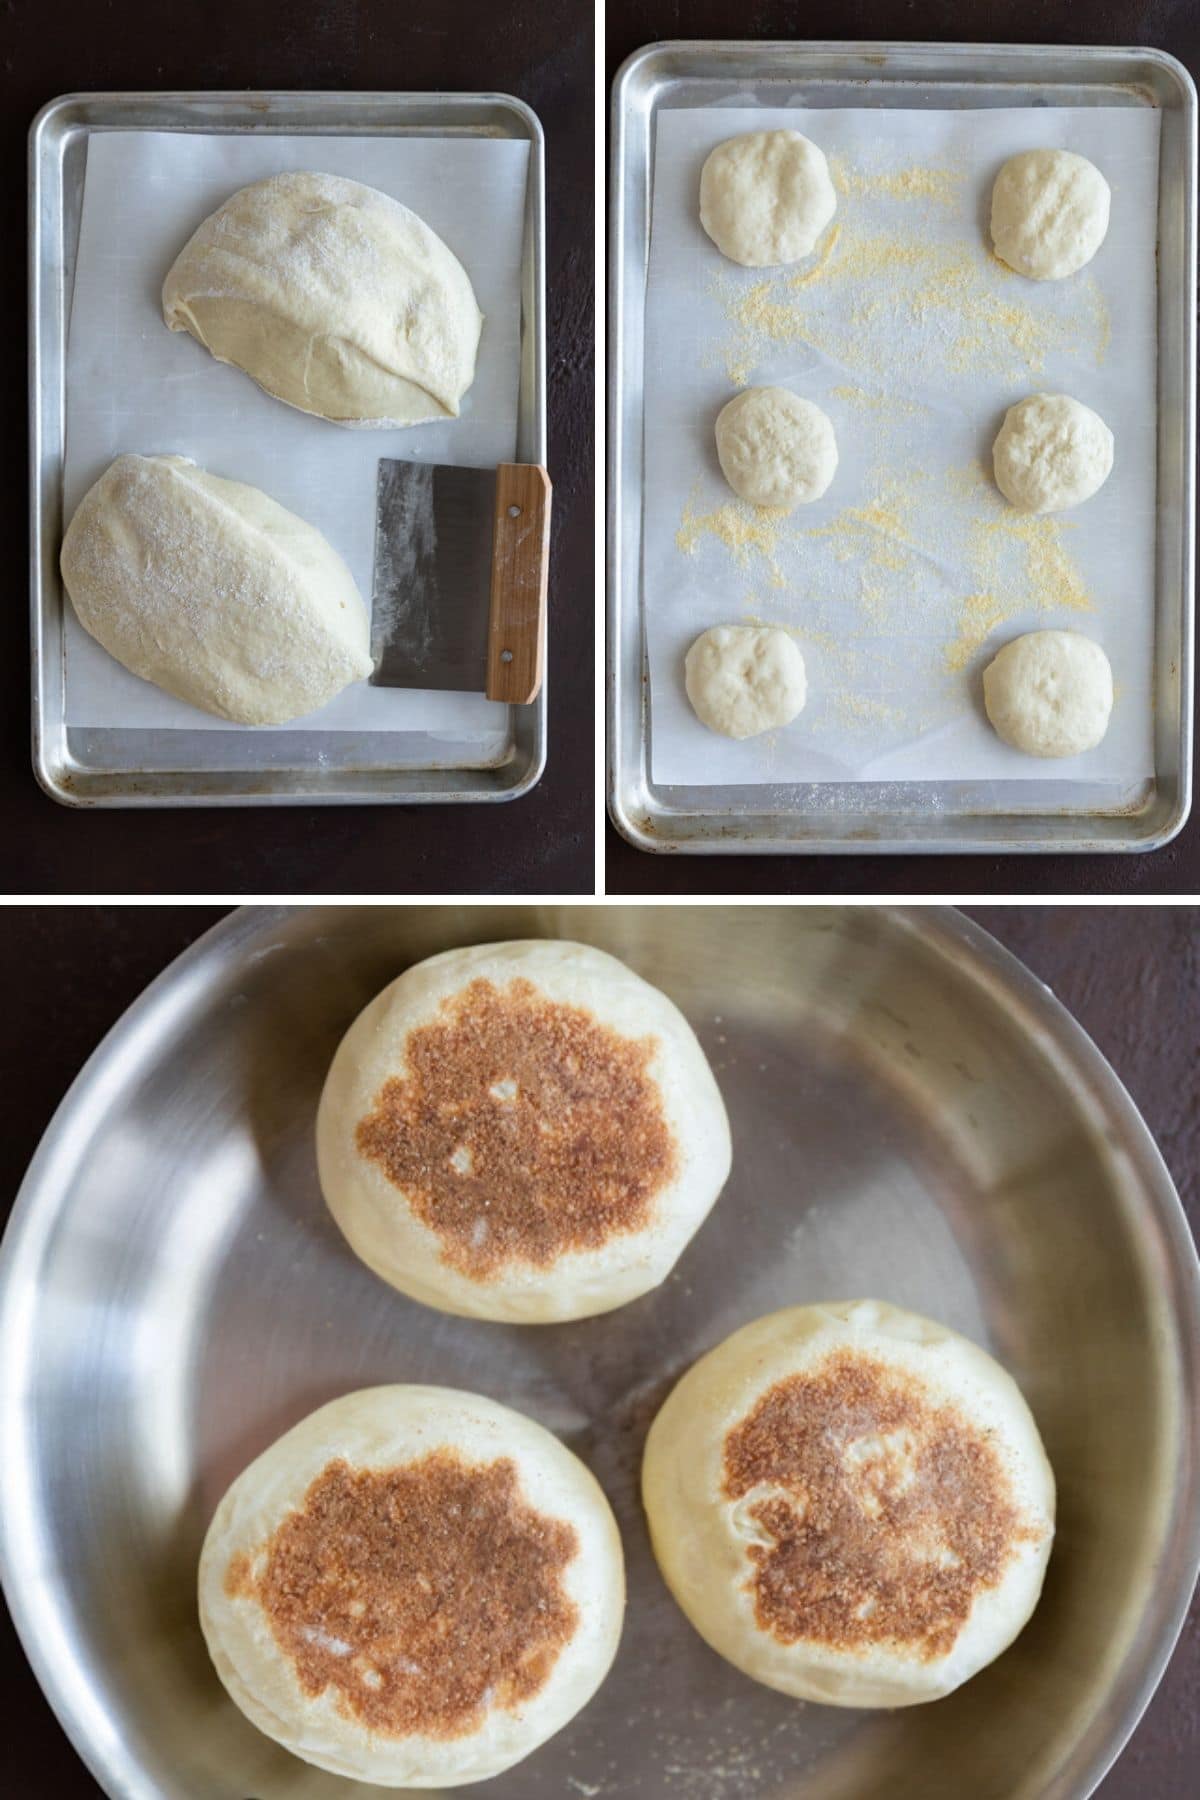
Rise again. Place the disks of dough on baking sheets with parchment paper that has been sprinkled with cornmeal. Sprinkle more cornmeal over the top and cover them with a lint-free towel. Let the dough rise in a draft-free area for 1 hour, until doubled in size.
Cook. On a griddle over medium-low heat, brown both sides of each disk of dough. Return the muffins to the baking sheet and bake for 10 minutes.
Cool. Let the muffins cool completely before slicing or the centers will appear doughy. Once cooled, use a fork to split them open. You can toast them in a toaster or toaster oven and serve them with your choice of toppings.
How to store English Muffins?
Keep muffins in an airtight container at room temperature for up to 2 days or in the refrigerator for up to 5 days.
Can you freeze English Muffins?
English muffins freeze well for up to 3 months. Thaw overnight in the refrigerator then warm before serving.
How to toast English Muffins?
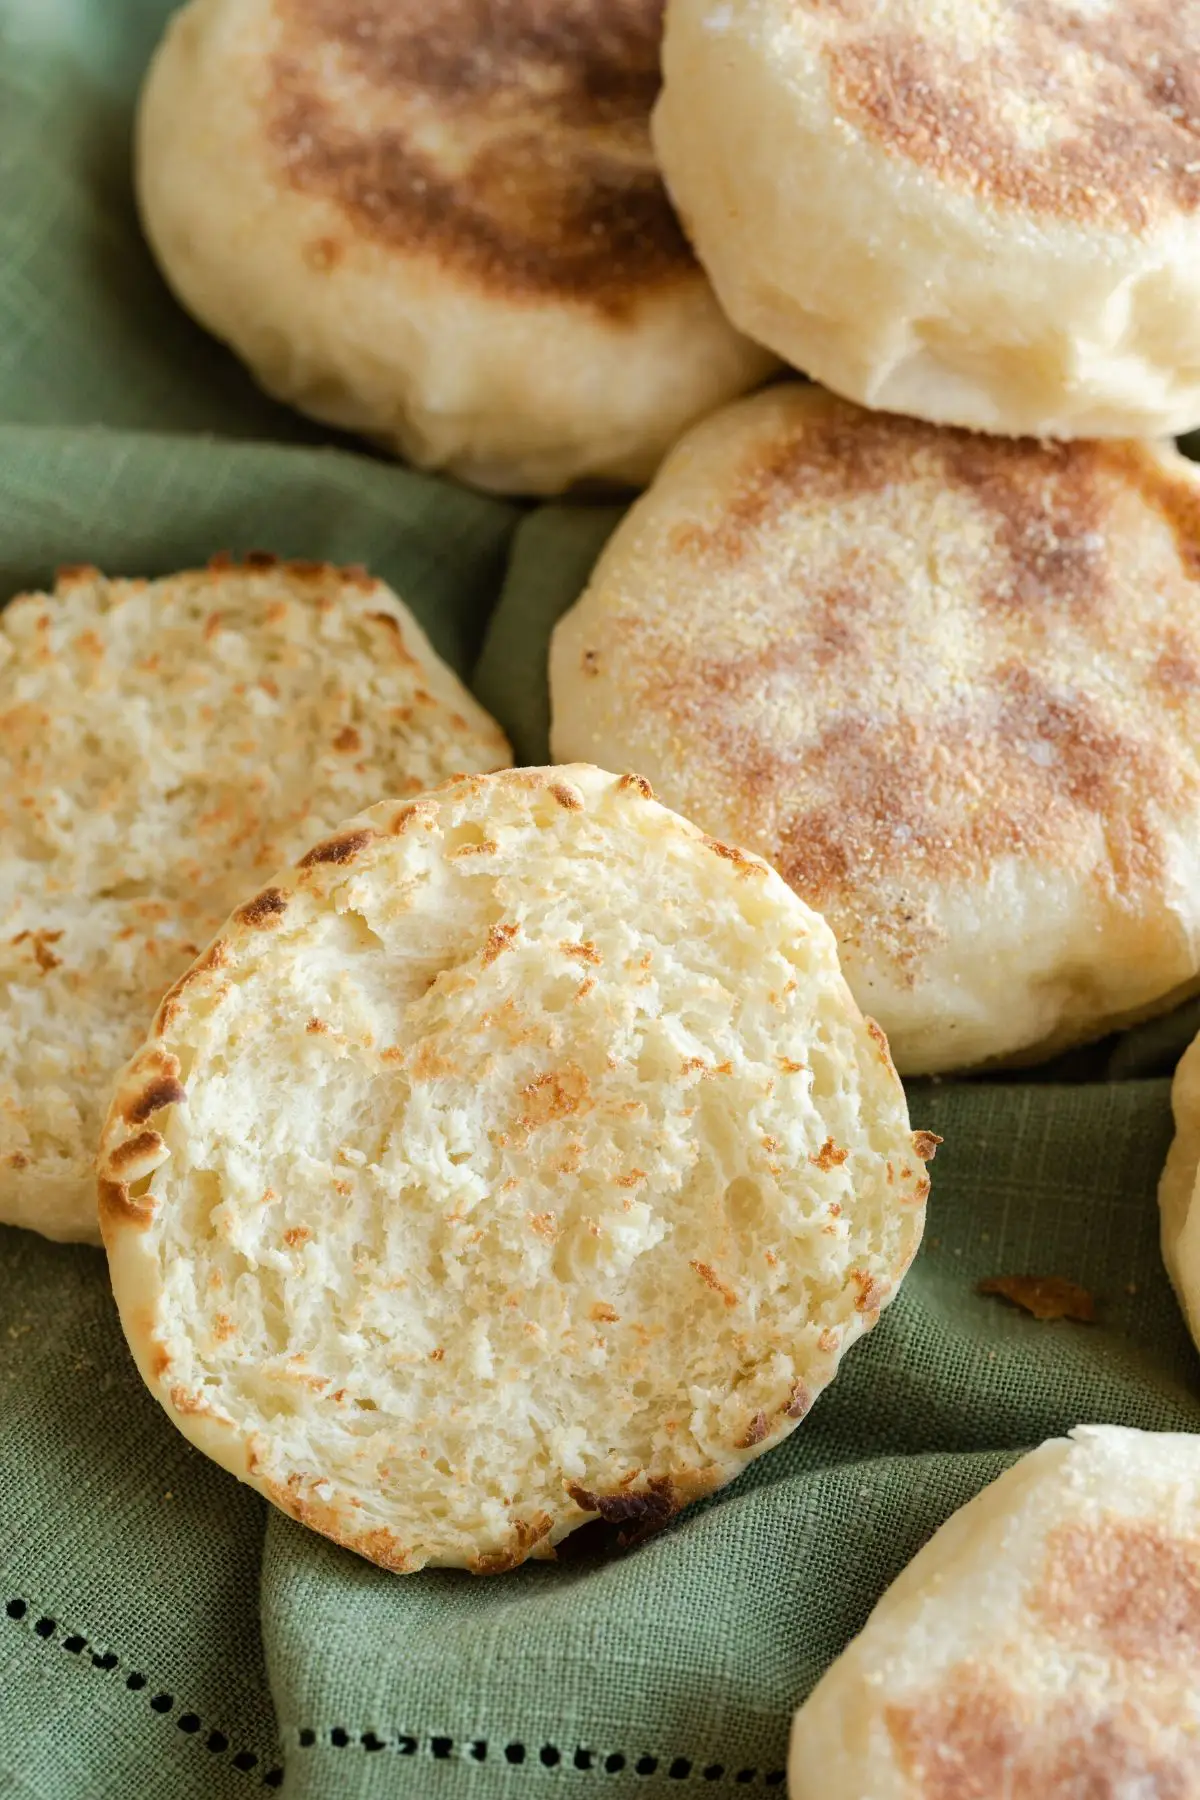
Split the muffins open with a fork. This guarantees nooks and crannies! Place each half of the muffin in a toaster and toast until the edges are lightly browned. The end result will be a crunchy and chewy texture. YUM!
If you like this English Muffin recipe, try these other breakfast recipes:
Homemade English Muffins
Ingredients
- 2 cups (480 ml) whole milk
- 3 tablespoons honey
- 2 ¼ teaspoons active dry yeast, 1 packet
- 1 large egg
- 4 tablespoons unsalted butter, melted
- 5 cups (650 g) bread flour
- 1 ½ teaspoon salt
- cornmeal, for dusting
Instructions
- In a small saucepan, heat the milk and honey over low heat until it reaches 105-115ºF. Remove from heat, stir in the yeast, and set aside for 5 mins. Whisk in the egg and melted butter.
- Add the flour and salt to the bowl of a stand mixer. Fit the mixer with the dough hook attachment. with the mixer on low speed, gradually pour the milk mixture into the flour.
- Continue to beat on low until the flour is incorporated, stop and scrape down the sides and bottom as needed. Turn the speed up to medium and mix for about 4 minutes, until the dough clears the sides of the bowl and is smooth and elastic. The dough should feel slightly tacky when gently pressed with your fingertip.
- Scrape the dough out into a lightly oiled bowl. Brush a little oil over the top of the dough. Cover and set in a warm place to rise for 1 hour or until doubled in size.
- Gently punch the dough down and turn it out onto a lightly floured surface. Gently knead the dough together into a ball and divide it in half. Divide each half into 8 equal-sized pieces. You should have 16 dough balls. (If you want smaller muffins, divide each half into 11 pieces to equal 22 dough balls.) Roll each piece into a ball and flatten the ball into a disk. (If the dough is too sticky, lightly oil your hands to make it easier to handle the dough.)
- Place the disks on a baking sheet lined with parchment paper that has been dusted with cornmeal. Sprinkle more cornmeal over the tops. Cover with a lint-free towel and set in a draft-free place for 1 hour, or until doubled in size.
- Preheat the oven to 325ºF.
- Heat a griddle over medium-low heat. Gently lift each disk with a plastic spatula and place it on the griddle. (Handle the dough with care so you don’t deflate it) Cook them for about 2 minutes on each side, until lightly browned on both sides. Work in batches.
- Place the muffins back on the cookie sheet and bake them for 10-15 minutes. The internal temperature should be about 200°F on an instant-read thermometer.
- Transfer the muffins to a cooling rack and let them cool completely.
- Split the English muffins with a fork and toast them a toaster until the edges are lightly browned. Serve warm with your favorite jam or butter.
Video
Notes
- Milk: I prefer using whole milk because it yields a rich, tender texture. Some readers have had success using almond milk, oat milk, and skim milk.
- Honey: If you don’t have honey or don’t want to use honey, you may use 1-2 tablespoons of granulated sugar in its place.
- Yeast: This recipe doesn’t call for proofing the yeast in water before you use it. It goes directly into the warm milk to proof. Because of this, it’s important to use brand new yeast that’s well within its expiration date. If you are worried about whether your yeast is good, you can add it to ¼ cup of warm water (105-115°F) with 1 teaspoon of sugar and let it sit for 5 minutes. If it foams, it’s good to use. Omit ¼ cup of milk (so you’d only use 1 and ¾ cups) and add the yeast mixture to the warmed milk mixture as you would in step 1.
- Flour: Bread flour yields the classic chewy texture and will give you the very best results. All-purpose flour may be used by keep in mind it contains less protein and the texture of the muffins may suffer.
- Shaping muffins: To get muffins that are uniform in size, I suggest weighing the dough. For 16 muffins, each portion of dough should weigh 78 grams. For 22 muffins, each portion of dough should weigh 57 grams.
- Muffins are good for up 5 days stored in an airtight container at room temperature or in the refrigerator.
- Muffins can also be wrapped in plastic wrap, sealed in a zip-top bag, and frozen for up to 3 months. Thaw overnight in the refrigerator and toast before serving.
Nutrition
Adapted from Laura in the Kitchen

I made these a couple of quarantine weeks ago and have made them 5 times since! They are that good – and easy.
The only thing I did differently was use buttermilk instead of regular milk because I like that flavor. Thanks for an amazing recipe! Some more are actually rising as we speak….
My husband loved these! Mine ended up needing extra time in the oven because they were massive but no one is complaining about that!
My first time making English Muffins. (I’m 83 years old!) True to the notes, it was a sticky dough and I had to add extra flour. They are cooling now, so they haven’t been tasted yet. They look authentic.
I’m on my third batch of these now and they are SO delicious. They have become a breakfast ritual for me now every morning (and sometimes an afternoon snack, too)! I highly recommend this recipe.
This is my go-to recipe for English muffins. I have make them many times and they always turn out great. I live in Costa Rica and don’t have access to bread flour, so I use 3 cups all-purpose and 2 cups whole wheat. Delicious!
Hi..Jen
I jesslyn may I ask if I use all purpose flour can make this muffin bun..
Bread flour will give you the best results. All-purpose flour is softer and will change the texture of the muffin.
These remind me of a product Freihofer Bakery in Albany, NY used to sell but I can’t find anywhere today. They were called “Australian Toaster Biscuits”. They were slightly sweet as these are, and when sliced with a sharp bread knife, you get a smooth inside surface (not the “nooks and crannies” as when you “fork” slice them) which takes to butter nicely and then your favorite jam or spread. Cinnamon Sugar is also great on them.
I made them today. They seemed to come out denser than I anticipated and no nooks and crannies. I did not weigh but measured the flour and did use bread flour. Great taste.
Any suggestions as I will make them again.
Weigh the flour to ensure you are not using too much. The nooks and crannies will happen if you split the muffins with a fork instead of slicing them with a knife.
I’m definite going to try this! Thank you.
Just one tip, from an English person old enough to have grown up enjoying traditional, rather formal, afternoon teas with family and guests on a regular basis: don’t split the muffins before you toast them, but afterwards. Just toast each side very lightly, then — as you rightly say — split them open with two forks and stuff them with butter. So much butter, in fact, that in runs down your chin as you eat! (Not easy to deal with politely when your grannie has you under her gimlet eye, searching for signs of misbehaviour such as the unforgivable faux pas of eating cake before your muffin!) Ideally, of course, you wouldn’t need to toast them at all but eat them fresh from the oven when, of course, the inside wouldn’t be toasted.
Anyway, that’s how we ate muffins. Others may have been different.
Only marginally less perfect than eating them straight from the oven is toasting them over the fire with a long toasting fork thrust up the middle of the muffin so you can toast each side. (Again, the inside isn’t toasted so you just split them as you would if they were freshly baked.)
There’s something about toasting muffins — and crumpets, and plain old toast — over an open fire that makes them taste extra special. I think it’s the blast of extra-high heat, a bit like the way naan bread tastes so good made in a proper tandoori oven.
Now, what about a recipe for crumpets too (the ones that are about 3 inches across) to go with the muffins to complete the perfect English winter’s afternoon tea, or substantial breakfast? Nothing cheers the soul on a British winter’s afternoon when it’s only four o’clock but it’s already beginning to get dark and the rain is sliding down the window but you have a blazing fire, a toasting fork and the delicious dilemma of whether to have a crumpet first or a muffin, both oozing with melting butter, and the prospect of a meringue filled with cream and some other delicious little dainty, or even just a good fruit cake, to follow. Bliss!
I’m half Scottish so I also love a perfect Scottish afternoon tea with scones — no cream, please, that’s an unnecessary English addition — and pancakes, the Scottish kind about the same size as crumpets, preferably with some home-made jam. Strawberry has its afiçonados, and raspberry, too, of course. But my favourite was always my grandmother’s rhubarb and ginger jam. Ooh, I can taste it now! Yummy! (I must try to find a recipe for it.)
Anyway, thank you for the recipe — I’m going to try it very soon — and for the nostalgic memories, too. Thank you.
I think the end product is worth the time, since I have so much of it to try new recipes right now. I’m an experienced baker and the directions were accurate and precise. I will be teaching my granddaughters using this recipe!