
Triple Chocolate Cheesecake
This post may contain affiliate links. Read the full disclosure here.
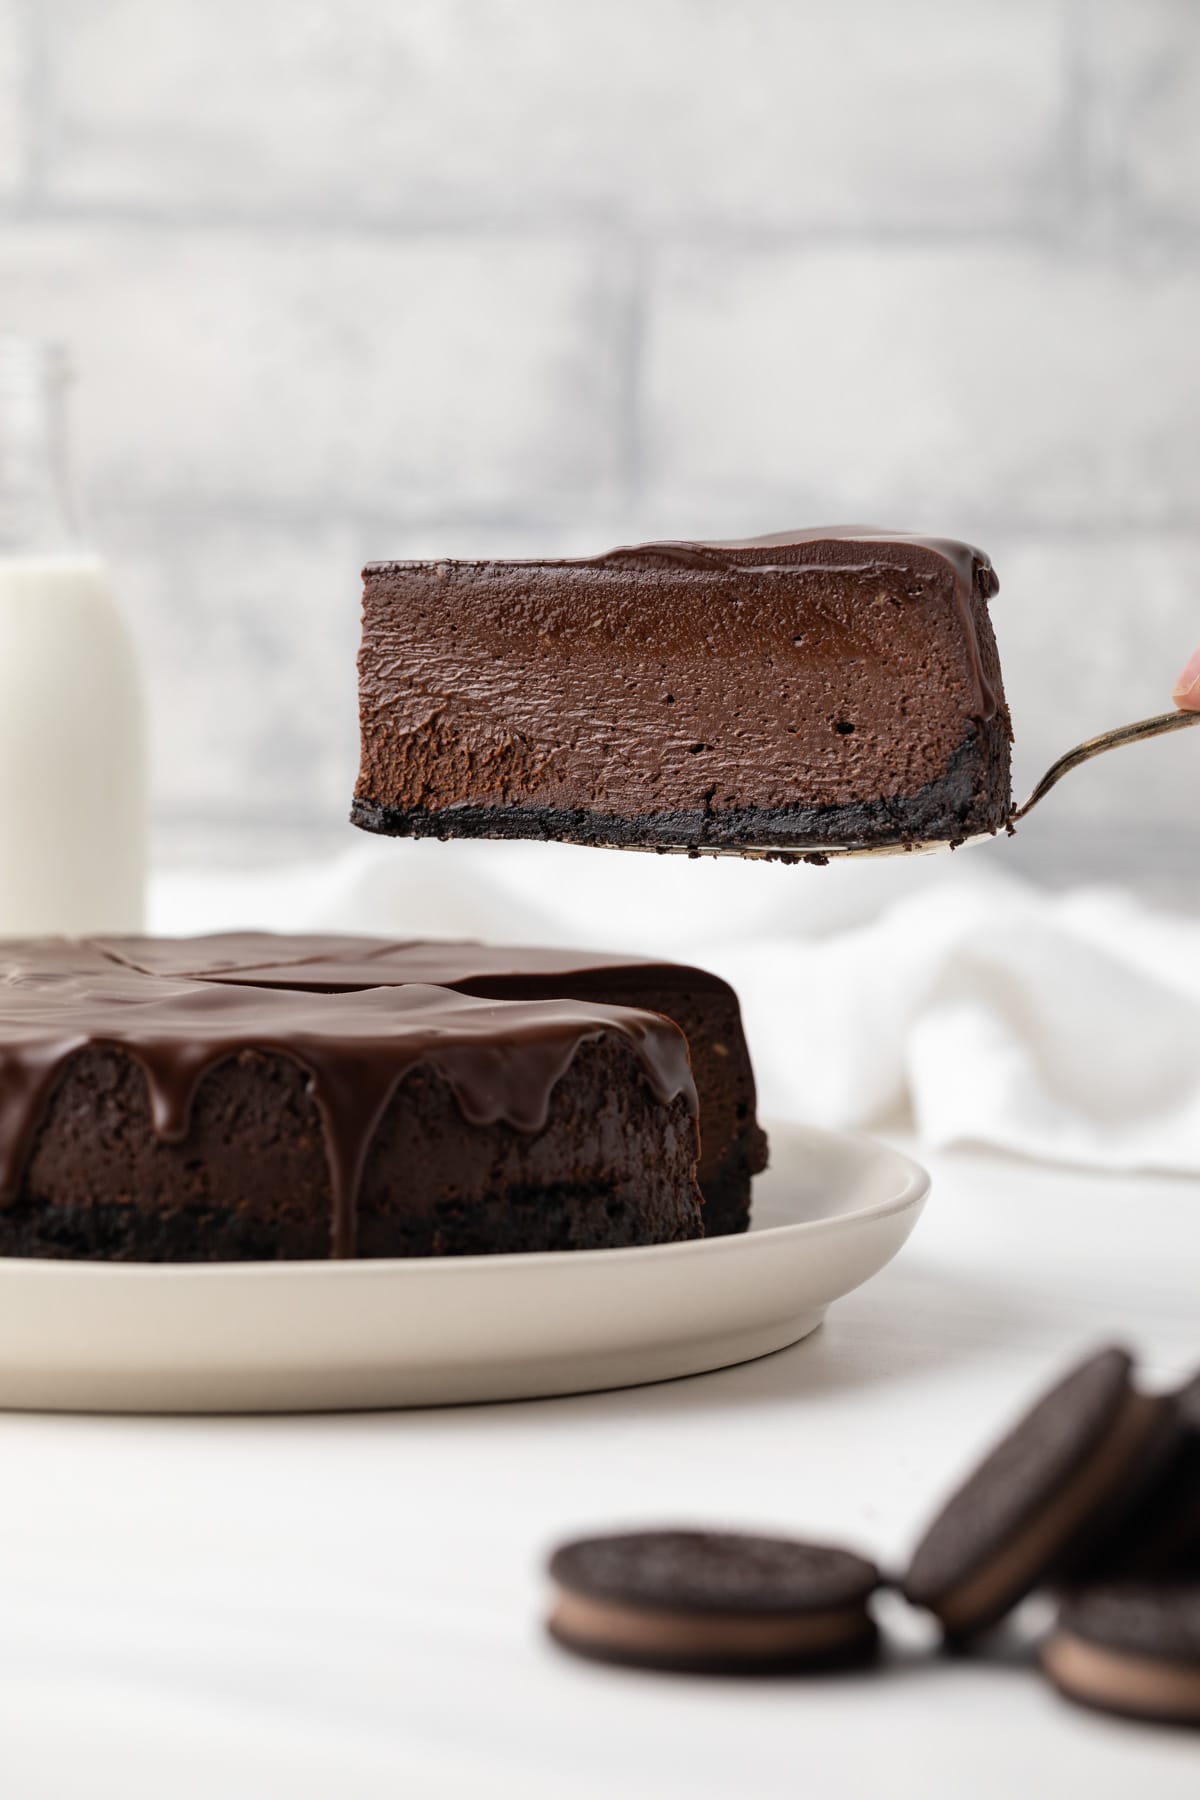
Triple Chocolate Cheesecake with an Oreo crust and a rich chocolate glaze is a decadent dessert that is ultra creamy and smooth. If you are a chocolate lover, this cheesecake with THREE different chocolate layers is for you!
Triple Chocolate Cheesecake
It’s no secret, I LOVE cheesecake.
There is an ever-growing archive of cheesecakes on my blog and I don’t plan to stop. You may remember my super popular Nutella cheesecake and this recipe for the best cheesecake. But personal favorites are Butterfinger cheesecake and cappuccino cheesecake.
Today we’re visiting the decadent chocolate variety again. I’m trading Nutella for a triple chocolate cheesecake that’s LOADED with chocolate flavor.
Try topping it with chocolate whipped cream for even more chocolate. You are welcome.

Triple Chocolate Cheesecake Details
Let’s talk about the triple layers of chocolate in this cheesecake.
Layer one – chocolate-filled Oreos ground into crumbs then mixed with butter or the crust.
Layer two – chocolate cheesecake.
Layer three – chocolate glaze.
So basically this is a mountain of chocolate and an even larger mountain of calories. But hey, it’s dessert and it’s meant to be eaten in moderation so we’re okay here.

What You’ll Need
The ingredient list seems long but a few of the ingredients are used in multiple parts of the recipe.
- Chocolate filled Oreos
- Unsalted butter
- Semisweet chocolate
- Cream cheese
- Granulated sugar
- Unsweetened Dutch-processed cocoa powder
- Vanilla extract
- Salt
- heavy cream
- You may use sour cream in place of heavy cream. Increase the amount to 1 cup.
- Eggs
- For The Glaze
- Light corn syrup
- This is an optional ingredient. It adds shine to the chocolate ganache but won’t ruin the recipe if you omit it.
How to Make Triple Chocolate Cheesecake
Oreo cookie crust. I used chocolate-filled Oreos but if you can’t get them in your area, regular Oreos are perfectly fine. Any other chocolate cookie with a chocolate filling will also work.
Pulse the Oreos in a food processor, filling and all, until the cookies turn to crumbs. Mix the crumbs with melted butter and press them into the bottom of a 9-inch springform pan or cheesecake pan. Bake the crust for 10 minutes so it sets.


Chocolate cheesecake. The chocolate cheesecake filling is my go-to cheesecake base. It’s so luscious and creamy. I used this batter in every single cheesecake on the blog.
It starts with full-fat block cream cheese, sugar, eggs, and heavy cream. I typically add vanilla also. Today, I’m also including melted chocolate and cocoa powder. So much CHOCOLATE.
We’re using 3 blocks of cream cheese which in total is 24 ounces. Most of the time I use 4 blocks but this batter needed room for an entire 12 ounces of melted chocolate.
I find it easiest to beat the cream cheese first until it’s smooth then beat in the sugar, cocoa powder, salt, and vanilla until it’s all mixed in well. Next, beat in the heavy cream followed by the melted.
The batter gets a little thick here but I add the eggs at the very end to loosen it up.
Folding the eggs in at the end also prevents whipping excess air into them. This is the main cause of cracks in cheesecakes.


Spread the batter evenly over the baked Oreo crust then bake the cheesecake. I bake for one hour and then turn the oven off and let the cheesecake sit with the door closed for another hour. This also helps to prevent cracks.
Always plan ahead because cheesecakes are time-consuming.
After the two-hour bake and cool down, the cheesecake still needs to cool completely then chill in the refrigerator for at least four hours. I prefer to chill cheesecakes overnight though.
After the cheesecake has chilled, it’s time to add the glaze. I made a simple glaze with chocolate, butter, and corn syrup all melted together. You can skip the corn syrup if you like. All it does is add shine to the glaze.


Slicing this triple chocolate cheesecake can be tricky. If the glaze is refrigerated, it will firm up and be difficult to slice through. But on the other hand, if it hasn’t had time to set, it will go everywhere when you slice through.
My suggestion is to glaze the cheesecake just before you plan to serve it then chill it for about 10 minutes so the glaze sets but doesn’t become too firm.
Also, run a knife under hot water, wipe it dry with a clean towel, then cut through the cheesecake. Repeat these steps after each cut and you’ll get neat and clean slices.

To lighten the cheesecake, serve with whipped cream. Chocolate shavings will also make a lovely presentation when serving a crowd.
Tips for Success
- Make sure all the ingredients are room temperature before you start making the cheesecake. I like to set the cold ingredients out on the counter about 30 minutes prior to baking.
- Use a water bath for the best texture! Use this free download to get a pdf printout of how to properly use a water bath and prevent leaks.
- Add the ingredients in order of the recipe. It’s super important that each ingredient is added at the right time. Eggs should always come last and they should be folded in, not mixed in with the mixer.
- Allow the cheesecake to sit in the oven for an extra hour after baking. This will help prevent cracks. I also recommend letting the cheesecake refrigerate overnight after it has completely cooled.
Triple Chocolate Cheesecake

Ingredients
For the crust
- 2 ½ cups (250 g) chocolate filled Oreos or plain Oreos, about 25 cookies
- 4 tablespoons unsalted butter, melted
For the filling
- 12 ounces (340 g) semisweet chocolate, coarsely chopped
- 24 ounces (680 g) cream cheese, softened to room temperature
- 1 ½ cups (300 g) granulated sugar
- ⅓ cup (28 g) unsweetened Dutch-processed cocoa powder
- 1 tablespoon vanilla extract
- ½ teaspoon salt
- ¾ cup (180 ml) heavy cream, at room temperature
- 4 large eggs, lightly beaten at room temperature
For the glaze
- 4 ounces (113 g) semisweet chocolate, coarsely chopped
- 4 tablespoons unsalted butter, cut into cubes
- 2 tablespoons light corn syrup
Instructions
Make the crust
- Adjust the oven rack to the lower third position and preheat the oven to 350ºF. Wrap the outer bottom of a 9-inch springform pan tightly with aluminum foil; set aside.
- Combine the cookie crumbs and melted butter. Press the crumb mixture into the bottom and about 2-inches up the sides of the pan. Bake for 10 minutes. Set aside to cool while you make the filling.
Make the filling
- Reduce the oven temperature to 300ºF.
- Place chocolate in a heatproof bowl and set over a pot of barely simmering water. Stir continuously until melted and smooth. Remove from heat and set aside to cool slightly.
- In a large mixing bowl beat the cream cheese with an electric mixer until smooth. Add the sugar, cocoa powder, vanilla, and salt then beat until well combined.
- Beat in the heavy cream followed by the melted and cooled chocolate. Scrape down the sides of the bowl as needed. Using a silicone spatula, gently stir in the eggs just until combined.
- Pour the batter over the crust in the prepared pan. Place the cheesecake inside a roasting pan. Fill the roasting pan with enough hot water to reach halfway up the sides of the cheesecake pan. (Alternatively, you can place the roasting pan filled with water on the lower rack of the oven.)
- Bake for 1 hour, OR until the edges are set and the center is slightly jiggly. The center of the cheesecake will still look wet, this is normal. Turn the oven off, leave the cheesecake in the water bath in the oven with the door closed for another hour.
- Remove the cheesecake from the water bath and run a small knife around the outer edge of the cheesecake to loosen it from the pan. Allow it to cool completely to room temperature. (The cheesecake should not feel the slightest bit warm.) Refrigerate the cheesecake for at least 4 hours but preferably overnight.
Make the glaze
- Remove the sides of the pan and place the cheesecake on a serving platter.
- Combine chocolate, butter, and corn syrup in a heatproof bowl and set it over a pot of barely simmering water. Stir continuously until melted and smooth.
- Use an offset spatula to spread the glaze over the top of the cheesecake. Refrigerate for 10 minutes to allow the glaze has set.
Notes
- Oreos: If you can’t find Oreo cookies any chocolate-filled sandwich cookie will work.
- Dutch-processes cocoa: It has a smoother chocolate flavor. I recommend it but the natural cocoa powder will also work.
- Heavy cream: Sour cream can be used in place of heavy cream. Increase the amount to 1 cup (226 g).
- Corn syrup: It is added for shine. It’s completely optional so feel free to leave it out if you don’t want to use it.
- Baking variation: Bake the cheesecake in 24 muffin cups lined with paper for 20-25 minutes. Turn the oven off and leave them in for another hour.
- Prevent a soggy cheesecake! Read through my helpful tips on how to create a leakproof water bath.
- The baked and chilled cheesecake will keep for up to 4 days covered tightly and stored in the refrigerator.
- The cheesecake will keep for up to 2 months covered tightly and stored in the freezer. Cut frozen and let the slices sit at room temperature for 15-30 minutes before serving.
Nutrition
The nutrition information provided is for convenience and as a courtesy only. It is not guaranteed to be accurate because nutrition information can vary for a variety of reasons. For precise nutritional data use your preferred nutrition calculator and input the exact ingredients and brands you used in the recipe.
What can be a substitute for corn syrup for the shine if I dont have any?
You can just leave it out.
I have made this recipe a couple times now and it is easily the best cheesecake I’ve ever had. I recently made a change with the crust where i use a 9 oz fudge brownie mix baked for 18 min for the crust instead of the oreo. That took an already awesome cheesecake recipe over the top.
I love that idea, Dave! Thank you so much for sharing!!
Can the glaze be put on ahead of serving? I’m making it today but not serving it until tomorrow evening. Thanks!
It can but it will harden upon refrigeration. You’ll want to let the cheesecake set out for about 45 minutes before serving so the glaze softens.
I’m new to baking cheesecakes, but I have had some good success making your recipes and they have all turned out great, so far. This chocolate one is next on my list to try. I’m wondering, is ok to substitute dark chocolate for the semi-sweet?
It will affect the final flavor of the cheesecake. However, if you like dark chocolate and that’s what you want to use, then go for it!
Hey Dave, I used dark chocolate when I made this and it was awesome! I’m guessing you don’t like things quite as sweet either if using dark chocolate. I cut way down on the sugar barely using a fourth cup. Otherwise, thanks for the recipe, it was great! Just tweeked to my taste buds.
The oreo crust is a trainwreck. It certainly will not set by baking it for 10 min. Went back to chocolate graham crackers a stick of butter and letting set in the freezer
Hi Kelly! Because this cheesecake is baked, the crust needs to be baked first in order for it to come out firm enough to support the filling. If you were making a no-bake cheesecake, then yes, you’d want to freeze/refrigerate the crust.
Did you try the recipe as written? Why would you say that the Oreo crust is a train wreck? It is not! I bake a lot of cheesecake, and the Oreo crust is very popular. This crust recipe works extremely well.
I really enjoy making your cheesecake recipes, on your cappuccino cheesecake I substituted Espresso instead of cappuccino about four or 5 tablespoons My family really enjoyed it . I can’t wait to make this triple chocolate cheesecake of yours cheese cake looks awesome thank you again .
I’m thrilled you enjoy the cheesecake recipes! Thanks for sharing your adaptation of the cappuccino one. I can’t wait to try that myself!!
You indicated you had a free download on how to use the waterbath, but I could not locate it on the webpage. Would you please email me the link or the pdf?
Thank you.
Hi Tanya! Sorry about that. You can get the download here: Free PDF Download.
I just made this cheesecake, I followed the instructions and just turned off the oven. There are bubbles on the surface of my cheesecake – did I overmix? Is my cheesecake ruined? Can I save it?
Thanks,
Cristina
Air bubbles will happen if you beat too much air into the batter but the cheesecake isn’t ruined. It’s a minor imperfection that will be covered with ganache.
I can hardly wait to make these chocolate cheesecake,,,,, they look so delicious.
This cheesecake is so decadent and dreamy!