
Pumpkin Pie Pop Tarts
This post may contain affiliate links. Read the full disclosure here.
Made with a flaky pastry crust and topped with cinnamon frosting, these Pumpkin Pie Pop Tarts are a breakfast pastry you’ll want to enjoy all day long! Perfect for chilly fall days, whether you enjoy for breakfast or dessert!

An Easy Breakfast Pastry
If you are a fan of pop tarts and pumpkin pie, this pumpkin pie pop tarts recipe is for you!
Made with a flaky pie crust filled with pumpkin filling and topped with a cinnamon frosting, this toaster pastry is great for when the weather turns cool. They also freeze well so you can make them ahead of time and warm them up when you’re ready to serve them.
Fall baking is usually full of pumpkin pie cupcakes, pumpkin crumble bars, and pumpkin whoopie pies. But today we’re making pop tarts!
Making pop tarts at home turned out to be simpler than I thought it would be. The process is long, but it isn’t hard. Unless you have a tendency to fail at making pie crust. Then I can’t help you…
Haha! I’m only kidding. Follow the tips in my homemade pie crust recipe and you will do just fine.
Make sure to read through the recipe completely before getting started on today’s homemade pumpkin pop tarts. The dough needs to chill for 2 hours before rolling it out. That’s the most time-consuming part so plan ahead.
And, trust me, these pumpkin toaster pastries are well worth every minute! In fact, making a double batch to freeze extras isn’t a bad idea!
Why this recipe works
- Butter and shortening in the pastry dough yield a buttery and extra flaky texture.
- The pumpkin spice pie filling, buttery pastry, and sweet cinnamon glaze makes a scrumptious, flavor profile.
What You’ll Need
These easy homemade pop tarts start with a basic pastry crust, followed by just 3 ingredients in the filling and a simple glaze!
- All-purpose flour
- Salt
- Butter & shortening – Your butter and shortening should be chilled and cut into pieces. I always use unsalted butter for my pastry crust.
- Ice water – It’s very important to use ice water and not warm water here.
- Pumpkin puree – I use canned pumpkin. I don’t recommend pumpkin pie filling.
- Brown sugar – Brown sugar pairs well with pumpkin for a warm, sweet center.
- Pumpkin pie spice – You can make your own spice mix but I typically just buy it at the store.
- Egg wash – Made with egg and milk.
- Confectioners’ sugar – For the sweet, creamy glaze. Sift first to avoid any clumps.
- Vanilla extract – Just a tiny splash!
- Ground cinnamon – The cinnamon flavor in the icing really brings it all together!
- Heavy cream – You can also use milk.
How to Make Pumpkin Pie Pop Tarts
These pumpkin pie pop tarts begin with a homemade pastry dough, which does require 2 hours of chill time, but after that these come together quickly and easily.
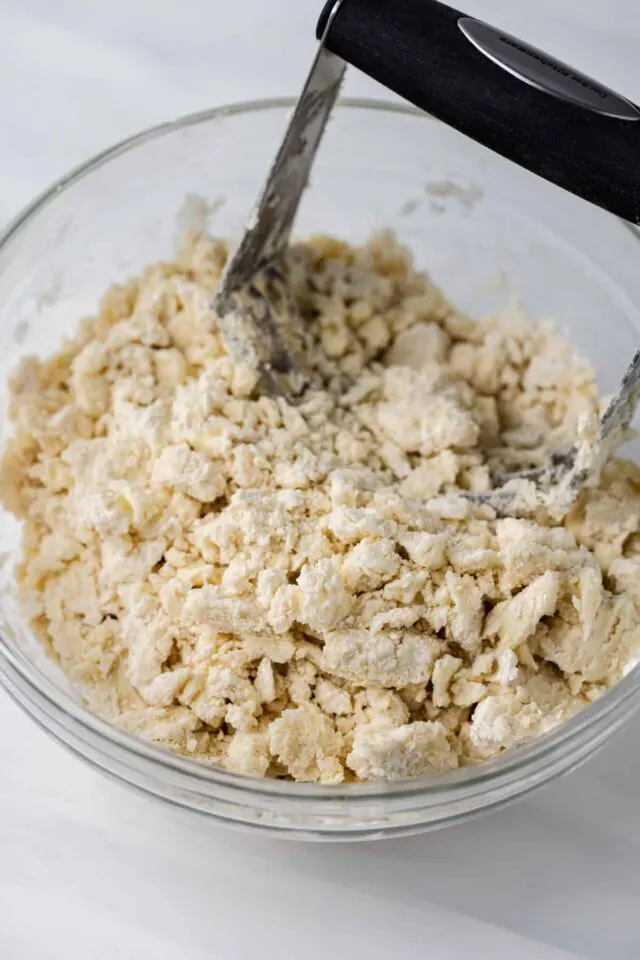
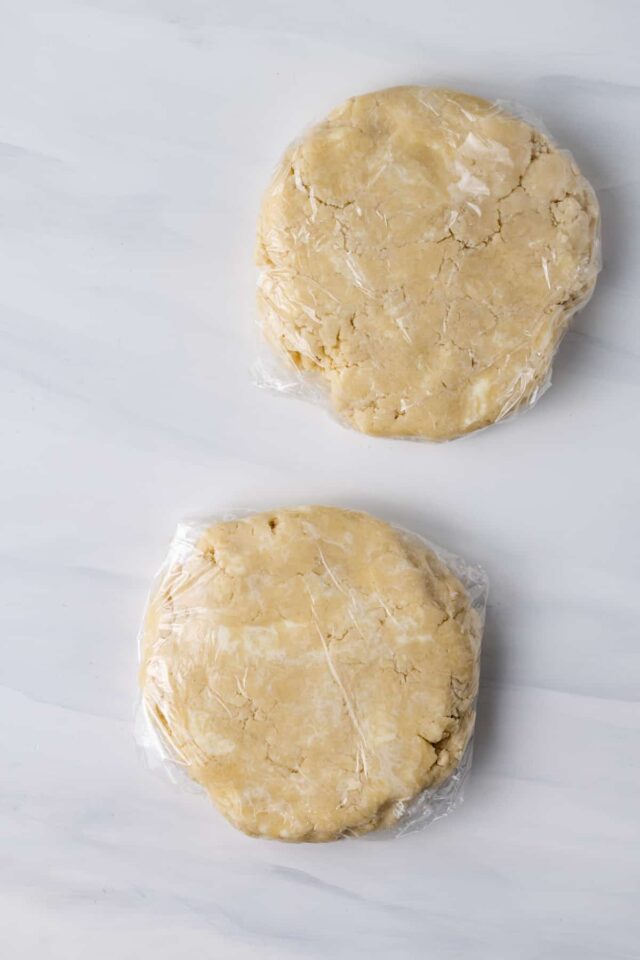
- Make the pastry dough. Combine salt and flour, then cut in the butter and shortening until coarse crumbs form. Toss in just enough water to moisten the flour. Shape the dough into discs and refrigerate for at least 2 hours.
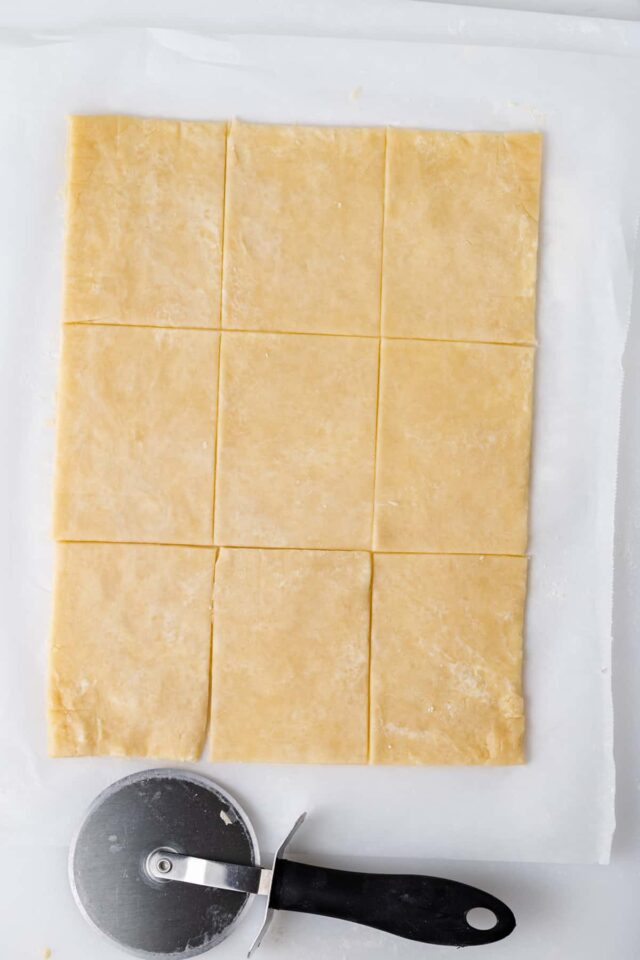
- Roll out the dough. Roll each disc into a 9×12 rectangle. Trim the edges to make them neat and straight. Cut into 9 small rectangles and arrange on a parchment-lined baking sheet. Refrigerate while working with the other disc.
- Make the filling. Mix together the filling ingredients.
- Assemble the pumpkin pastries. Divide the filling evenly over each rectangle on one tray. Brush the egg wash on the outer edges of the pastry. Brush the second tray of pastries and place them egg wash side down over the filling. Press firmly to seal around the dough. Brush the tops with egg wash.

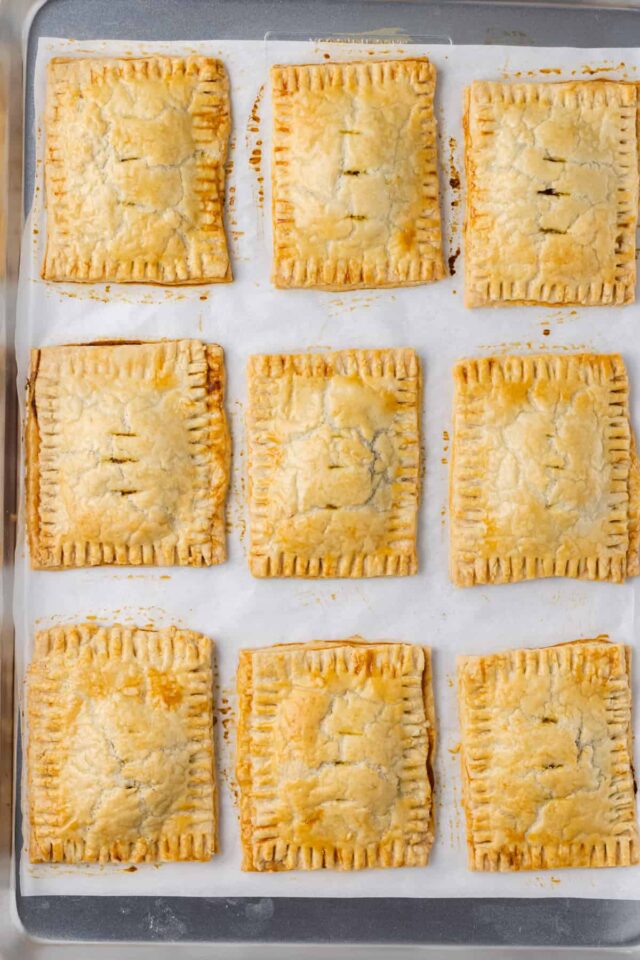
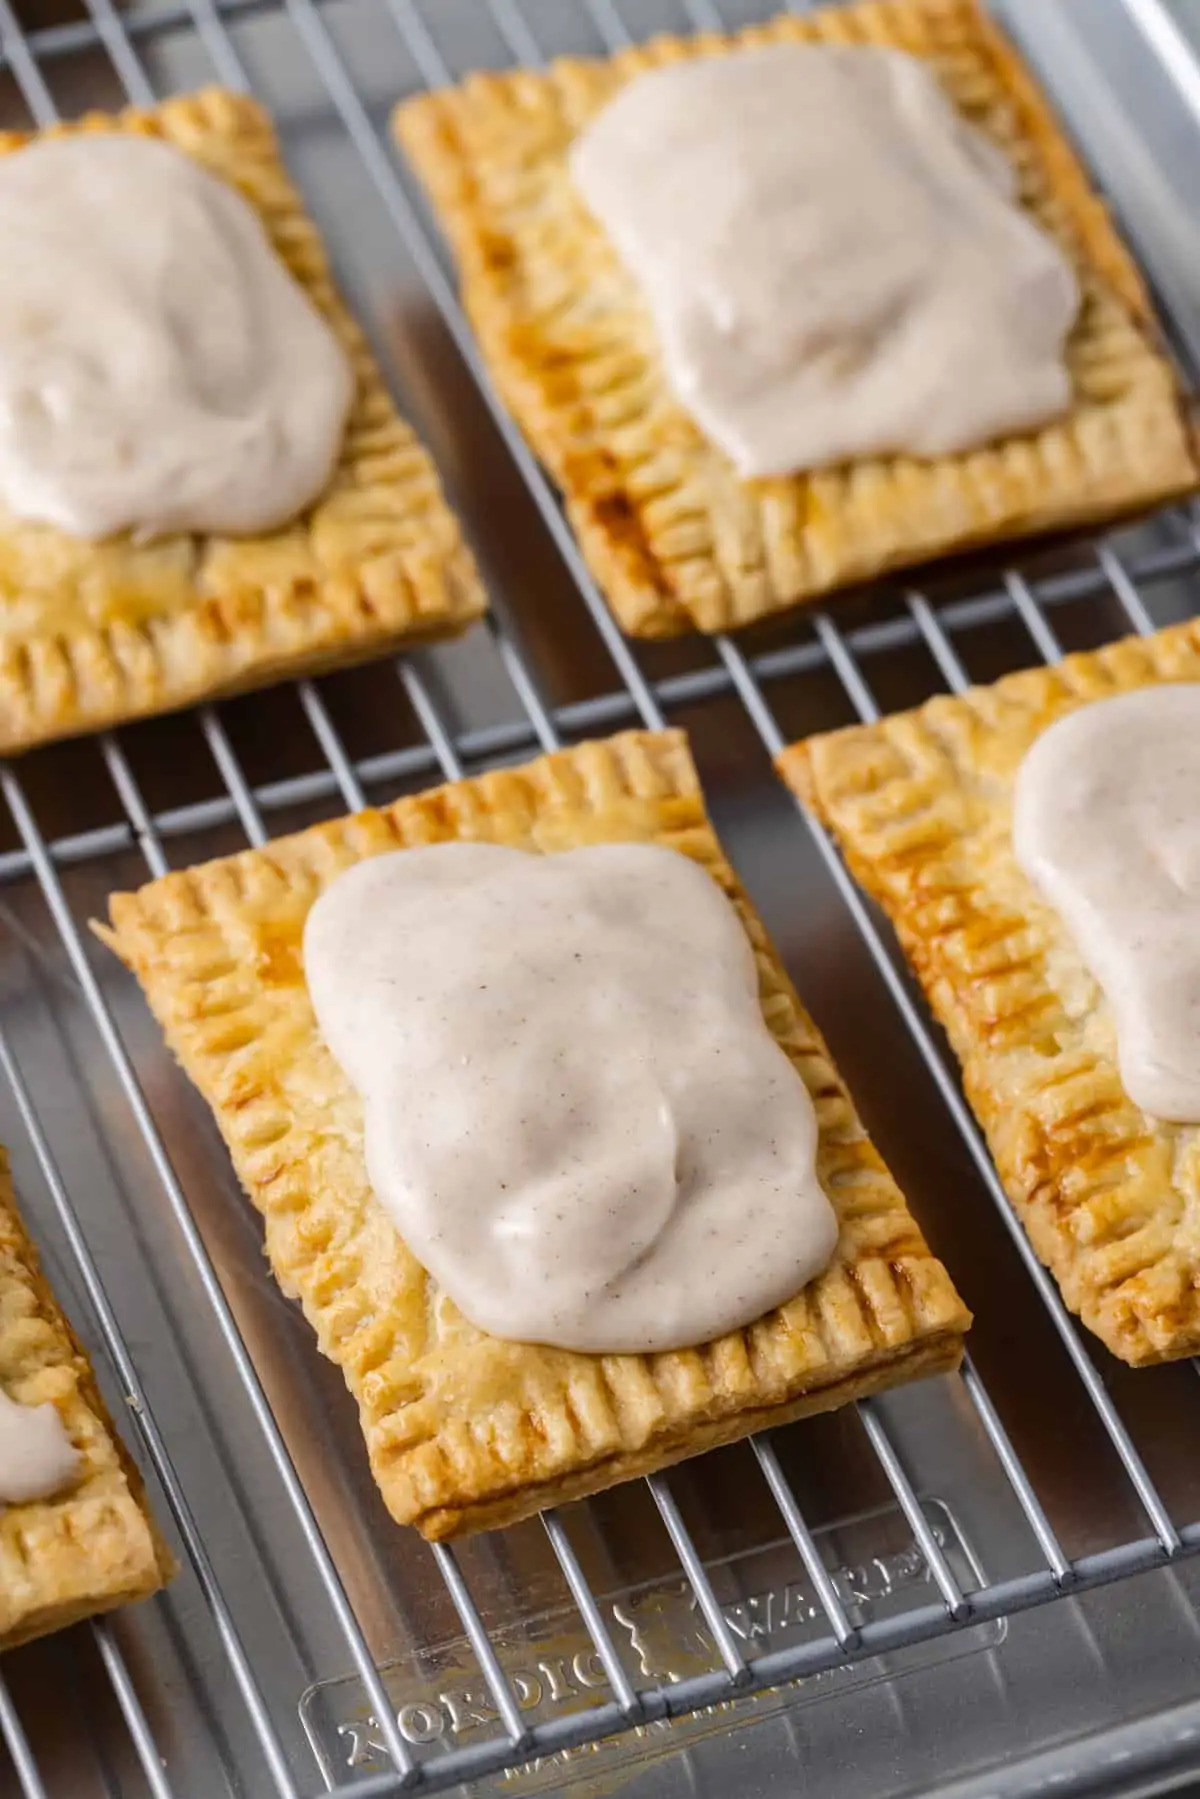
- Bake. Cut slits in the top of each pastry. Bake until golden brown, rotating the pan halfway through. Cool on the pan for 10 minutes then transfer to a cooling rack to cool completely.
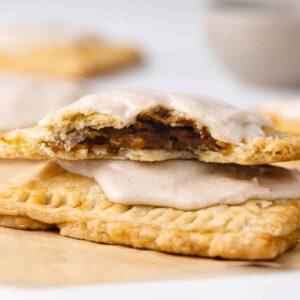
- Make the icing. Whisk all icing ingredients together until smooth and free of lumps. Add more heavy cream as needed. Spread over the cooled pumpkin toaster pastries.
Tips for Success
The most important part of this recipe is the pastry dough. While it’s not hard if you’ve never made it before there are a few things to keep in mind.
- Use store-bought pastry dough. I haven’t made this recipe with store-bought pastry dough but I’m certain it would work just fine. Keep in mind the texture will vary slightly than if using my homemade recipe. If you have a favorite pastry dough recipe you’d prefer to use instead, feel free to do so.
- Let the dough sit on the counter. After you have shaped and chilled the dough, let it sit on the counter for about 10 minutes before rolling it. This makes it easier to handle.
- Take care rolling the dough. When you are rolling it out be sure to be gentle with it. Don’t tug and force it to stretch. This will only tear it.
- Don’t overfill the pastries. This recipe should make just enough filling but take care not to overstuff any of the pumpkin pop-tarts, which will cause the edges to not seal and the filling to leak out.
- Swap out the filling. Want something a little different than pumpkin pie? You can also fill them with this homemade pumpkin jam or apple butter! This basic recipe will also work for any other homemade pop tart flavor you want to make as well.

Serving Suggestions
These pumpkin pop tarts should be enjoyed at room temperature, as they need to cool completely before adding the icing. The icing is optional, of course, but I definitely recommend it! The cinnamon icing really takes this breakfast pastry from good to amazing!
Once you add the icing, you can enjoy them right away or let them sit for an hour to harden the icing.
How to Store & Freeze
These pumpkin breakfast pastries are ideal for making ahead – you can even keep them in the freezer to have on hand when the craving strikes!
- How to store in the fridge. Baked and glazed pop tarts will last for 3 days in the fridge. Reheat at 350°F for 10 minutes to reheat.
- How to freeze. Freeze these homemade pop tarts before adding the glaze. They’ll last for up to 3 months, just keep them wrapped tightly. Thaw overnight then reheat in the oven at 350°F.
Frequently asked questions
Canned pumpkin is cooked but it’s often spiced and sweetened before canning. While pumpkin puree is simply fresh pumpkin that’s cooked and pureed.
These pop tarts are really simple to make. You can buy a ready-made crust and they will take no time at all, but I promise the homemade crust is worth the effort!
If you don’t have pumpkin pie spice, mix 1 teaspoon ground cinnamon, ¼ teaspoon ground nutmeg, and ⅛ teaspoon ground cloves. Use only ½ teaspoon of the spice mixture.
Pumpkin Pie Pop Tarts
Ingredients
For the pastry
- 2 ½ cups (325 g) all-purpose flour
- ½ teaspoon salt
- ¾ cup (169 g) unsalted butter, cut into pieces and chilled
- ⅓ cup (60 g) vegetable shortening, chilled
- 4-5 tablespoons ice water
For the filling
- ½ cup (120 g) pumpkin puree
- 3 tablespoons light brown sugar, packed
- ½ teaspoon pumpkin pie spice
- 1 large egg
- 1 tablespoon milk
For the icing
- 1 cup (120 g) confectioners' sugar
- ½ teaspoon vanilla extract
- ¼ teaspoon ground cinnamon
- 3-4 tablespoons heavy cream or milk
Instructions
Make the pastry
- Combine the flour and salt in a large mixing bowl. Using a pastry cutter or two knives cut the butter and shortening into the flour mixture just until coarse crumbs form. Don’t try to work it in too well. Large clumps are perfectly okay.
- Toss in just enough of the ice water to moisten the flour. You will know you have enough water when you can squeeze the mixture and it holds together.
- Shape the dough into equal size discs and wrap tightly with plastic wrap. Refrigerate the discs for at least 2 hours.
- Set one chilled disc on the counter for 10 minutes. Working on a lightly floured surface, roll the disc into a 9×12 inch rectangle that is ⅛ of an inch thick. Trim the edges to make them straight and neat.
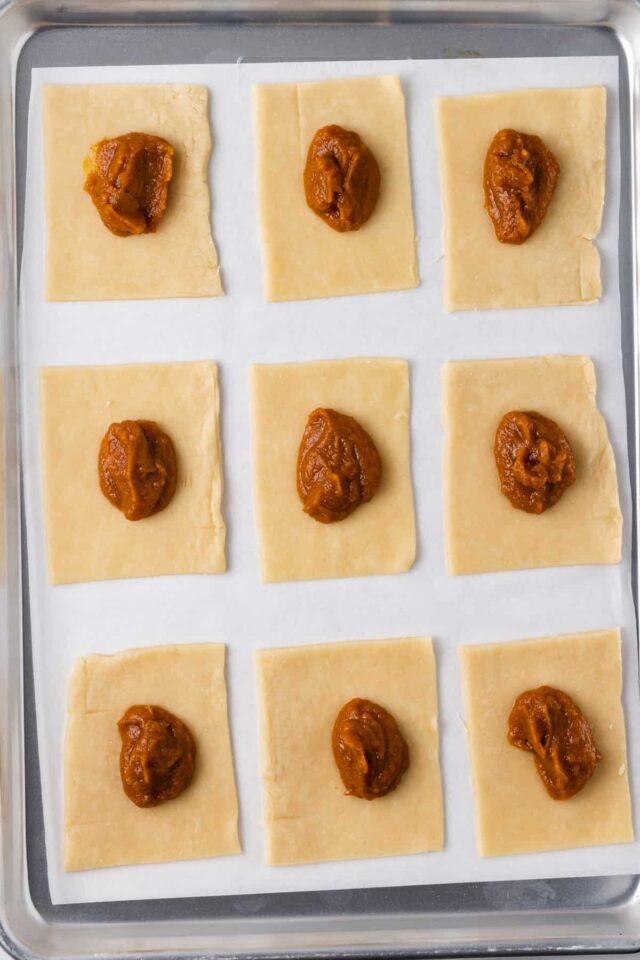
- Cut the rectangle lengthwise into 3 equal size strips. Cut each strip into thirds. You should have 9 small rectangles. Arrange the rectangles on a parchment-lined baking sheet. Place the baking sheet into the refrigerator and repeat the process with the second disc.
Make the filling:
- Preheat the oven to 350°F.
- Mix the pumpkin puree, sugar, and pumpkin pie spice together in a small bowl. Set aside.
- Working with one baking sheet of pastry at a time, divide filling evenly among the 9 rectangles; placing it in the center of each pastry.
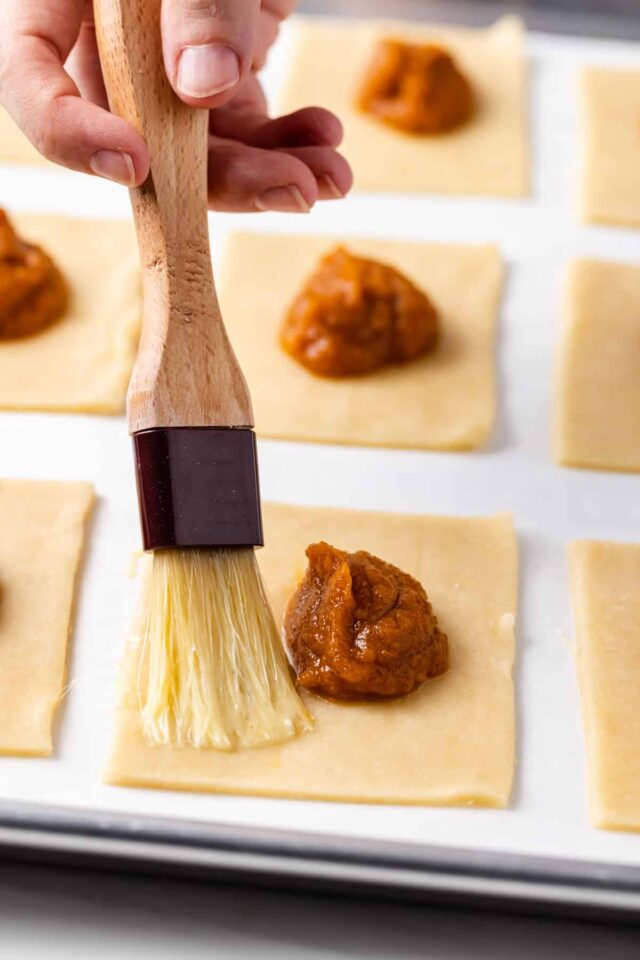
- Whisk the egg and milk together in a small bowl. Brush the egg wash on the outer edges of the pastry around the filling.
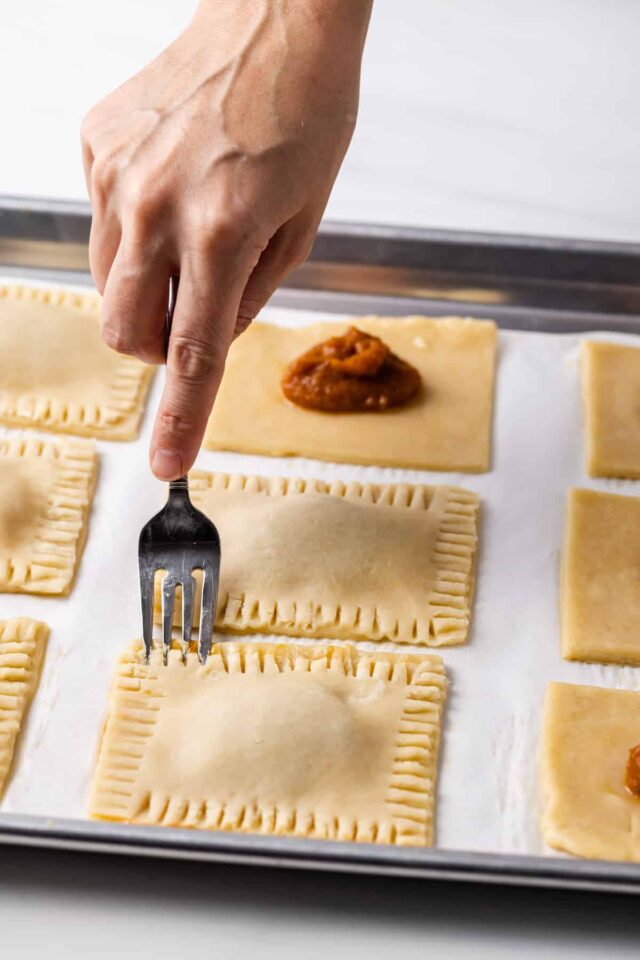
- Remove the second set of rectangles from the refrigerator and brush the entire surface with egg wash. Place each rectangle over the filling with the egg wash side down. Press firmly around the pocket of the filling to seal the dough all the way around.
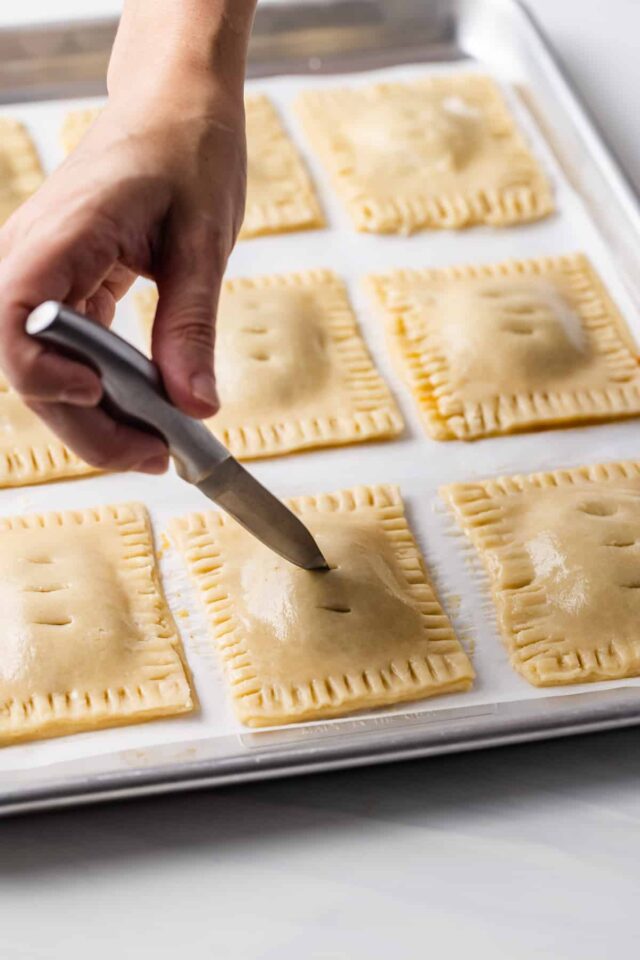
- Brush the tops of each pastry lightly with egg wash. Cut small slits in the top of each pastry to allow steam to escape during cooking.
- Bake for 25 to 30 minutes, until light golden brown. Rotate the pan halfway through baking.
- Cool the pop-tarts on the pan for 10 minutes, then transfer to a cooling rack to cool completely before icing.
Make the icing
- In a small bowl, whisk all the ingredients together until the icing is smooth and free of lumps. The icing should be a spreadable consistency. Add a teaspoon or more heavy cream if needed.
- Use a spoon to spread the icing over the cooled pop-tarts. Enjoy right away or let them sit for an hour to harden the icing.
Notes
- Pastry: I haven’t made this recipe with store-bought pastry dough but I’m certain it would work just fine. Keep in mind the texture will vary slightly than if using my homemade recipe. If you have a favorite pastry dough recipe you’d prefer to use instead, feel free to do so.
- Pumpkin: I used canned pumpkin puree. I don’t recommend using pumpkin pie filling.
- Baked and glazed pop tarts will keep for up to 3 days in an airtight container stored in the refrigerator. Bake in a 350°F degree oven for about 10 minutes to reheat.
- Baked and unglazed pumpkin pie pop tarts freeze well for up to 3 months. Thaw them overnight in the refrigerator and bake in a 350°F degree oven for about 10 minutes to reheat. I’m not sure how well they reheat in a toaster oven.
Nutrition
The nutrition information provided is for convenience and as a courtesy only. It is not guaranteed to be accurate because nutrition information can vary for a variety of reasons. For precise nutritional data use your preferred nutrition calculator and input the exact ingredients and brands you used in the recipe.
Hi Jen!
I was curious if you had any good (and easy) ideas for other fillings besides pumpkin for these?
You can use any flavor of jam, apple pie filling, cherry pie filling, etc.
Thank you. I have these cooling now for an after school snack. My taste-testing preschoolers and I loved them. 🙂
That’s so great to hear, Nicole! Enjoy!