
Easter Macarons
This post may contain affiliate links. Read the full disclosure here.
Macarons are my favorite cookie. They’re light, sweet, delicious, and elegant. A little touch of Paris in your kitchen. While these definitely take some practice and effort to master the technique, once you do, you’ll love having these cookies in your repertoire! These Easter Macarons are perfect springtime treats.

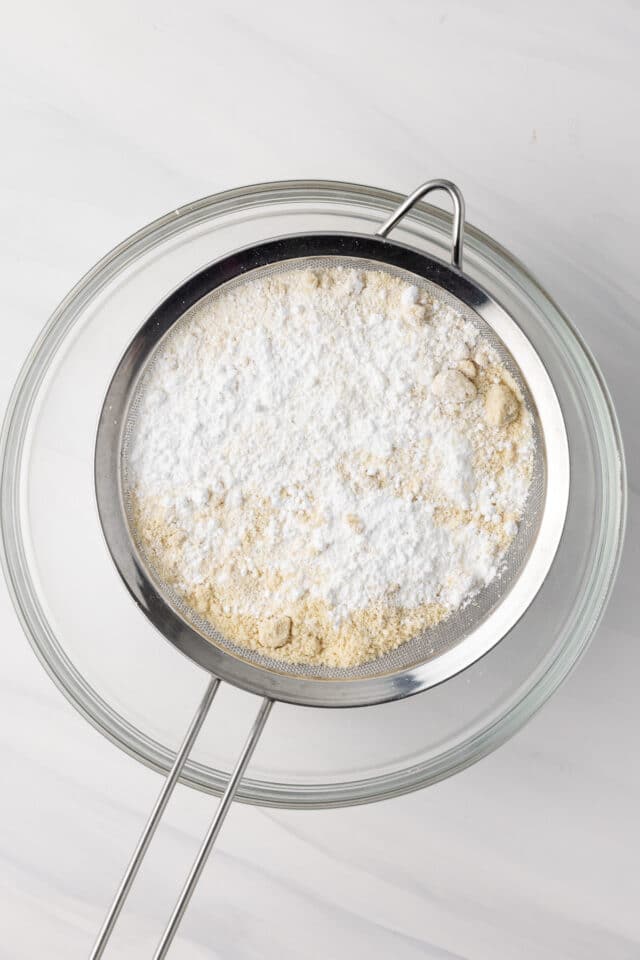
Macarons are made by whisking egg whites until a stiff-peaked meringue forms. Then sifted, almond flour and powdered sugar are folded in slowly until the desired consistency is reached. This process of knocking out air and folding is called macaronage.
Macarons are finicky and require accurate measurements and a proper technique to make. It’s extremely important to weigh each ingredient. And it’s even more important to complete each step with the proper technique.
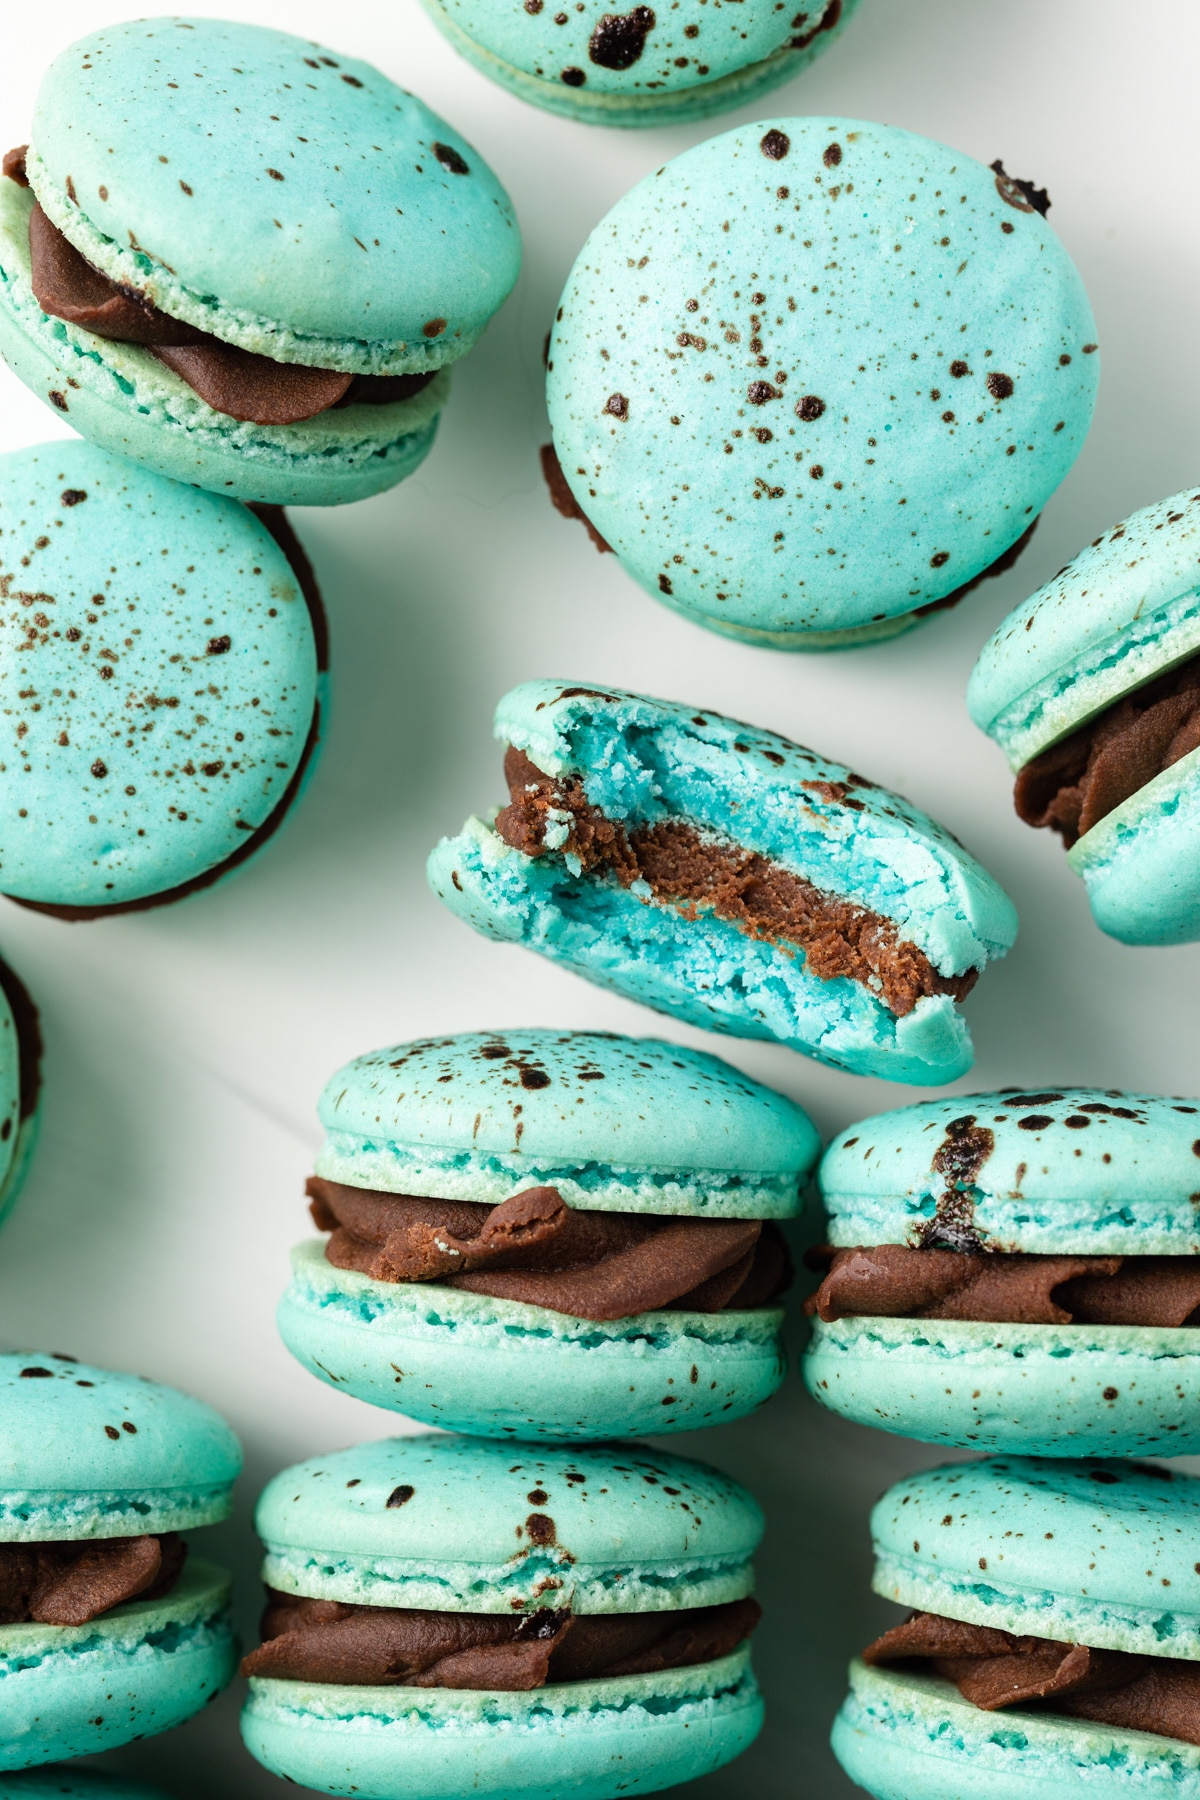
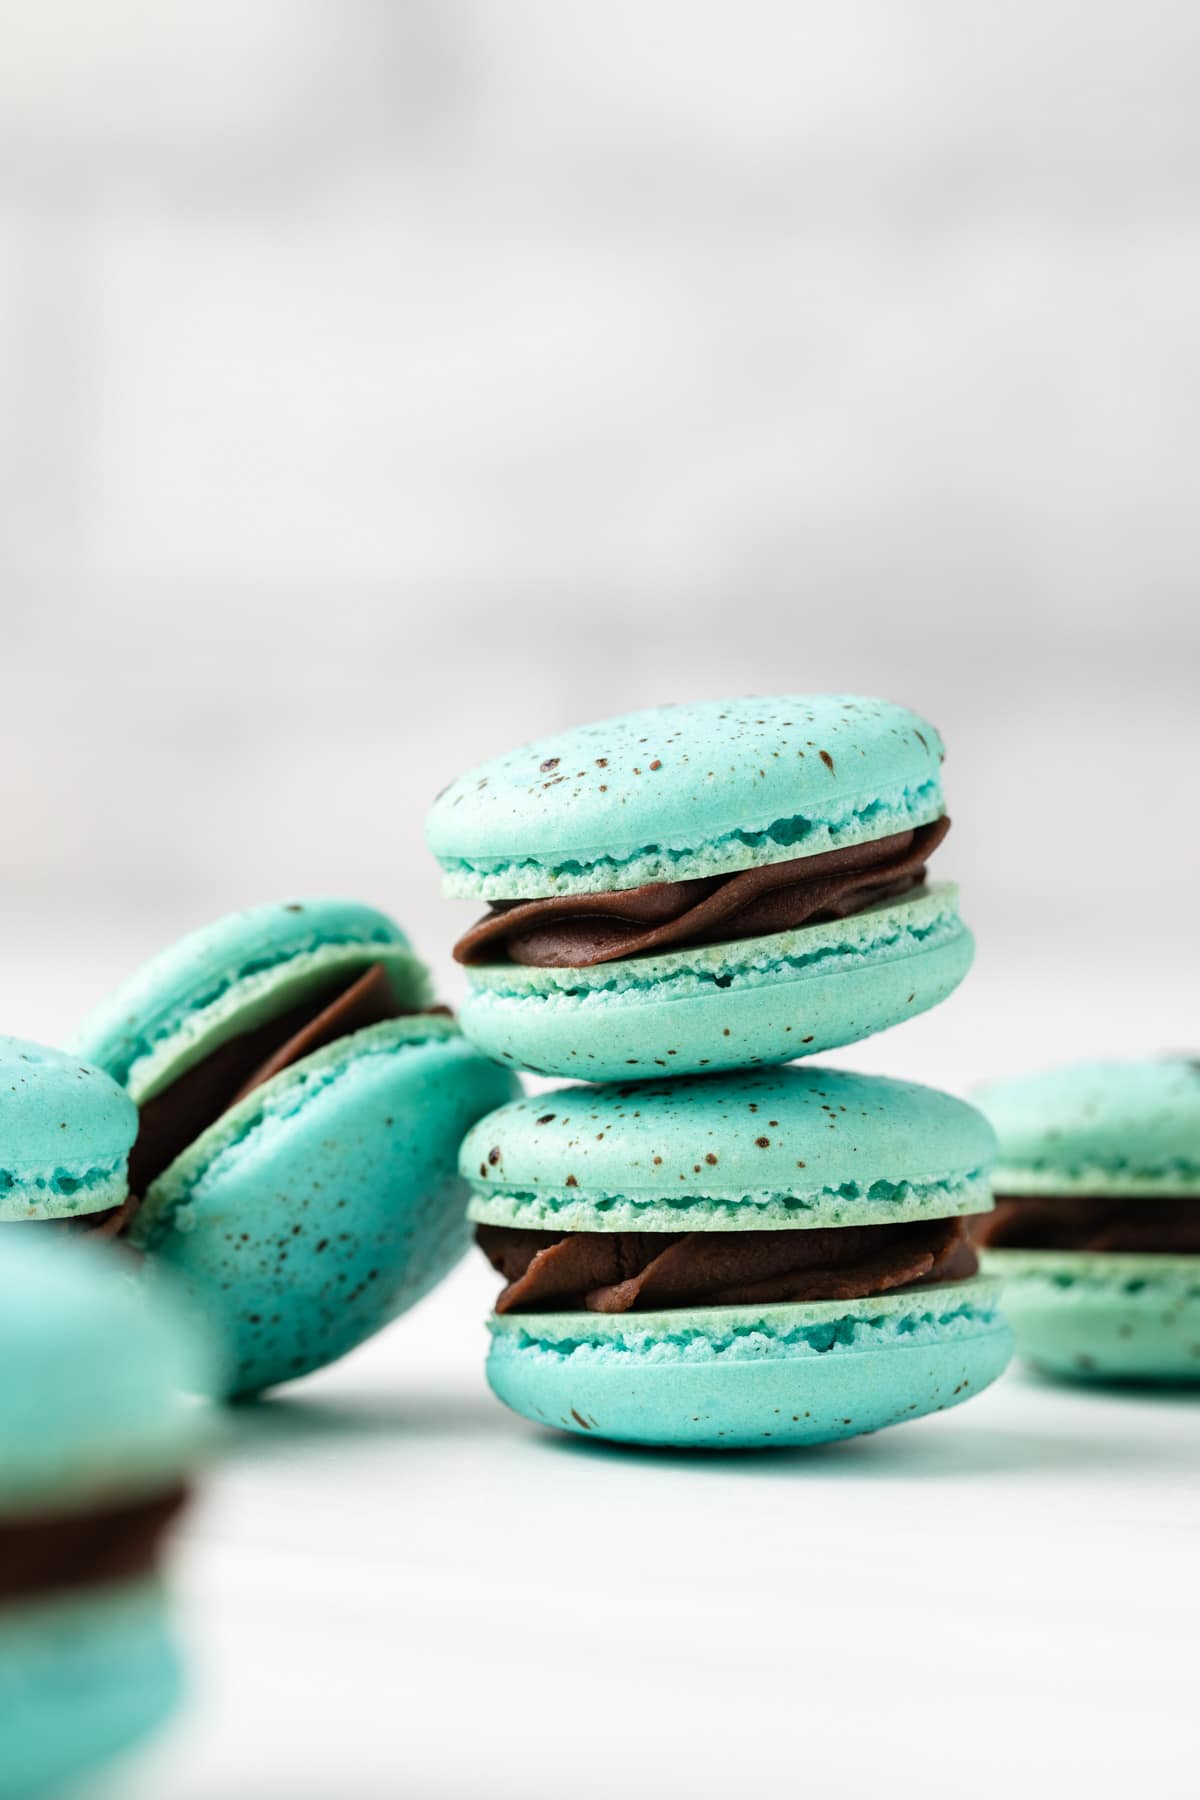
These Easter Macarons will be an adorable addition to your Easter table. They have a malted milk chocolate ganache filling with a speckled shell that looks like a robin’s egg. They are a more sophisticated and grown-up version of malted milk eggs that the Easter Bunny often leaves behind in Easter Baskets.
These will take practice! It took me several months of continuous practice to learn the basics and perfect the technique. So don’t be discouraged if your macarons do not turn out the first time. Keep at it!
Don’t attempt making macarons on a humid day!! This was my problem when I first began experimenting. It was too humid where I live in the summer – so if you are having a warm and humid spring where you are, wait for a cooler day.
Once you’ve mastered the technique, you can easily whip up a batch of strawberry macarons or french macarons anytime the mood strikes!
Recipe Details
- Taste – So, so, so good!
- Texture – Crisp on the outside and slightly moist and chewy on the inside
- Ease – These require practice and patience. Your first attempt may not be successful – but don’t give up!
- Time – With two hours of prep and a little over an hour for cooking, these will take about 3 hours and 15 minutes to cook.
What You’ll Need
Ingredients
This Easter Macaron recipe uses very standard macaron ingredients. You may already have them on hand.
For the Shells
- Almond flour: Make sure to use almond flour! It’s finely ground and I’ve had the best success with this over almond meal.
- Powdered sugar: It’s the same as confectioners’ sugar and is the main sweetener in macarons.
- White sugar: A small mound of granulated sugar is used to make the meringue base.
- Egg whites: Room temperature egg whites are a must!
- Cream of tartar: Helps to stabilize the egg whites so they whip up to stiff peaks.
- Vanilla extract: It’s completely optional to use vanilla extract but I love the flavor it adds.
- Blue Food Coloring: You can use gel or powdered food coloring.
- Cocoa Powder: This provides the speckling.
- Water
For the Filling:
- Milk Chocolate: Use the highest quality you can find.
- Heavy Cream: A necessity for the ganache.
- Malted Milk Powder: This gives the ganache its malted flavor. If you can’t find it, you can still make these cookies.
Recommended tools
- Stand mixer: A stand mixer is going to work best for whipping up the egg whites. You can use a hand-held electric mixer but keep in mind that it may take longer for the egg whites to whip to stiff peaks.
- Silicone spatula: A silicone spatula works best for folding the dry ingredients into the egg whites.
- Baking pans: You’ll need 4 large baking sheets. This recipe makes a lot of macarons.
- Silicone baking mat: I love to use silicone baking mats for macarons. It has a template printed on the mat so you don’t need to print one-off.
- Piping bags: You’ll need large piping bags for the amount of batter the recipe yields.
- Piping tip: I like smaller piping tips like this Wilton 2A. It pipes perfect mounds of batter for well-shaped macarons.
How to Make Easter Macarons
A few things to note before we begin making these Easter egg macarons:
- Only gram measurements are given! This is because using the exact amount of each ingredient is crucial to the success of your macarons.
- Whipping the egg whites to the proper consistency is also very important. Pay attention and read the instructions fully.
- Understanding how the final batter should look and feel will help you immensely when it comes to getting the recipe right.
Step 1: Preheat the oven and prepare your workstation
Set the oven rack to the lower third position. This is just below the center of the oven. Place an empty baking sheet on the rack and line 4 more baking sheets with silicone macaron mats.
Or you can use a 1.5-inch round cookie cutter and trace 20 circles onto sheets of parchment paper cut to fit the baking pans. Set another sheet of parchment paper over each template.
Preheat the oven to 300°F.
Fit a large piping bag with a medium round piping top and set aside.
Step 2: Combine the dry ingredients
You’ll want to sift the almond meal and powdered sugar together in a large bowl. Do this 2-4 times with a fine-mesh sieve and discard any large clumps. Don’t try to press those clumps through the sieve. Just toss them out!
Step 3: Whip the egg whites
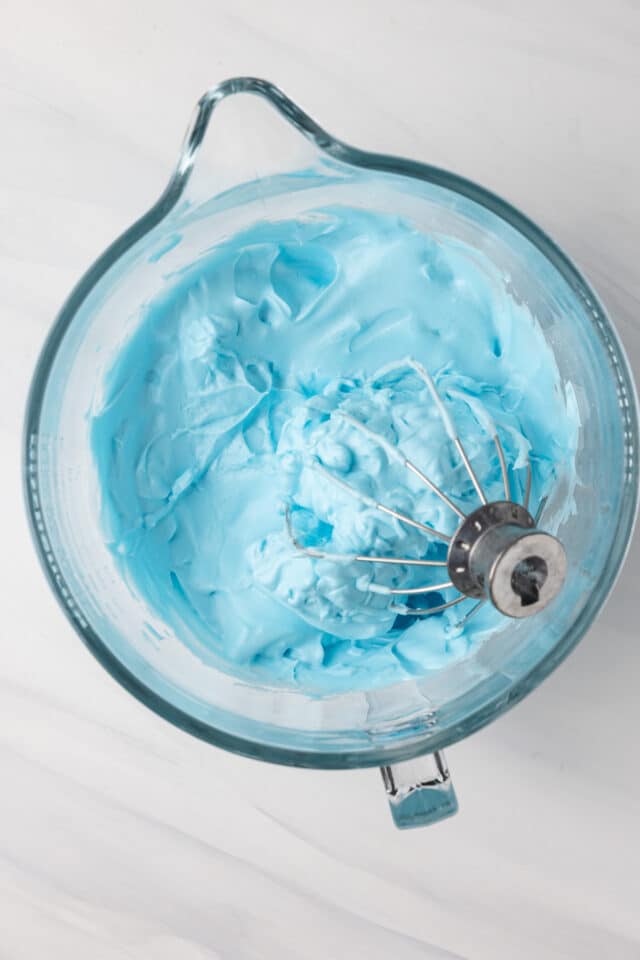
Add the eggs whites and cream of tartar to the bowl of a stand mixer. Using the whisk attachment, beat the egg whites on medium speed until foamy.
With the mixer running, gradually add the granulated sugar. Once all the sugar is added, turn the speed to high and beat until the whites are the consistency of shaving cream. Add the vanilla and a few drops of gel food coloring. The color will fade during baking so use a little more than you think you need.
Continue to beat at high speed until stiff peaks form. Take extra care here so you don’t overwhip the egg whites. You don’t want them to be dry and foamy. The meringue should be thick, stiff, and glossy.
Step 4: Macaronage
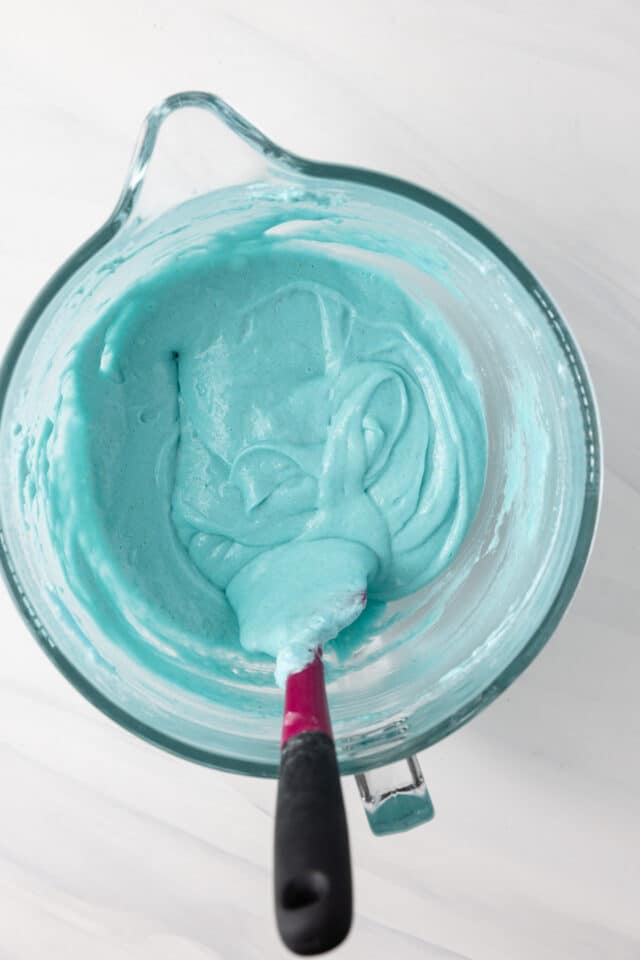
Use a silicone spatula and fold half the almond mixture into the meringue. It’s okay to be a little rough at the point. You want to knock some of the air out of the batter.
Add the remaining almond mixture and gently fold everything together. This is the part where the batter can go wrong. Overmixing or undermixing will cause issues with how the macarons bake up.
After a couple of stirs, you’ll need to stop and check the consistency of the batter. Continue to do this until the batter is just right.
The batter should be shiny and flow like lava. You will be able to let the batter slide off the spatula as you draw a figure 8 and the batter won’t break. The figure 8 you just drew should rest on top of the batter in the bowl without sinking in and losing its shape.
Step 5: Pipe and let dry
Fill the prepared piping bag with the macaron batter – be gentle as you fill the bag, try not to overwork the batter. Hold the piping bag straight up and down and pipe small blobs of batter to fill the template.
Hold the baking sheet firmly with both hands and bang it on the countertop several 2-4 times. This will remove any air bubbles or imperfections on the surface.
Use a toothpick to touch up any bubbles or divots that are stubborn to even out. Just gently swirl the tip of the toothpick in the imperfection until the batter evens out.
Allow the macarons to sit at room temperature until they form a skin and are no longer sticky when you gently touch them – this will take at least 30 minutes and as long as 60 minutes.
Just before baking, mix the cocoa powder with water until you have a dark brown liquid. Dip the bristles of a toothbrush or paintbrush in the liquid and flick the bristles over the top of the macarons. This will give the speckled egg appearance.


Step 6: Bake
Bake the macarons, one sheet at a time, for about 15-18 minutes, until the shells have developed the signature foot /ruffle on the bottom. Take care and don’t let the macarons brown. Double the baking sheets up in the oven, or the bottoms of the macaroons will become too brown.
To check for doneness, you can gently press on the shell and lightly rock your finger back and forth. If the top of the macaron is wiggly, it needs another minute or two to bake.
Remove from the oven and allow the shells to cool for 10 minutes before removing them from the pan. Repeat with the remaining baking sheets
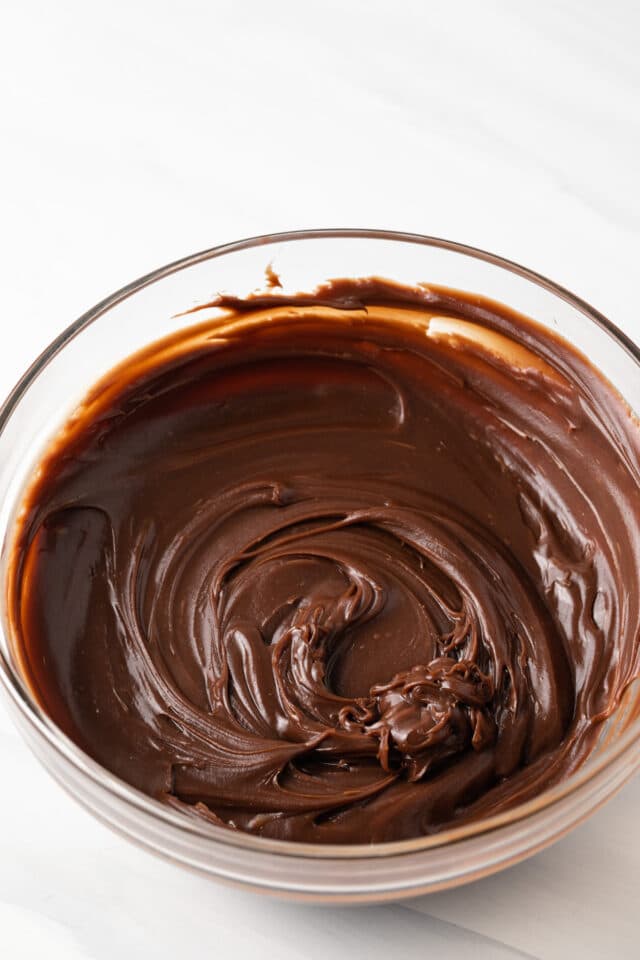
Step 7: Make the Ganache
Place the chocolate in a heatproof bowl and set aside. Add the cream and malted milk powder to a small saucepan and heat until simmering, stirring constantly to dissolve the milk powder. Pour the heated milk over the chocolate and let sit for two minutes.
Whisk the mixture until the chocolate is completely melted and the mixture is smooth and shiny. Let the ganache cool for 3- 5 minutes. Then use a handheld mixer or stand mixer with a whisk to whip the ganache for one minute on medium-high speed, until it becomes lighter and fluffier in texture and color.
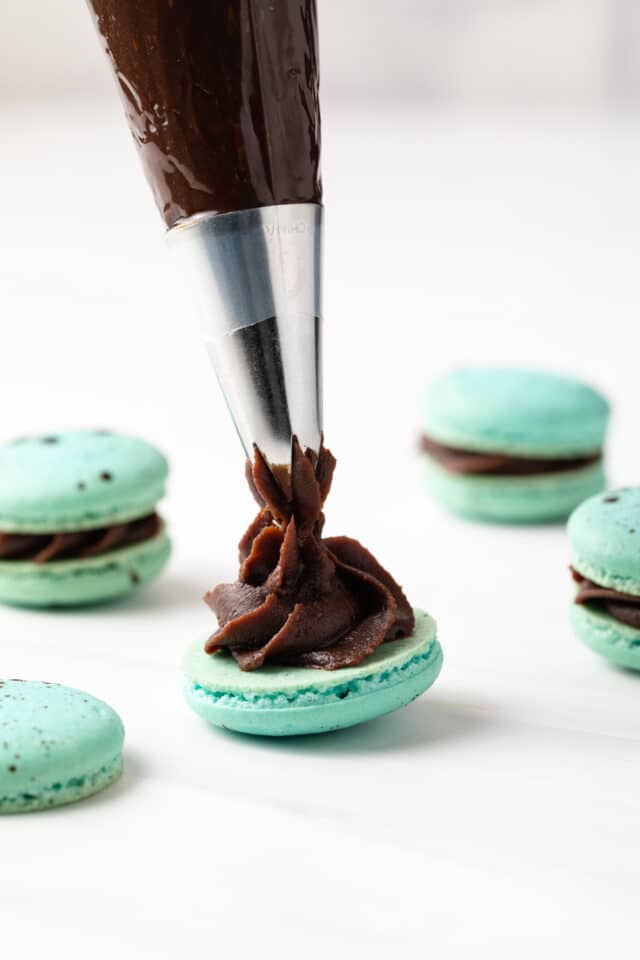
Step 8: Fill the shells
Once the shells are completely cooled, you can fill them with the ganache.
Take a minute to find mates for each shell, make sure they are similar in size. Then add the ganache to a small pastry bag or piping bag fitted with a small round tip. Pipe a small amount onto the bottom side of one shell then top it with its matching shell.
Place the filled cookies in an airtight container and refrigerate them for 1-3 days. The filling will meld with the shells, creating a soft and chewy texture. It’s worth the wait!
Tips For Success
- When choosing powdered sugar for macarons, be sure cornstarch is listed on the ingredient label.
- While it’s not completely necessary, you can have better success when you process the almond flour and powdered sugar in the food processor for 2 minutes before sifting.
- Separate the egg whites while they are cold then place them in a glass dish covered with a lint-free cloth or paper towel until they reach room temperature.
- Wash and thoroughly dry your mixing bowl and whisk attachment before whipping the egg whites. This extra step will ensure that both are clean of oils which can affect how well the egg whites whip up.
- Stop whipping the egg whites as soon as they reach stiff peaks. If you overwhip and end up with dry styrofoam egg whites, you’ll have to start over. Overbeaten egg whites will cause the macarons to become hollow and crack.
- Bake the macarons on the lower third rack in the oven. This is immediately below the center. This position prevents the tops from becoming too brown.
- Make sure you double up the baking pans (one on top of the other) so the bottoms of the shells don’t burn.
- Let the shells cool completely before trying to remove them from the pan. If you try to remove them while they are warm, the feet will stick and possibly tear off.
Storage & Freezing
Refrigerate: Macaron shells can be made up to 3 days in advance. Store in an airtight container or wrap in plastic wrap and separate the shells with layers of parchment paper. Keep refrigerated until ready to use.
Once filled, store the speckled egg macarons in an airtight container in the refrigerator for up to 3 days.
Freeze: Unfilled macaron shells can be stored in an airtight container in the freezer for up to 1 month. Thaw in the refrigerator for at least 2 hours before using. After thawing, the shells will remain good for 2-4 days.
Once filled, macarons can be frozen for up to 1 month. Thaw in the refrigerator for at least 2 hours before serving. After thawing, the macarons will remain good for 2-4 days.
Easter Macarons

Ingredients
For the Macarons
- 270 grams confectioners’ sugar
- 150 grams almond flour
- 150 grams egg whites, at room temperature
- ¼ teaspoon cream of tartar
- 52 grams granulated sugar
- ½ teaspoon vanilla extract
- 1-2 drops blue gel or powdered food coloring
- 2 teaspoons cocoa powder
- 1 tablespoon water
For the Filling
- 6 ounces (170 g) finely chopped milk chocolate
- ¾ cup (180 ml) heavy cream
- 2 tablespoons malted milk powder
Instructions
Make the macarons
- Set the oven rack to the lower third position. This is just below the center of the oven. Place an empty baking sheet on the rack and line 4 more baking sheets with silicone macaron mats. Preheat the oven to 300°F.
- Using a fine-mesh sieve, sift the confectioners' sugar and almond flour into a large bowl. Repeat 2-4 times and discard any clumps. Don't force the clumps through the sieve!
- In the bowl of a stand mixer fitted with the whisk attachment, whip the egg whites and cream of tartar on medium speed until foamy. Gradually add the granulated sugar. Turn the speed up to high and whip until soft peaks form. Add the vanilla and 1-2 drops of food coloring. (The color will fade during baking so use a tad more food coloring than you think you need.)
- Continue to whip on high speed until a thick, glossy meringue forms. Take extra care to not overwhip.
- Using a silicone spatula, fold half the almond mixture into the meringue until fully combined. It’s okay to be a little rough at the point. You want to knock some of the air out of the batter.
- Add the remaining almond mixture and gently fold everything together. This is the part where the batter can go wrong. Overmixing or undermixing will cause issues with how the macarons bake up. After a couple of stirs, you’ll need to stop and check the consistency of the batter. Continue to do this until the batter is just right. (The batter should be shiny and flow like lava. You will be able to let the batter slide off the spatula as you draw a figure 8 and the batter won’t break. The figure 8 you just drew should rest on top of the batter in the bowl without sinking in and losing its shape.)
- Transfer the batter to a large pastry bag fitted with a medium-round piping tip. Be as gentle as you can with the process. Try not to overwork the batter.
- Pipe 1 to 2-inch rounds onto the prepared baking sheets. Gently tap the baking sheet on the countertop to bring any air bubbles to the surface. Let the macarons sit for 30 to 60 minutes, until a dry skin forms on the surface. They should not feel sticky to the touch when going into the oven.
- Just before baking, mix the cocoa powder with water until you have a dark brown liquid. Dip the bristles of a toothbrush into the liquid and flick the bristles over the top of the macarons. This will give them a speckled egg appearance.
- Bake one sheet at a time for about 15 to 18 minutes. The macarons are done when you can gently press on the shell and lightly rock your finger back and forth without it moving. If the top of the macaron is wiggly, it needs another minute or two to bake.
- Cool the shells completely on the baking sheet set on a wire rack. Do not attempt to remove the shells from the silicone mat until they are completely cooled or they may stick and break off.
Make the filling
- Place finely chopped chocolate in a heatproof bowl and set aside.
- Add cream and malted milk powder to a small saucepan and heat just until simmering while stirring constantly to dissolve the milk powder. (The cream should be just beginning to bubble and should not yet be fully simmering or boiling.)
- Pour the heated cream over the chocolate and let it sit for 2 minutes. Then whisk until the chocolate is completely melted and the mixture is smooth and shiny. Let the ganache cool for 3 to 5 minutes.
- Once the ganache has cooled slightly, use a handheld electric mixer or a stand mixer with the whisk attachment to whip the ganache on medium-high speed for about one minute, until it becomes lighter and fluffy in texture and lighter in color.
- Fit a piping bag with your desired piping tip (I used a Wilton 1M piping tip), or simply snip the corner off the bag.
- Match up the macarons and turn half upside down. Pipe the whipped ganache onto the upside-down macarons in a circular pattern then top them with the remaining macarons.
- Store the macarons in the refrigerator for at least 1-3 days and bring them to room temperature just before serving. They taste the best this way.
Notes
- Silicone baking mat: If you don’t have a silicone baking mat for macarons, you can use a 1.5-inch round cookie cutter and trace 20 circles onto sheets of parchment paper cut to fit the baking pans. Set another sheet of parchment paper over each template.
- Double baking pans: Make sure you double up on the baking sheet or the bottoms of the macarons will be too brown!
- Refrigerate: Macaron shells can be made up to 3 days in advance. Store in an airtight container and separate the shells with layers of parchment paper. Keep refrigerated until ready to use.
- Once filled, store the macarons in an airtight container in the refrigerator for up to 3 days.
- Freeze: Unfilled macaron shells can be stored in an airtight container in the freezer for up to 1 month. Thaw in the refrigerator for at least 2 hours before using. After thawing, the shells will remain good for 2-4 days.
- Once filled, macarons can be frozen for up to 1 month. Don’t freeze macarons filled with high moisture fillings like jams & jellies. Thaw in the refrigerator for at least 2 hours before serving. After thawing, the macarons will remain good for 2-4 days.
Nutrition
The nutrition information provided is for convenience and as a courtesy only. It is not guaranteed to be accurate because nutrition information can vary for a variety of reasons. For precise nutritional data use your preferred nutrition calculator and input the exact ingredients and brands you used in the recipe.
These turned out super yummy and beautiful!!!