
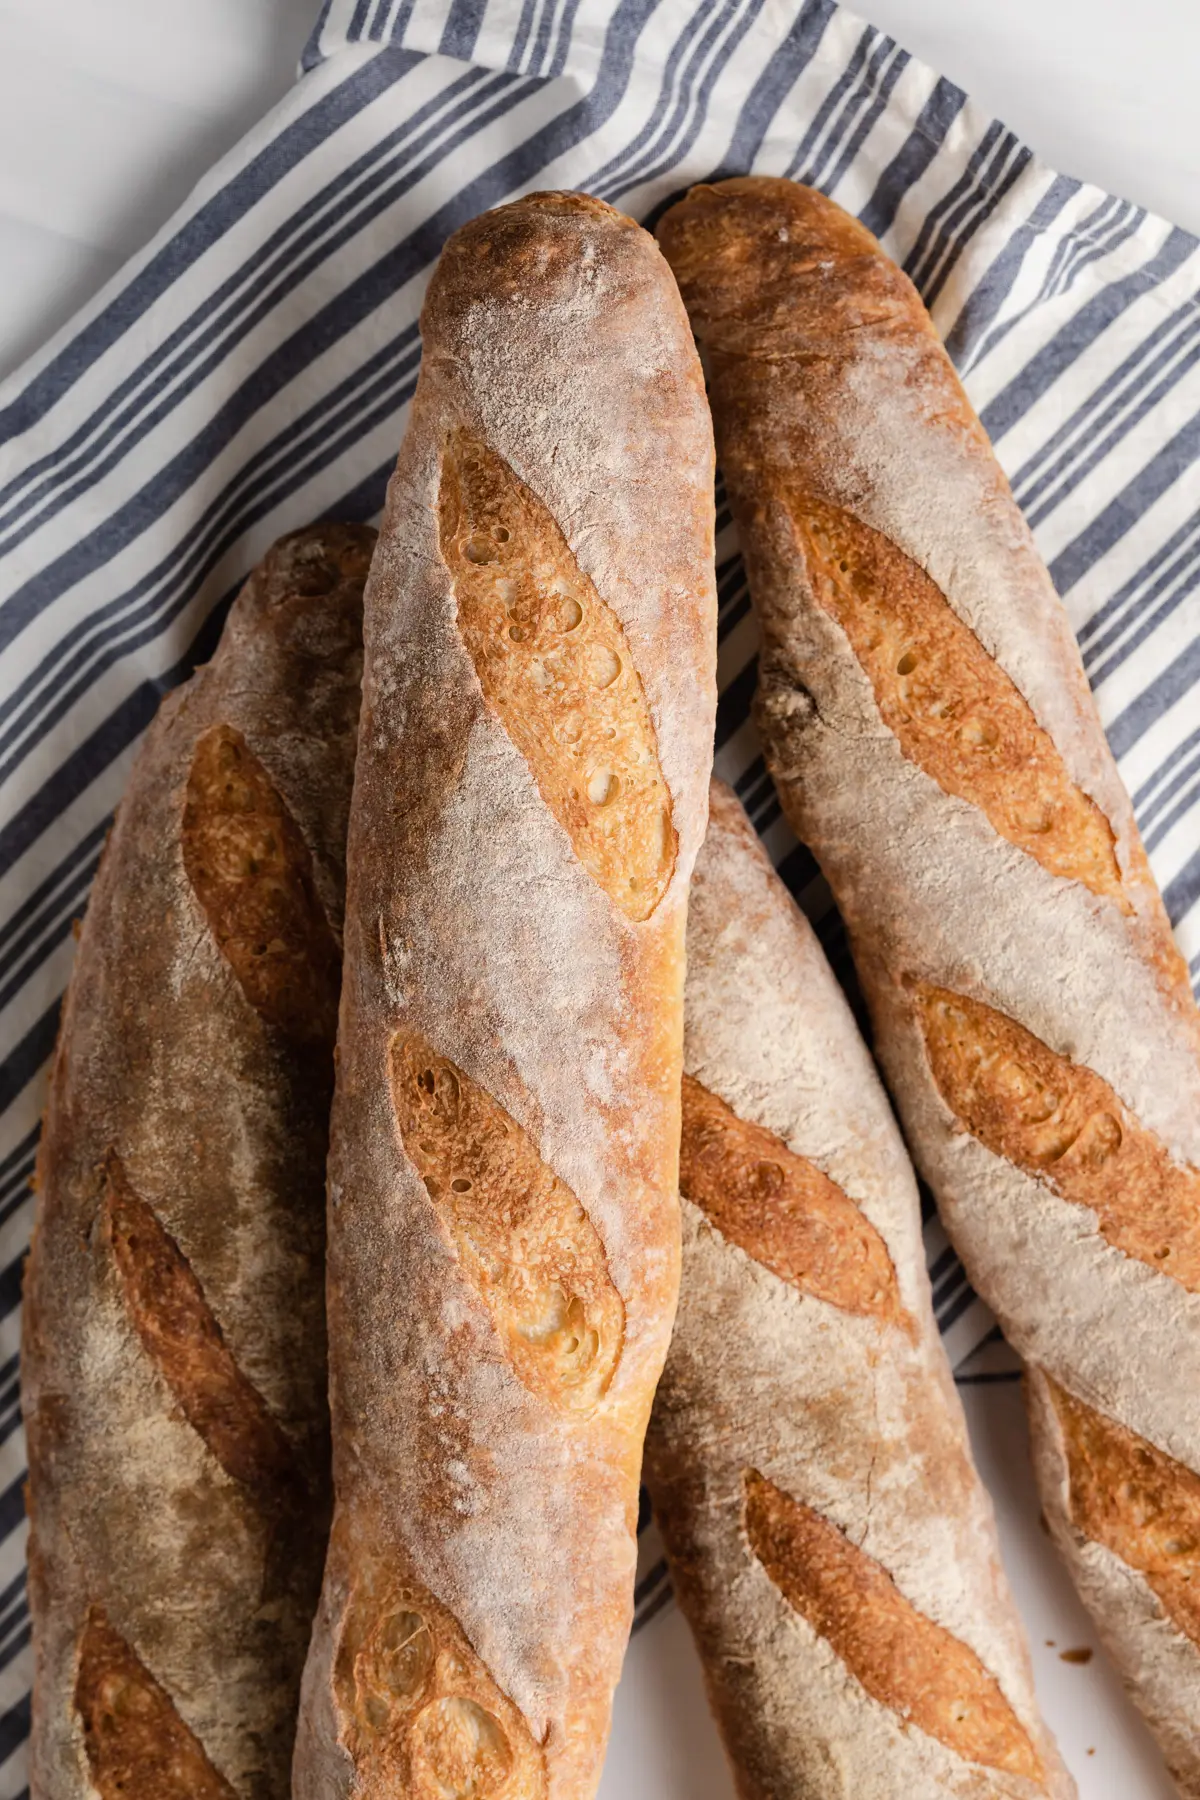
French Baguette
This post may contain affiliate links. Read the full disclosure here.
The perfect, easy French baguette recipe for baking at home.
While riding on my red-striped moped in the glistening sunshine in the scenic south of France, I dreamed up this perfectly easy recipe for making baguettes at home. Just kidding, I’m at home just like everyone else these days.
The baguette practically screams France though. The word for the thin, long bread shaped loaf in French literally translates to “wand” or “baton.” The French even have a proper way of carrying one’s baguette – tucked under the arm. A French meal can never really be complete until the trusty, crusty baguette makes an appearance.
My inspiration for this recipe came from several of my favorite books. These include, “On Baking: A Baking Textbook,” “The Bread Collection” by Brian Hart Hoffman and “Joy of Baking.” I developed this recipe to be easy enough for the beginner baker to attempt with confidence. You don’t need to be an expert bread maker!
You’ll love the airy crumb with chewy texture of this bread recipe. The crust is that perfect crispy without being so crispy that it digs into the roof of your mouth. It’ll be your favorite sidekick to your pasta dishes or perfect base for bruschetta.
After mastering this recipe, I encourage you to give homemade ciabatta a try! Both can be sliced and served with my classic baked brie!
Why this recipe works
- This recipe doesn’t require kneading, which makes it great for beginners. Long proofing times eliminate the need to knead. It also give you more hands off time in the process.
- The bread gets most of its flavor from the poolish, a type of preferment. This yeast, flour, and water mixture ferments overnight in the refrigerator. Longer fermentation equals more flavor for this recipe.
- Don’t strive for perfection! Each loaf will look different. It’s perfectly okay if some are slightly misshapen. Part of the mystique of the baguette is its rustic appearance.

Classic baguette recipe
While this recipe may appear long, it is designed to be exceptionally easy for the beginning baker. The recipe has a significant amount of hands-off time. It’s a breeze to fit this into your busy schedule and make delicious homemade baguettes.
As a no-knead recipe, the dough requires long proofing times. The gluten needs extended time in order to develop appropriately. Additionally, the flavor profile is enhanced by the long proof time.
You can personalize the bread to your preferences, as well. If you need smaller baguettes, divide the dough into thirds, instead of halves, for shorter loaves. If you prefer loaves to have a lighter crust, then bake them at 450°F for 18-20 minutes.
Speaking of that signature crispy crust, this recipe uses ice cubes to create steam in the oven. This aids in developing a deep golden crust with a perfect crispy texture.
Ingredients
- Flour: This baguette recipe works best with bread flour. It develops the chewy texture of the bread. While all-purpose flour may work, I have not tested it. You may be disappointed when it gives you a less chewy texture.
- Yeast: As a leavening agent, the yeast creates a light and airy feeling in the bread. It releases acids and alcohols as it grows, which enhance the flavor of the bread.
- Salt: This ingredient works to strengthen the dough by tightening the bonds between the gluten strands. Additionally, it increases flavor in the finished product.
- Sugar: While sugar may not be a traditional baguette ingredient, I find it adding a little sugar helps to keep the yeast lively. The amount of sugar in the recipe does not create a sweet flavor in the bread. However, you are welcome to omit this ingredient.
- Water: Be mindful of the temperature of your water. Room temperature water functions best in this recipe. It helps facilitate the fermenting in the poolish along with adding moisture to the dough.
To make this homemade baguette you’ll need:
- Mixing bowl: You’ll need a small bowl to ferment the poolish in the refrigerator. A large mixing bowl is ideal for combining the ingredients for the dough.
- Bench scraper: A bench scraper is a cool tool that easily cuts the dough without tugging or pulling it. However, a sharp knife will work in its place.
- Baking pan: Grab a 13×18 half sheet pan to bake your loaves.
- Bread lame: Ideally, a bread lame would be used for scoring the loaves. You could also use a sharp knife.
How to make baguette
While the proofing times may be long, you’ll find this recipe is easy enough for a beginner. Remember to plan ahead. First, you’ll make the poolish, a preferment.
After 12-24 hours, you’ll make the dough. Then, you’ll go through multiple steps of stretching and folding the dough, pre-shaping the dough and final dough shaping. There will be periods of rest as outlined in the recipe. It is important to closely follow the rest periods to have the optimal bread.

Step 1: Make the poolish
First, you will combine the ingredients for the poolish in a small bowl until thoroughly mixed. The ingredients will be blended after about 2 minutes.
Then, cover in plastic warp. Finally, place in the refrigerator for 12-24 hours. The longer the poolish ferments, the more flavor the baked bread will have at the end.
Step 2: Make the dough
Next, you’ll whisk together the flour, sugar, salt and yeast in a large bowl until well blended.
Grab your poolish. Then, add water to it. Gently mix to loosen it form the sides of the bowl.
Add the poolish to the the flour mixture. Then, mix with a wooden spoon until a shaggy dough forms. It is normal for the dough to appear dry.
Using your fingertips, you will gently work the dough until all the dry ingredients are moistened. Once fully hydrated, the dough will become very sticky.
Lightly oil a medium bowl. Then, use a dough scraper or silicone spatula to scrape dough into the bowl. Rotate the dough until all sides are coated with oil.
Finally, cover the bowl with plastic wrap. Let sit at room temperature for 45 minutes.

Step 3: Stretch & fold
After resting, gently grab the dough on one side. Then, lift and stretch it over the top of itself. Turn your bowl 90 degrees and repeat the process. Do this until you have gone all the way around the bowl.
Flip the dough over. The top should now be the bottom. Then, cover with plastic wrap. Let rest at room temperature for 45 minutes.
Repeat the process of lifting and stretching. Cover with the method above and let rest for another 45 minutes.
You’ll repeat the lifting and stretching one more time. Again, cover the dough and let rest for a final 45 minutes.


Step 4: Prehape the dough
Prior to preheating, adjust your oven racks for the baguettes. One should be in the center of the oven. Another should be at the very bottom position.
Then, place a cast-iron skillet on the bottom rack. Turn oven to 475°F. Make sure to let the oven preheat for at least one hour to ensure it is hot enough.
Prepare your work space by lightly dusting with rice flour. Then, delicately turn out the dough from the bowl. Avoid knocking air out of the dough.
You’ll need to use a bench scraper or sharp knife to divide the dough into equal parts. Be careful not to tug or stretch the dough.
Start by working with one piece of dough. Gently pat it into a 6×4-inch rectangle. Locate the long side of the rectangle. Then, fold the top of the dough over onto the center as if you are folding a letter.
Then, fold the top all the way down. Use your fingertips to press and seal the seam.
Do this same process with the second piece of dough. Let the two dough logs rest seam side down for 30 minutes. You will want to cover them with plastic wrap to prevent them from drying out.

Step 5: Shape the baguettes
Use your bench scraper to gently flip the dough, so the top becomes the bottom. Gently pat the dough into a rectangle again.
Fold the long side over to the center. This should mimic folding a letter. Use your fingertips to press and seal the seam.
Fold the bottom up to meet the center. Again, press the seam with your fingertips.
Fold the top of the dough over to create a cylinder. You’ll use your thumb to create tension on the surface during this folding. Seal the seam using your fingertips.
Roll out each dough piece into a 14-inch loaf. Place your rolled dough seam side down onto a half-sheet baking pan lined with a lint-free cloth, which is lightly dusted with rice flour. You need to wrinkle the cloth to create a barrier between loaves.
Cover the dough and let it proof at room temperature until the loaves increase by 45-50% in volume. This normally takes 45-60 minutes. You will know they are ready to bake when you gently press a fingertip into the dough and a slight indention remains.

Step 6: Bake
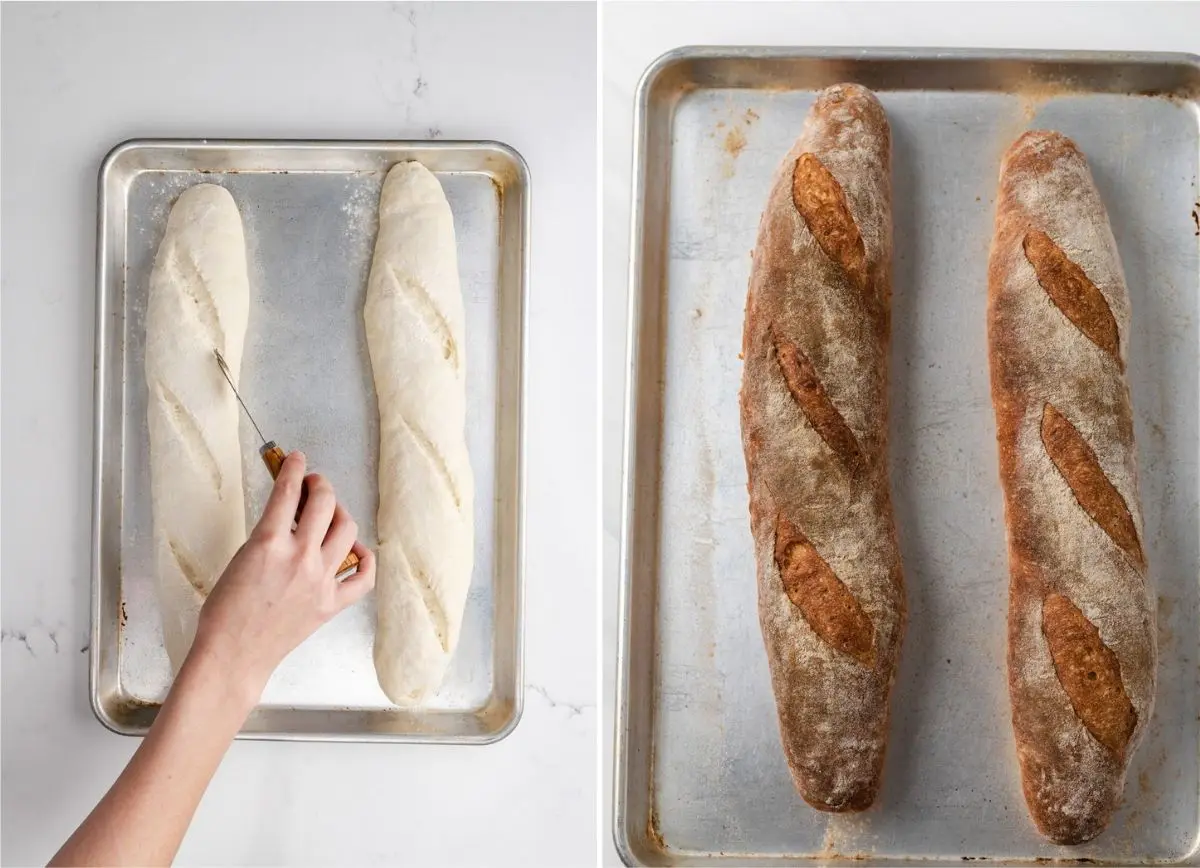
Lightly oil a baking sheet and delicately transfer the baguettes onto it. Grab your rice flour and dust the tops of the loaves. Use a sharp knife or bread lame to cut 3-4 diagonal slashes across the tops of the loaves as shown below.
You’ll need 2 cups of ice at the ready. Place the baking sheet on the center rack. Immediately, drop the ice into the cast-iron pan on the bottom rack.
Quickly close your oven door. (No peeking in the oven. You’ll let the steam out!)
Finally, bake the baguettes for 15 minutes. Reduce the oven temperature to 425°F, then bake the baguettes until they appear deeply golden brown. This should take about 10 minutes.
Be careful when opening the oven door. Slowly open the door to gradually release the steam. Remove baguettes from the baking sheet. Let cool completely on a wire rack.

Tips for success
- This recipes creates the best results when you use the weight measurements for the ingredients. A food scale is your best friend while making baguettes.
- Plan ahead. You’ll have a better finished product by making the poolish the day before you make the bread. Ideally, 12-24 hours of fermentation works best for this recipe.
- Don’t panic. Sticky dough is normal, as this is a 70% hydration dough. If your hands are sticking, dampen them during the stretch and fold steps. During the shaping of the dough, rice flour works wonders to prevent sticking to hands and surfaces.
Storing & Freezing
To store: These baguettes store best once completely cooled. Wrap in aluminum foil at room temperature for up to 2 days. Avoid storing the bread in your refrigerator as this will likely dry it.
To Freeze: When stored properly, you can freeze the bread for up to 3 months. Wrap the cooled loaves in double layers of plastic wrap. Then, wrap those in double layers of aluminum foil. To reheat, strip off protective layers and heat in the oven to your desired warmth.
When your loaves dry out, spritz them with water from a food-safe spray bottle. Or quickly pass the loaves under a running faucet. DO NOT SOAK! You’ll end up with soggy bread and a sad heart.
Finally, reheat by baking at 450°F for 5-7 minutes to restore the loaves.
French Baguette

Ingredients
For the poolish
- ½ cup (60 g) bread flour
- ¼ cup (60 ml) water, room temperature
- ¼ teaspoon instant yeast
For the baguette
- 2 ⅔ cups (346 g) bread flour
- 1 ½ teaspoon sugar
- 1 teaspoons salt
- 1 teaspoon instant yeast
- 1 scant cup (225 ml) water, water
- rice flour, as needed
- 2 cups ice
Instructions
Make the poolish
- Combine all ingredients for the poolish in a small bowl. Mix until thoroughly blended, about 2 minutes. Cover with plastic wrap and refrigerate for 12-24 hours. The longer it ferments, the more flavor the bread will have.
Make the dough
- In a large mixing bowl, whisk the flour, sugar, salt, and yeast together until well blended.
- Add the water to the poolish and gently mix to loosen it from the sides of the bowl. Add it to the flour mixture and mix with a wooden spoon until a shaggy dough forms. The dough will look dry at this point.
- Using your fingertips, gently work the dough inside the bowl until all the dry ingredients are moistened. The dough will become very sticky once fully hydrated.
- Using a dough scraper or silicone spatula, scrape the dough into a medium bowl that’s lightly oiled. Turn the dough over inside the bowl so all sides are coated with oil. Cover with plastic wrap and let sit at room temperature for 45 minutes.
Stretch & fold
- Gently grab one side of the dough, lift and stretch it over the top of itself. Turn the bowl 90 degrees and stretch the same way. Continue to rotate 90 degrees, stretch and fold until you’ve gone around all four sides of the dough. Flip the dough over so the bottom becomes the top. Cover with plastic wrap and let rest at room temperature for 45 minutes.
- Repeat the stretch and fold process. Cover and let rest for another 45 minutes.
- Repeat the stretch and fold process once more. Cover and let rest for a final 45 minutes.
Preshape the dough
- Adjust the oven racks so that one is in the center of the oven and one is at the very bottom position. Place a cast-iron skillet on the lowest rack. Heat the oven to 475°F. It's important to let the oven preheat for at least an hour to ensure it is hot enough.
- Very lightly dust your work surface with rice flour. Carefully, turn the dough out of the bowl without knocking too much air out of it. Use a bench scraper or sharp knife to divide the dough in half. Take care not to tug or stretch the dough.
- Working with one piece of dough at a time, gently pat into a rectangle 6×4-inch rectangle. Starting on one long side, fold the top of the dough over onto the center like you’re folding a letter. Then fold the top all the way down and use your fingertips to press and seal the seam.
- Let the two dough logs rest seam side down for 30 minutes. Cover with plastic wrap to prevent the dough from drying out.
Final dough shaping
- Using a bench scraper, gently flip the dough so the top is now the bottom. Gently pat the dough into a rectangle.
- Fold one long side over to the center like you’re folding a letter. Use your fingertips to press and seal the seam. Fold the bottom up to meet the center and press the seam once more. Fold the top of the dough over to create a tight cylinder, using your thumb to create tension on its surface. Seal using your fingertips.
- Gently roll out each dough piece into a 14-inch loaf. Place the rolled dough seam side down onto a half sheet baking pan lined with a lint-free cloth that’s lightly dusted with rice flour. Wrinkle the fabric in between the loaves to create a barrier.
- Cover and let proof at room temperature until the loaves increase 45-50 percent in volume, about 45-60 minutes. They’re ready to bake when you gently press a fingertip into the dough and a slight indention remains.
- Gently transfer the baguettes to a lightly oiled baking sheet. Dust the tops with rice flour. Use a sharp blade or bread lame to cut 3-4 diagonal slashes across the top centers.
- Have 2 cups of ice ready. Place the baguettes on the center rack and immediately drop the ice into the cast-iron pan on the bottom rack. Quickly close the oven door.
- Bake for 15 minutes. Reduce the oven temperature to 425°F and bake until baguettes are deeply golden brown, about 10 minutes.
- Open the oven door slowly to release the steam! Remove baguettes from pan and let cool completely on a wire rack.
Notes
- The recipe process seems long and might be intimidating. Keep in mind, most of this time is hands-off. The dough requires long proofing times in order for the gluten to develop since this is a no-knead recipe. This long proof time also develops an enhanced flavor.
- Bread flour. I’ve only tested the recipe with bread flour as it is the best flour for a chewy bread texture. All-purpose flour may work but keep in mind the texture will not be as chewy.
- Sugar. I added a little sugar to the recipe to keep the yeast lively. It’s not enough to add sweetness to the bread, and it’s okay to omit it if you wish.
- The dough. This is a 70% hydration dough. It will be sticky. Use dampened hands during the stretch and fold process to help prevent the dough from sticking to your fingers. Rice flour works best when shaping the dough! Lightly dust the work surface, your hands, and dough with the rice flour.
- Avoid handling the dough too much! Overmixing or overworking will give you a flat, dense loaf.
- Smaller baguettes. You may wish to divide the into thirds for shorter baguettes instead of dividing in half.
- Baking. The baguettes bake at 475°F for 15 minutes then at 425°F for 10 minutes. This helps to create a dark golden crust. If you prefer them to be lighter in color, bake them at 450°F for 18-20 minutes.
- Wrap completely cooled baguettes in aluminum foil and they will keep for up to 2 days at room temperature. The crust will soften but can be toasted if you wish to crispen it up.
- The bread will stay fresh for up to 3 months if stored in the freezer. Wrap the cooled loaves in double layers of plastic wrap followed by double layers of aluminum foil. Reheat the frozen loaves as desired in the oven.
- I don’t recommend refrigerating the bread. Often times, this will dry it out.
- If the baguettes do dry out, moisten them with water either by spritzing them with a spray bottle or by passing them quickly under a running faucet. DO NOT SOAK! Then, bake them at 450°F for 5-7 minutes.
Nutrition
The nutrition information provided is for convenience and as a courtesy only. It is not guaranteed to be accurate because nutrition information can vary for a variety of reasons. For precise nutritional data use your preferred nutrition calculator and input the exact ingredients and brands you used in the recipe.
Recipe adapted by On Baking: A Baking Textbook and The Bread Collection. Method adapted by Joy of Baking.
Ive made your Ciabatta, excellent recipe BTW. Now I’ve made this one and it is one of the best recipes that I’ve come across. My baguettes had a great crust and soft interior. I’ve made them twice in the past week. Thank you so much, your repipes always seem to work .
Hello, thank so much for this very straightforward recipe. I am making it for the first time. I’m trying sort out my timing and would like to know whether there is an option to insert a “cold proof” (possibly overnight, depending on my schedule) either before or after the room temperature proof that precedes baking. Thanks in advance for your advice.
JimW.
I’ve not tested the recipe any other way than the way it is written so I can’t offer advice on changes to the proofing.
I’ve eating amazing baguettes from Première Moisson bakery when I lived in Montreal. Now I missed them so dearly that I decided to try my hand at it. So I’ve perused countless recipes online and yours is it for me! You cover all the important aspects in a user-friendly manner and your photos on folding and shaping are so helpful. Will sure let you know how it goes and will check out your other recipes as well 🙂 Thank you profusely for this!!
Oops..I’ve ”eaten” amazing baguettes.
This recipe is amazing! I am so glad I found it. Very descriptive and great photos. After the 12-24 hour it took me about 5.5-6 hours for the rest of the steps. So just plan ahead, but that’s most bread.
Thanks for your helpful tutorial! Not sure what bread has against me- but I stress and partly fail at every yeast dough I’ve ever made. Luckily we are not foodies here, and it always turns out decent-enough.
I haven’t ever heard of rice flour, and would hate to buy a special ingredient I’ll never use. I also hesitate to not follow your recipe precisely- especially considering what I just said about breads hating me. Bread flour I have, but could you dust with AP flour?
Rice flour is easier to work with because it doesn’t become as sticky when moistened by the dough. But you can use all-purpose flour or bread flour for dusting if you don’t have rice flour
I have always wanted to make baguettes at home this recipe looks easy to follow along (esp with the accompanying video!). I have experience baking bread at home so this doesn’t worry me but I do have a question what happens if you don’t add the ice step when baking? Will you still develop a good crust? The reason I asked this is the last time I did something with steam in my oven, I managed to completely ruin the electronics of my Meile oven!!!! So I am just a little hesitant. Thank you and I love all your recipes:-)
The ice will melt to create steam which does help give the bread a dark, crisp crust. You have a Meile oven which is a steam oven. You can omit the ice and use the steam function on your oven instead. You’ll need to refer to the owner’s manual for instructions on how to do that.
I’ve always wanted to make French baguettes, and you’ve given me the nudge I needed! Looks beautiful!