
Chocolate Peanut Butter Cheesecake
This post may contain affiliate links. Read the full disclosure here.
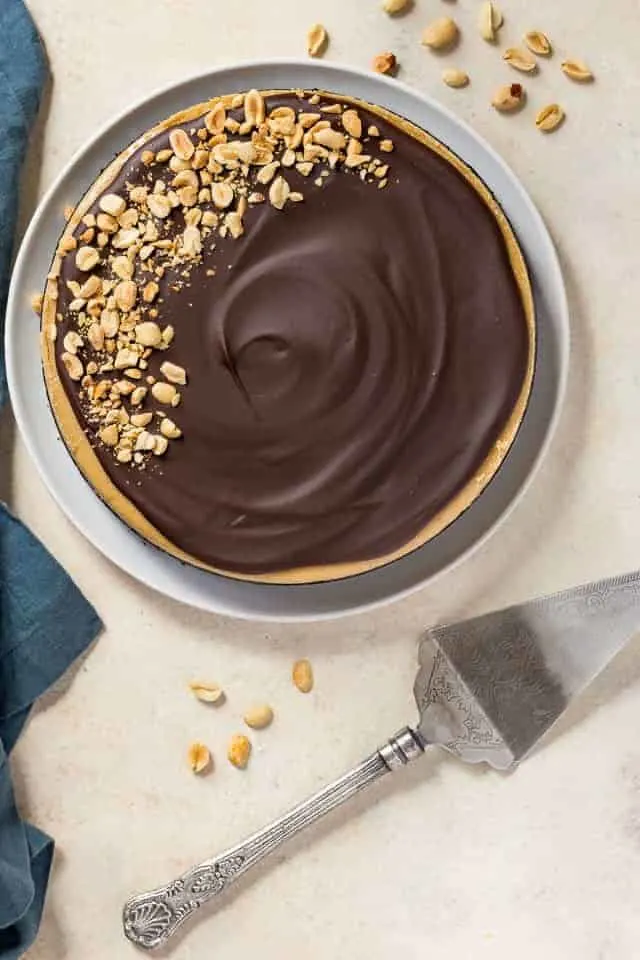
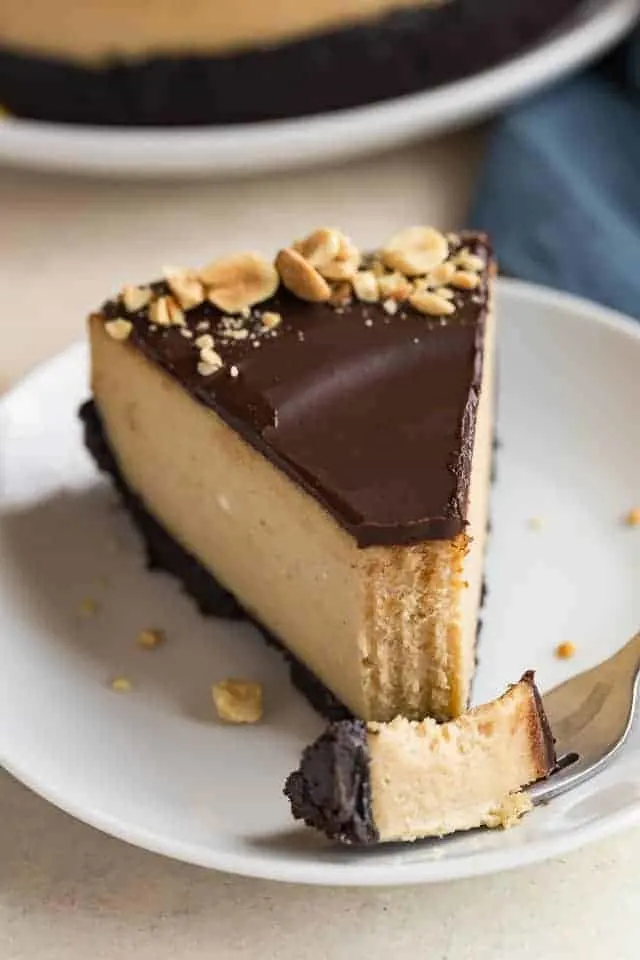
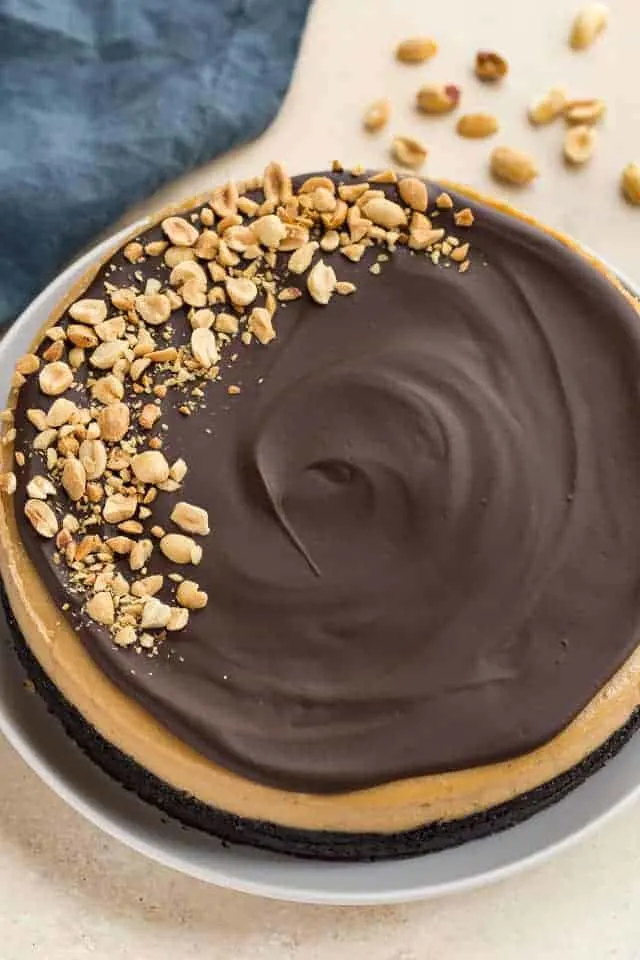
This Chocolate Peanut Butter Cheesecake starts with an Oreo cookie crust, followed by a rich peanut butter filling, then topped with chocolate ganache and chopped peanuts. It’s a decadent dessert that is well worth the effort of making a baked cheesecake.
It’s no secret I love cheesecake. I have so many different cheesecake recipes on the blog and will continue to add to the collection.
Today’s recipe is a play off my popular Nutella Cheesecake. The recipe is pretty much exactly the same with the exception of using peanut butter instead of Nutella.
Make sure you read through my post on how to make the best cheesecake. There you’ll learn all of my favorite tips and tricks for making a perfect cheesecake. If you follow these tips, your cheesecakes will come out creamy and free of cracks.
Chocolate cookie crust
The chocolate peanut butter cheesecake begins with a chocolate crust made with chocolate filled Oreos just like my peanut butter pie recipe. You can use any fudge-filled sandwich cookie that resembles an Oreo.
Pulverise 30 cookies in a food processor or smash them in a zip-top bag with a rolling pin. You should end up with about two and a half cups of cookie crumbs.
Mix the crumbs with melted butter and press it into the bottom of a 9-inch springform pan. Bake the crust for 10 minutes at 350°F.
Peanut butter cheesecake filling
The creamy peanut butter filling calls for cream cheese, heavy cream, sugar, vanilla, salt, peanut butter, and eggs. Basically, your staple cheesecake ingredients with the addition of peanut butter.
I have a specific order for adding the ingredients to the filling. The reason behind this is to achieve an ultra creamy filling. So be sure to follow the recipe exactly when mixing the filling.
First, beat the cream cheese until smooth and creamy. Then mix in the sugar, salt, vanilla until well combined. Beat in the cream until the filling is light and creamy. Mix in the peanut butter next. And finally, fold in lightly beaten eggs.
Don’t use the mixer to beat in the eggs! It’s important that you fold them in with a spatula. Using a mixer will whip too much air into the eggs causing the cheesecake to puff up during baking. It will then deflate as it cools causing cracks to form on the surface.
I preach this with every cheesecake I share with you. I’m sorry for constantly repeating myself but it’s really the most valuable cheesecake advice I can give you.
Bake the cheesecake low and slow
Bake the cheesecake in a water bath at 300°F for one hour. Then, turn the oven off and let the cheesecake sit in the oven for another hour. Do not crack the oven door.
I know a lot of other recipes tell you to crack the door, but don’t do it. Trust me on this. Leave the door closed to allow the oven to cool down slowly.
This is a process you don’t want to rush because it also helps keep the top from cracking.
After the cheesecake has cooled in the oven for an hour, it needs to sit at room temperature until it’s completely cool to the touch. Then, refrigerate it for at least 4 hours but overnight is best.
I decided to top the cheesecake with chocolate ganache and garnish it with chopped peanuts.
The ganache is super simple. Just warm heavy cream in a saucepan and pour it over chopped chocolate. Let it sit for a minute then stir it until melted and smooth. Spread it over the top of the cheesecake and pop it back in the refrigerator until it sets.
Cheesecakes are extremely time-consuming but one bite of this chocolate peanut butter cheesecake will make it all worthwhile.
Chocolate Peanut Butter Cheesecake
Ingredients
For the crust
- 2 ½ cups (250 g) fudge filled cookie crumbs, about 30 sandwich cookies, such as Oreos
- 4 tablespoons unsalted butter, melted
For the filling
- 24 ounces (681 g) cream cheese, softened
- ¾ cup (180 ml) heavy cream
- ¾ cup (150 g) granulated sugar
- 1 tablespoon vanilla extract
- ½ teaspoon salt
- 2 cups (516 g) creamy peanut butter
- 4 large eggs, lightly beaten
For the glaze
- ½ cup (120 ml) heavy cream
- 8 ounces (226 g) semisweet chocolate, coarsely chopped
Instructions
Make the crust
- Adjust the oven rack to the lower third position and preheat the oven to 350ºF. Wrap the outer bottom of a 9-inch springform pan tightly with aluminum foil. Combine the cookie crumbs and melted butter. Press the crumb mixture into the bottom and about 2-inches up the sides of the pan. Bake for 10 minutes. Set aside to cool while you make the filling.
Make the filling
- Reduce the oven temperature to 300ºF.
- In a large mixing bowl beat the cream cheese with an electric mixer until smooth and creamy. Add the sugar, salt, and vanilla, beat on low speed until well combined. Add the heavy cream and beat on low speed until smooth. Add the peanut butter and beat until well incorporated. Scrape down the sides of the bowl as needed. Using a silicone spatula, gently stir in the eggs just until combined.
- Pour the batter over the crust in the prepared pan. Place the cheesecake inside a roasting pan. Fill the roasting pan with enough hot water to reach halfway up the sides of the cheesecake pan. (Alternatively, you can place the roasting pan filled with water on the lower rack of the oven.)
- Bake for 1 hour, OR until the edges are set and the center is slightly jiggly. Turn the oven off, leave the cheesecake in the water bath in the oven for another hour.
- Remove the cheesecake from the water bath and run a small knife around the outer edge of the cheesecake to loosen it from the pan. Allow it to cool completely to room temperature. (The cheesecake should not feel the slightest bit warm.) Refrigerate the cheesecake for at least 4 hours or overnight.
Make the glaze
- Remove the sides of the pan and place the cheesecake on a serving platter.
- Bring the cream to a low boil over medium-low heat. Pour the warm cream over the chocolate in a medium bowl and stir to combine. Pour the glaze over the top of the cheesecake and use an offset spatula to smooth it over. Refrigerate for 20 minutes or until the glaze has set.
Notes
- Make sure the peanut butter you use is not natural. Choose a brand such as Jif®.
- Stir the peanut butter well before using. Sometimes the oils will separate from the peanut butter and you need all that oily goodness to keep the cheesecake from drying out.
- Start checking on the cheesecake after 30 minutes into baking. Oven temperatures vary and you may not need the full hour of bake time. Turn the oven off as soon as the edges of the cheesecake firm up but the center remains jiggly.
- Prevent a soggy cheesecake! Read through my helpful tips on how to create a leakproof water bath
- The cheesecake will keep for up to 4 days covered and stored in the refrigerator.
- The cheesecake can be frozen for up to 3 months. Thaw overnight in the refrigerator.
Nutrition
The nutrition information provided is for convenience and as a courtesy only. It is not guaranteed to be accurate because nutrition information can vary for a variety of reasons. For precise nutritional data use your preferred nutrition calculator and input the exact ingredients and brands you used in the recipe.
My very first time making a real cheesecake and it turned out absolutely perfect!!! Not a single crack and the texture is perfect. I was terrified if ruining it with the water bath so I put an inch of boiling water in a hand sheet cake pan on the rack directly under the cake and it worked like a charm. Thank you so much! I’m going to try another variation fur Christmas.
Hi, I followed your instructions closely and I used Jif peanut butter but there’s still oil separation. What could be wrong? Did I not mix enough?
Jiff is already creamed and will not have oil separation. Only natural peanut butter will separate and need to be stirred before using.
@Annie, the same thing happened to me.
You have the best website for recipes I have found so far! A few years back, in my entertaining stage of life, I was the queen of cheesecakes in the town! I have to say you give such detailed instructions and yes you can never say the instructions too much
and a few new ideas for me – now I can’t wait to start making them again. I used to make four or five at Christmas time at Christmas time and give them to my friends for gifts as well as keeping 1/2 of each for family and friends’ dinner parties. A favourite one back in the day was the candycane no bake cheesecake. Do you have a recipe for that? I can’t wait to read your blogs and recipes – thank you for sharing!
Hi Janice! Thank you so much for saying all those nice things! I’m extremely happy you find the site beneficial to you. I don’t have a recipe for a candy cane cheesecake but that’s a great idea for the holidays!
Hey just want to ask, would this cheesecake hold in room temperature? Or does it need to be in the fridge until serving?
It definitely needs time in the fridge to set but after that, I think it would be okay for about an hour at room temperature before serving.
could you add things to the cheesecake mixture? like bits of oreo, or mini reese’s pieces?
I actually haven’t tried add-ins with this recipe but I imagine it would work fine.
Is it still meant to be jiggly after you pull it out of the oven? Will it set once it’s been in the fridge?
Yes, the edges of the cheesecake should be firm and the center jiggly. It will set once it has been cooled and refrigerated for at least 4 hours.
Planning on making this for Thanksgiving this year. I hope it’ll turn out well.
Will Skippy brand peanut butter work well?
Skippy should work just fine. You just don’t want to use anything that’s labeled “all natural”.
I’ve made a few cheesecakes with Oreo cookies crumbs for the crust, but I’m a bit confused by your recipe. Do you mean for us to use the fudge in the middle of the cookie? I’ve never used it before and am afraid it will make the crust too sweet. Please clarify.
Thanks,
Nancy
I always leave the filling in the cookies because I don’t have time to scrape it out nor do I like to waste it. And I find that using the filling gives the crust more structure. It’s like a glue that holds all the crumbs together. I personally don’t think it’s too sweet but everyone has different tastes. Do you whatever best suits yours.
Hello!
Just curious, why can you not use a natural peanut butter?
Natural peanut butter has a higher oil content and could possible separate during baking. That could potentially ruin the cheesecake.
Looked so amazing I tried making it at home! I have a question though, I followed your instructions to a T and yet it seems as though it’s overbaked and quite dense. Mine was not “firm around the edges and gooey in the middle”, but rather firm all around after the 2 hours. Can you help me figure out what went wrong? I’d love to nail it next time. Thanks!
Oven temperatures can vary. Because of this, you may not need the full hour of baking. Start checking the cheesecake after about 30 minutes. Once the edges are firm but the center remains jiggly, turn the oven off and leave the cheesecake in the oven for an hour to slowly cool down. Also, make sure you’re not using natural peanut butter. Jif® works well for this recipe.