
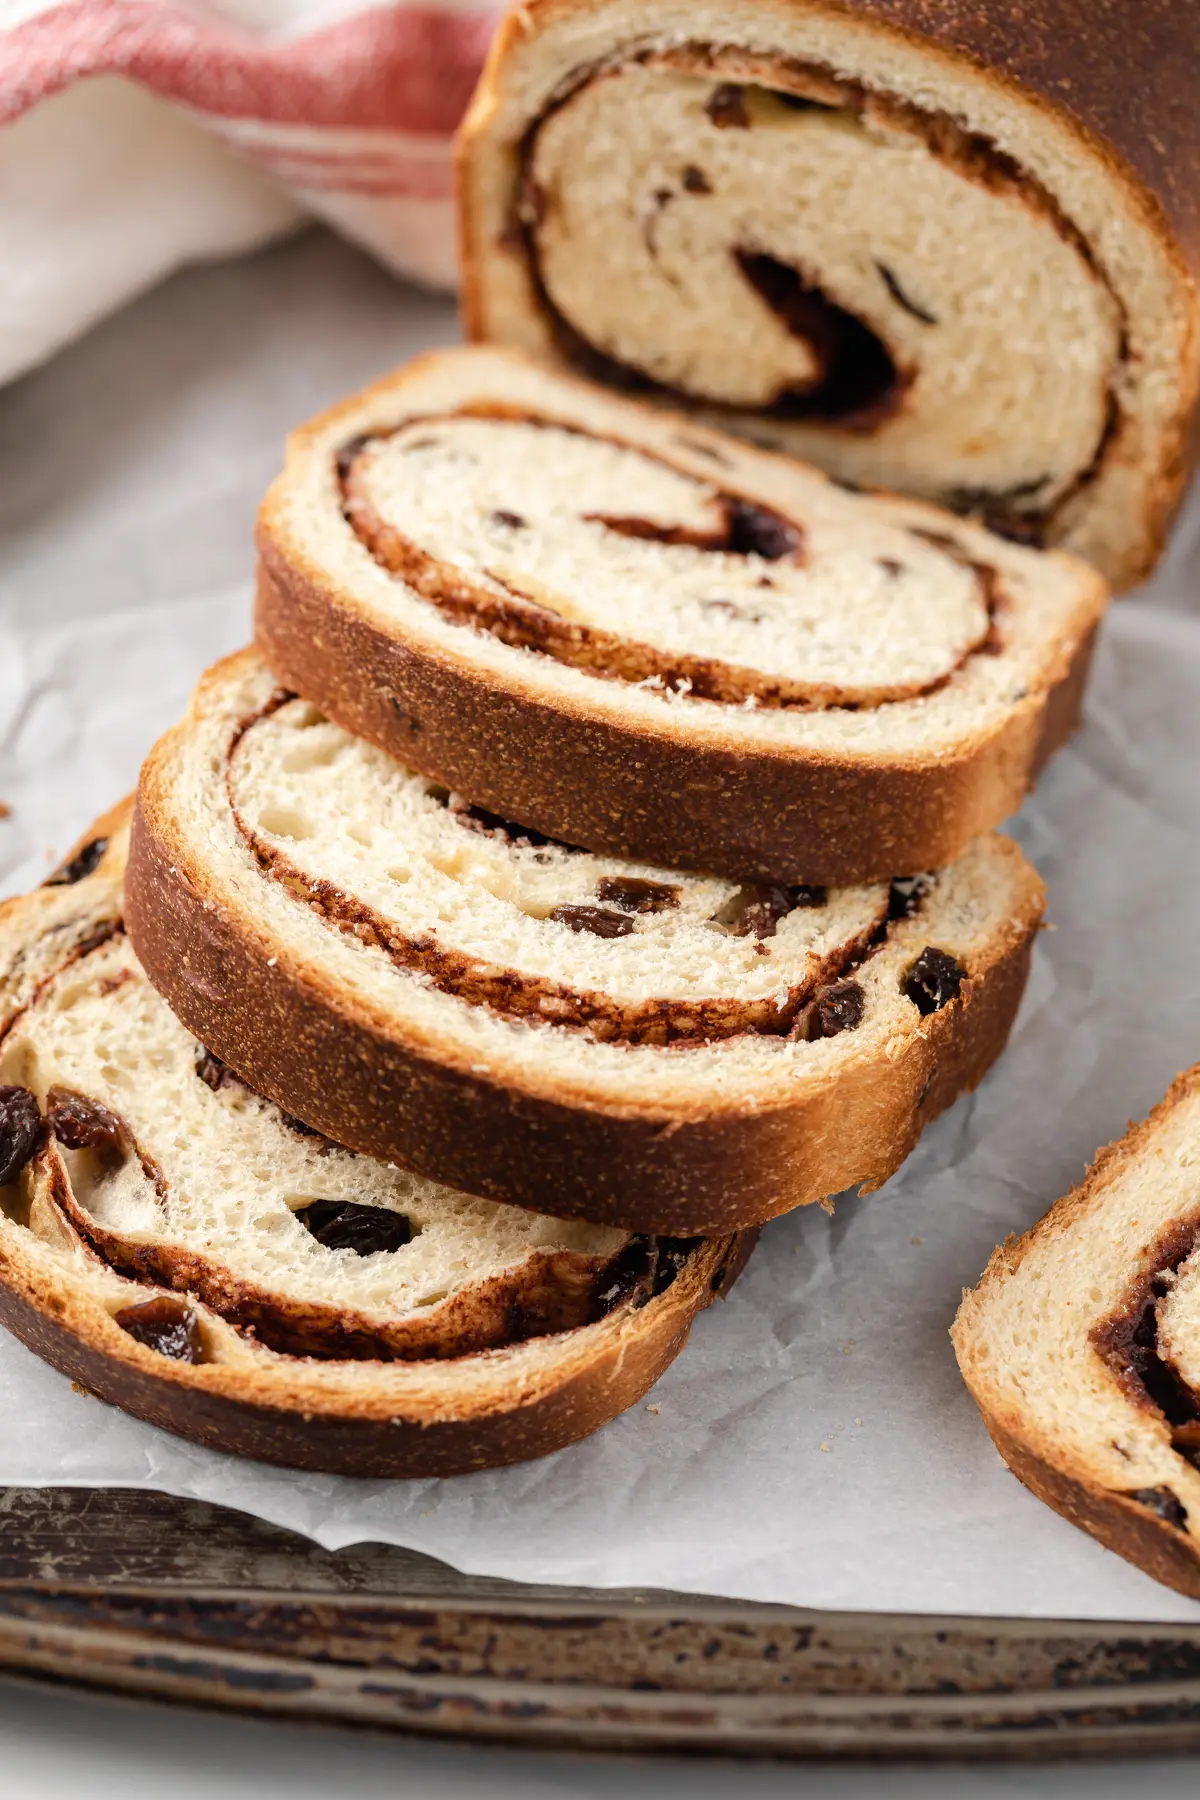
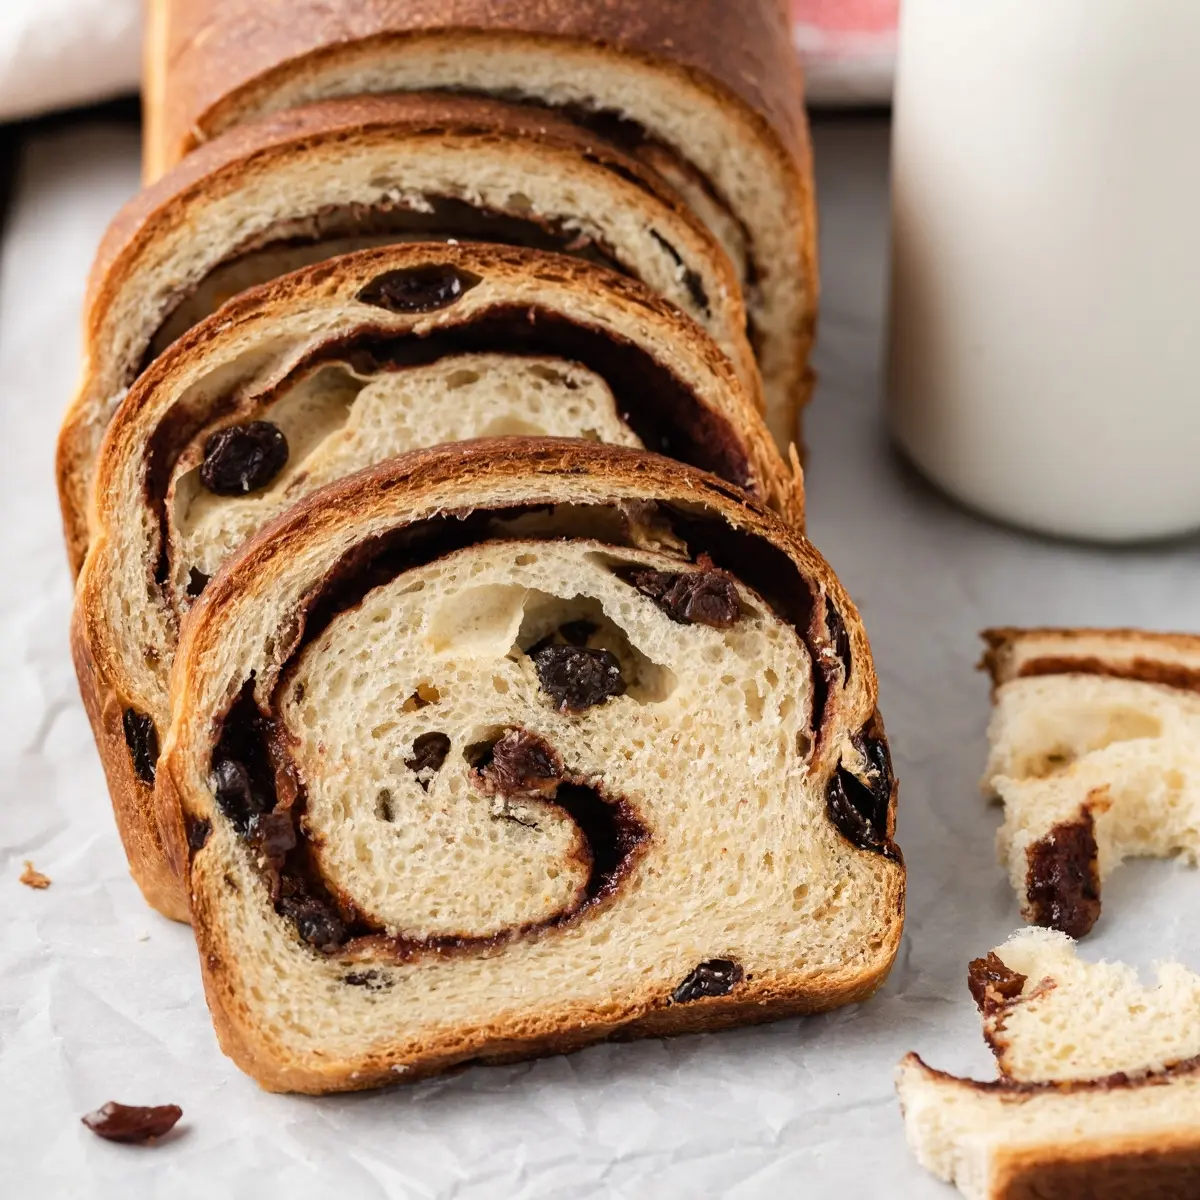
Cinnamon Raisin Bread
This post may contain affiliate links. Read the full disclosure here.
With only a handful of ingredients, this rustic cinnamon raisin bread makes for an easy breakfast delight.

I find this bread recipe fills your kitchen with the aromas of your grandma’s house on a cold, snowy winter morning. The limited ingredients featured in this recipe likely reside in your fridge and pantry right now.
It’s a real upgrade from the bread you can buy at the store! However, it remains easy enough for anyone to make with confidence.
Notes of cinnamon, raisins, and light brown sugar partner perfectly with your favorite brewed coffee or hot tea. Savor the moment with a hot or toasted slice of bread. A plentiful pat of melted butter adds that extra spark of flavor.
I adapted this recipe from a sweet bread favorite, my cinnamon swirl bread. Additionally, you may enjoy my cinnamon raisin muffins for their equally robust flavor.
Once you master homemade bread, next try homemade bagels!
Why this recipe works
- I utilize the power of cornstarch. When cornstarch combines with flour, it softens the proteins, which results in a light and chewy baked good. Yum!
- It is all in the mist. Misting the dough with water provides the moisture necessary to limit cracking. Additionally, the misting process creates that angelic, golden brown glow we all love on the crust.
- Using a thermometer to check the temperature of the milk in the recipe prevents the yeast from dying off. When the yeast fails to flourish, the bread will not rise.
Cinnamon raisin bread recipe
The beauty of this recipe is you probably already have the ingredients in your home. There are no rare or unique ingredients. You won’t have to worry about something only getting used once or taking up space on your shelves.
I find accessible ingredients are typically more budget-friendly. Of course, this helps you provide quality, homemade comfort foods to your family.
You’ll find that not many bread recipes will utilize cornstarch like this one. I learned the secret of cornstarch in baked goods from one of my favorite shows, America’s Test Kitchen. When cornstarch and flour combine, it softens the proteins resulting in a light and chewy bread.
Ingredients
- Flour: I prefer bread flour for this recipe, but you can use all-purpose flour if that’s what’s in your pantry. However, it may cause the dough to feel softer and the swirls may separate.
- Sugar: You’ll want to use light brown sugar for this recipe. It adds sweetness and depth to the flavor of the bread. However, if you are out of light brown sugar, you can create a similar mixture. Combine 1 cup of granulated sugar and 1 tablespoon of molasses.
- Cinnamon: As a strong spice, cinnamon adds a bittersweet, woody flavor to the bread. You could substitute with allspice, pumpkin pie spice, apple pie spice or nutmeg to achieve a similar flavor. You may need to use less nutmeg since the flavor can become quite potent.
- Yeast: Instant yeast works best with this recipe. Yeast causes the bread to rise by releasing carbon dioxide.
- Milk: The fat content in the whole milk gives this recipe a notable richness. You could use a milk alternative like almond milk, soy milk, or oat milk. Keep in mind this will have a slight effect on texture and flavor.
- Egg: The egg inside the dough adds richness and acts as a binding agent.
- Vanilla: Smooth sweetness flows from the vanilla extract and into the recipe.
- Butter: The fat content of butter acts enriches the dough similarly to the eggs. This makes it fluffy and light.
- Raisins: Make sure to soak your raisins as indicated in the recipe. Doing so softens the raisins and increases their juiciness. Dried cranberries or other dried fruit can be an alternative to raisins.
Equipment
- Mixer: Channel your inner Betty Crocker and grab your favorite stand mixer! You’ll need the paddle attachment and the dough hook to effectively make this bread recipe.
- Loaf Pan: Make sure to prepare your loaf pan with butter. Otherwise, line it to prevent the loaf from sticking to the pan.
How to make cinnamon raisin bread
Homemade loaves of bread are just the best! This simple ingredient bread recipe takes minimal effort when broken down into three main tasks.
The Filling – Simply, mix together the light brown sugar and the cinnamon. Set it aside for later.
The Bread Dough – Soak those delicious raisins, then set aside. Mix the yeast, then set aside. Utilize your stand mixer to mix ingredients and knead the dough. Mix the raisins in last.
Let rise, then roll it out. Put the filling in and roll it up like a log.
The Oven – Place rolled dough in the prepared pan. Let rise. When the cinnamon raisin bread is ready to bake, lightly mist with water.
Remove from oven upon reaching 190°F. Finally, let the bread sit in the pan for a while, remove and enjoy!

Step 1: Make the filling
First, combine sugar and cinnamon in a small bowl. Set it aside for later.

Step 2: Soak the raisins
Next, in a small saucepan, boil 2 cups of water. Remove the pan from the heat and add in your raisins. Leave the raisins in the water for 3-5 minutes. After that time, drain them well and set aside.

Step 3: Make the dough
Now that the raisins are prepared, warm your milk. Then, stir in the yeast and set aside.
Find your paddle attachment, and then, fit it into your stand mixer. Add the flour, cornstarch, sugar, and salt. With the mixer on low speed, mix until well blended or about 1 minute.
Then, add the yeast mixture, egg, and vanilla. Continue to mix at low speed until well blended.
Now, it’s time to change attachments. Put the dough hook on the mixer and knead on medium speed until the dough reaches 75°F.
Slowly add in the butter and continue kneading until the dough is fully developed. This means it should pass the windowpane test.
Next, place plastic wrap over your bowl. Place in a warm environment until it has doubled in size. This usually takes 45-60 minutes.
After the dough has doubled in size, punch it down and shape it into a ball. Then, place plastic wrap over the bowl. Allow it to rest for 5 minutes.


Step 4: Shape the dough
After the cinnamon raisin bread dough has rested, preheat your oven to 375°F. To prevent sticking, prepare the loaf pan with generous amounts of butter or line with parchment paper.
Let’s roll! Create a 10×6 rectangle by rolling out the dough. Take the beaten egg and brush it on the top of the rolled-out dough. Then, sprinkle evenly with the cinnamon and sugar mixture you set aside earlier.
Now, start with the short end and tightly roll the dough into a log. You will need to pinch the seam closed.
Then, place the loaf, seam side down, in your loaf pan. After that, cover it loosely with plastic wrap. Let it rise in a warm environment. This will take approximately 45 minutes or until you notice the loaf has increased in volume by 75%.

Step 5: Bake
Finally, lightly spritz the top of the loaf with water. Put your loaf in the oven. Then, bake for 30-35 minutes or until browned and internal temperature reaches 190oF. If your bread appears to be browning too quickly, intervene by putting aluminum foil over the loaf.
Then, allow the loaf to cool in the pan for 30 minutes. After that, transfer your loaf to a wire rack where it can cool completely.

Tips for success
- Avoid over baking the cinnamon raisin bread! Have your favorite instant-read thermometer handy to check the internal temperature of the bread. Once it reaches 190°F, the bread is ready to come out of the oven.
- Prepare your loaf pan. Of course, you do not want to be fighting a stuck loaf. Remember to generously butter or line your loaf pan.
- Properly measure the flour by using the spoon and level method or by weighing it. Accidentally using too much flour will cause the bread to be dense and dry.
Storing & Freezing
To store: Once completely cooled, store in a bread box or other vented container. Bread may be stored in this manner at room temperature for up to 4 days.
To Freeze: First, slice the bread. Then, store slices in a zip-top bag for up to 1 month in a freezer. As a result, you can thaw individual slices as you need them. This is perfect for an impatient toddler or just a kid at heart!
Cinnamon Raisin Bread
Ingredients
For the filling
- ¼ cup (52 g) light brown sugar, packed
- 1 tablespoon ground cinnamon
For the bread
- ½ cup (80 g) raisins
- ½ cup (120 ml) whole milk, warmed to 105-115°F
- 2 ¼ teaspoons instant yeast, 1 packet
- 2 cups (260 g) bread flour
- 1 tablespoon cornstarch
- ¼ cup (52 g) light brown sugar, packed
- 1 teaspoon salt
- 1 large egg, room temperature (plus 1 beaten egg for brushing dough)
- 1 teaspoon vanilla extract
- 4 tablespoons unsalted butter, softened
Instructions
Make the filling
- In a small bowl, combine the sugar and cinnamon. Mix well. Set aside.
Make the bread
- Bring 2 cups of water to a boil in a small saucepan. Remove from heat and add raisins. Let sit for 3-5 minutes to plump the raisins. Drain well and set aside.
- Stir the yeast into the warm milk and set aside.
- In the bowl of a stand mixer fitted with the paddle attachment, combine the bread flour, cornstarch, sugar, and salt. Mix on low speed until well blended, about 1 minute.
- With the mixer on low speed, add the yeast mixture, egg, and vanilla. Continue to mix until well blended.
- Switch to the dough hook attachment and knead on medium speed until the dough reaches 75°F. Gradually add the butter and continue kneading until the dough is fully developed and passes the windowpane test. Gently mix in the raisins.
- Cover the bowl with plastic wrap and set it in a warm environment until doubled in size, about 45-60 minutes.
- Punch the dough down and shape it into a ball. Cover with plastic wrap and let rest 5 minutes.
- Preheat the oven to 375°F. Generously butter or line a 9×5 loaf pan with parchment paper.
- Roll the dough into a 10×6 rectangle. Brush the top of the dough with the beaten egg then sprinkle evenly with the cinnamon-sugar mixture. Starting with the short end, roll the dough up tightly into a log. Pinch the seam closed and place the loaf seam side down in the prepared pan. Cover loosely with plastic wrap and let rise in a warm place for 45 minutes, until the loaf has increased by 75% in volume.
- Just before baking, lightly spritz the top of the loaf with water. Bake for 30-35 minutes until browned and internal temperature reaches 190°F. Cover with aluminum foil if the bread begins to brown too quickly.
- Cool in the pan for 30 minutes, then transfer to a wire rack to cool completely.
Video
Notes
- Warm Milk. Use a thermometer to check the temperature of the milk. If it’s too hot it will kill the yeast and the bread won’t rise.
- Bread flour. You can use all-purpose flour if you don’t have bread flour. The dough will be much softer than if using bread flour and the swirls may separate.
- Cornstarch. Using cornstarch is a trick I learned from America’s Test Kitchen. When combined with flour, it softens the proteins, resulting in a light and chewy baked good. If you don’t have it, you can use potato starch or simply omit it.
- Instant yeast. Active dry yeast can be used instead of instant. Sprinkle the yeast over the warm milk and allow it to sit for 5 minutes. Once foamy, stir well and add it to the flour mixture. The proofing times may need to be increased depending on the ambient temperature in your kitchen.
- Mist the dough. This adds just a touch of moisture that will turn to steam as the bread bakes. The steam allows the bread to expand without bursting open on the sides. It also creates a gorgeously golden crust.
- Don’t overbake! Use an instant-read thermometer to check the internal temperature of the bread. Once it reaches 190°F it’s ready to come out of the oven. It will continue to cook from the residual heat once removed from the oven. If the bread is overbaked it will be dry.
- Store completely cooled bread in a bread box or vented container at room temperature for up to 4 days.
- Slice the bread and freeze in a zip-top bag for up to 1 month. Thaw the slices as you need them.
Hi! I tried making this recipe, measured everything and took temperatures, but when I was mixing the dough, it ended up being a very wet dough and not so much like a loaf. It ended up not rising at all and came out pretty dense after baking. I’ve never had this issue before, but maybe you can help me troubleshoot? It still tastes great!
How did you measure everything? Weighing the ingredients is the best way to ensure accuracy. Humidity can affect the hydration of the dough making it wetter than normal. If the dough didn’t rise and came out dense, it sounds like the yeast was bad but sometimes this happens when too much flour has been incorporated.
I used a scale to measure all my ingredients. It has been a bit humid lately around my area, so maybe that didn’t help. I’ll have to give this recipe another try when it dries out a bit and get some new yeast and see if those 2 factors change it.
This is probably not a great recipe for a beginner. I am a regular with making homemade bread. The dough was very wet. The butter just slides off. You really have to knead it well.
When I made it. The first time my milk was too hot so my yeast didn’t get foamy. I threw that out and tried again. After that, it was a very wet dough. I mixed mine in my stand mixer for probably over ten minutes. It finally did come together. It just took a LONG time to mix. It came out ok after that. I think I cooked it a little too long. It was a little dry.
When do you add the raisins?! The recipe does not say, I’m afraid I missed it as my dough has already gone through the first rise…
It should be step 5 of “Make the Bread”.
Can you make this in a Bread Machine?
I’m unsure. I’ve never used a bread machine and haven’t tested this recipe in one.
Is it possible to half the recipe just by dividing everything by 2?
I don’t recommend halving yeast bread recipes. It’s best to make the recipe as is then freeze the uneaten portion for later use.
This bread takes me back to my childhood, too. My mom used to always buy raisin bread when I was a kid and I used to love it. I miss raisin bread so much.